|
|
Post by alexlea on May 15, 2023 16:28:54 GMT
Thought I'd finally get round to posting some pictures of my build - go easy on me!  Went with the sleeper base approach on top of a 6" foundation and two massive reinforced concrete slabs. Packed it full of old bricks, topped off with 4" of concrete then 6" of perlcrete on top of that, to leave me enough depth to sink my firebricks into the top. Placed my order with Vitcas yesterday so should be with me this week; 35x 65mm firebricks for the oven floor, a tapered arch, outdoor oven cement, screed, silicone for the chimney plate and some ceramic tape to protect the internal edges of the sleepers. I picked up 200 heavy duty firebricks from a steel fabricators to make the dome itself. I've measured it out and to give myself enough space for 4" of insulation (2" ceramic blanket, 2" perlcrete) the internal diameter will be 70cm, which should be enough space for a couple of pizzas and the fire itself. Will keep you updated on the build     |
|
|
|
Post by albacore on May 22, 2023 18:40:11 GMT
Great to see a new build starting from scratch! Good luck with it and keep us updated.
Lance
|
|
|
|
Post by alexlea on Jul 3, 2023 11:00:21 GMT
It's been slow progress what with one thing and another, (lots of measuring, planning and head scratching) but I've laid the floor and built the arch. I left a slight gap around the floor which I filled with more perlcrete and some fire resistant tape just to help protect the wooden sleepers in case the heat from the floor damages them. Probably overkill, but it wasn't much extra work. The floor was set with a mixture of fireclay and sharp sand (note to self- use finer sand next time as sharp sand contains bits of grit which made things a bit harder). It was harder than I thought to get the bricks to line up neatly, especially as the firebricks weren't always straight. I did some test cutting of the firebricks I'd salvaged and they were ridiculously hard. Even scoring and cutting with a bolster was tough, so after some sleepless nights, I admitted defeat and went with a barrel shape as this would involve less cutting. Built the arch yesterday and pretty pleased with it. It's a bit on the wonk, mainly because my joints were too thin to begin with, so had to increase them the closer I got to the keystone just to make sure it all fit together nicely. Also built the barrel form and covered with a sheet of floor protector which seems to work really well. Will hopefully get round to laying the bricks this weekend so it can cure while I'm on holiday! Any comments, questions or suggestions welcome    |
|
|
|
Post by downunderdave on Jul 5, 2023 10:25:40 GMT
Most folk believe that a half barrel oven will be easier to construct than a dome.The only time this is true is when it comes to brick cutting. It sounds like you have high duty firebrick which are very hard and tough on diamond blades. You should only use a wet saw, never dry cut them as the dust is really bad (silicosis).
It is no accident that the hemisphere is the most popular oven chamber for the past two thousand years or more. Because of thermal expansion cycling the hemisphere being a self supporting structure will last for generations, unlike the half barrel design which is inherently unstable. Because of this characteristic it requires either steel bracing or buttressing of the vault. Additionally the end walls, if built outside the vault are susceptible to being pushed out by the expanding vault. This problem can largely be overcome by building them under the vault, although this is more difficult. Both these problems are significant in kilns of this design because the temperature range is double or more than an oven with thermal expansion also being around double, but the principles still apply.
Chamber circulation is also poorer in a half barrel as opposed to a hemisphere, producing cool spots in the corners.. Eg Jaguar’s legendary hemi heads. Where the barrel oven shines is as a bread oven, being far better suited to loading multiple loaves.
|
|
|
|
Post by alexlea on Jul 6, 2023 9:54:49 GMT
Thanks for the advice Dave, I can see exactly where you are coming from. Given I'm a total novice, I think I just got overwhelmed by the idea of a dome, the bricks are much harder to cut (I'm using a respirator and goggles when I cut!), and don't have the budget for a hundred or so standard firebricks. I'm totally happy for this to be a learning experience, and if I get a few years out of this oven, even if it's a bit sketchy in terms of performance, I can always move on to bigger and better things. I could always demolish the barrel vault and build a dome in it's place. I'll bear in mind your suggestions and be wary of movement and the need for support, and buttress where I can. Thnaks again for the advice.
|
|
|
|
Post by downunderdave on Jul 6, 2023 11:33:48 GMT
Thanks for the advice Dave, I can see exactly where you are coming from. Given I'm a total novice, I think I just got overwhelmed by the idea of a dome, the bricks are much harder to cut (I'm using a respirator and goggles when I cut!), and don't have the budget for a hundred or so standard firebricks. I'm totally happy for this to be a learning experience, and if I get a few years out of this oven, even if it's a bit sketchy in terms of performance, I can always move on to bigger and better things. I could always demolish the barrel vault and build a dome in it's place. I'll bear in mind your suggestions and be wary of movement and the need for support, and buttress where I can. Thnaks again for the advice. For more information on barrel ovens try doing a search for “barrel oven Forno Bravo” there are plenty of builds there. |
|
|
|
Post by alexlea on Jul 6, 2023 12:48:59 GMT
Thanks, I'll have a good look over the threads. While I'm here, in terms of insulation, is there a 'best' way to order the insulation over the vault? I was thinking a thinish layer of heatproof screed to help hold the brickwork together and give a smooth surface, then ceramic blanket, then perelite, then another layer of screed and a final decorative cement skim. Does that sound okay?
|
|
|
|
Post by downunderdave on Jul 6, 2023 19:02:04 GMT
Thanks, I'll have a good look over the threads. While I'm here, in terms of insulation, is there a 'best' way to order the insulation over the vault? I was thinking a thinish layer of heatproof screed to help hold the brickwork together and give a smooth surface, then ceramic blanket, then perelite, then another layer of screed and a final decorative cement skim. Does that sound okay? Yes, but give the perlcrete layer at least a week of drying, then do the drying fires (7 fires in 7 days), then apply the outer renders layers. |
|
|
|
Post by alexlea on Jul 26, 2023 15:57:32 GMT
Cracking on with the build now we've had some suitable weather. I've built the main barrel vault, adding in a small went for the chimney as far forward as I can. The back wall is a bit scrappy, but it will be covered by insulation and render.   |
|
|
|
Post by alexlea on Jul 26, 2023 16:03:12 GMT
Continued the build after our holiday, so everything's had almost two weeks to cure. Have given the finished brickwork a good coating of heatproof screed just to help keep everything together and give a uniform surface to work with. I'm going to cover with ceramic blanket and chicken wire this weekend, then start the perlcrete layer. Couldn't resist the urge to remove the forms and am pretty pleased with the results. The mortar needs a tidy up, but I can do that while I'm waiting for the perlcrete to dry. Everything seems rock solid, and there's only one brick that I placed painted side facing in, but it's at the top of the oven roof so hardly visible, and I'm hoping it'll just burn off once I fire it up.  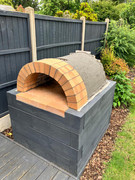  |
|
|
|
Post by downunderdave on Jul 29, 2023 2:25:16 GMT
End walls for half barrel ovens should really be built under the vault rather than beside it, otherwise the expanding vault has a tendency to push the end walls out due to thermal expansion. Keep an eye on it, but this could become a problem area. If you are covering the blanket layer(s) with a vermicrete layer then covering the blanket with chickenwire is both timewasting and counterproductive. It tends to compress the blanket which reduces insulation value as well as adding a highly conductive material to a layer that you want to be insulative.
|
|
|
|
Post by alexlea on Jul 31, 2023 12:42:57 GMT
End walls for half barrel ovens should really be built under the vault rather than beside it, otherwise the expanding vault has a tendency to push the end walls out due to thermal expansion. Keep an eye on it, but this could become a problem area. If you are covering the blanket layer(s) with a vermicrete layer then covering the blanket with chickenwire is both timewasting and counterproductive. It tends to compress the blanket which reduces insulation value as well as adding a highly conductive material to a layer that you want to be insulative. Thanks for the pointers. As mentioned above, the bricks were ridiculously hard to cut, so I made a call and built the back wall outside. I know it's not ideal, but I'll keep an eye on it as you've suggested. I take your point about the chicken wire too, but it helped keep the insulation on the back wall as I added the perlcrete. Adding the perlcrete layer is a bloody fiddly job and I figured I didn't need the insulation flapping around making it harder. To be honest, I'm hoping the industrial firebricks don't expand as much as standard firebricks, and do a good job of holding the heat in by themselves, but I'm adding as much perlcrete as I can - as they say, you can't have too much insulation! It's very much a learning experience. I'm more than prepared to pull down the barrel vault in future years and replace with a pompeii dome, but I can't justify the additional cost at the moment. |
|
|
|
Post by alexlea on Sept 18, 2023 11:15:47 GMT
|
|
|
|
Post by alexlea on Sept 18, 2023 11:18:39 GMT
|
|
|
|
Post by alexlea on Sept 18, 2023 11:25:59 GMT
First proper fires; finally got round to firing up the oven in anger (no thanks to the British weather). Watched a few videos on how to light the fire and went with the raft method, piling up the logs around the back wall to heat them up as the initial fire gets going. Took a bit of trial and error to get the temperature high enough and the fire fierce enough to get some nice pizzas out. Started with some half sized margaritas and by the end of the first sessions, they were coming out lovely; crisp and blistered on on the base and chewy and bubbling on the top! Second firing went a lot easier and quicker. Heated up quickly with little smoke and the pizzas seemed to cook better if I raked the coals to one side and cooked on the over, probably as the heat "rolled" over the inner wall from one side to the other. Got the oven ceiling up to 515 degrees C and the outside dome was still pretty cool, so I'm taking that as a win! Only issue was a nasty crack that appeared in the arch where I'd used a thicker layer of mortar and the mortar hadn't filled the entire gaps, so I'm thinking the heat was getting in there and expanding it. That said, the arch seemed solid enough regardless and the gap disappeared after the oven cooled. There was a bit of cracking in the perlcrete layer, but nothing serious.     |
|


