|
|
Post by bookemdanno on Aug 19, 2013 12:57:10 GMT
Lovely work there Suitord.
you can set a rotating guide about TDC on the oven if you really want a perfect round shape, along with a curved trowel if you like? I really paid attention to getting the vermicrete bang on so that i didn't have to make up any low spots or shaping with the render.
Have a quick look at the later stages of my build "a suffolk oven" and you'll see what i mean.
For the finish coat, get the render on and roughly shaped then let it set up or harden off a bit. Don't be tempted to keep messing about with it. A large damp sponge can then be used to bring up the "fines" in the mix and then trowelled off. A small hand pump spray bottle can be useful at this stage too to mist over the render during trowelling off.
Waterproofer in the first "scratch" coat too.
Start the fires small, go steady, and you'll need more after the Vermicrete layer too. It holds a lot of moisture in there, and needs forcing out or it'll get trapped by the waterproof outer layers.
|
|
|
|
Post by suitord on Aug 20, 2013 12:45:21 GMT
Thanks - like the look of the curved trowels. Started with a small fire last night, everything seems to have survived, so something similar again tonight I'd say. Attachments:
|
|
|
|
Post by rivergirl on Aug 20, 2013 13:00:48 GMT
Another fab oven !
|
|
|
|
Post by suitord on Aug 29, 2013 17:56:24 GMT
Got the insulation finished over the weekend past first the blanket and chicken wire...
|
|
|
|
Post by suitord on Aug 29, 2013 18:24:40 GMT
Have problem posting images this evening, but will try again some other time, I have finished the vermicrete. Thanks for the advice bookemdanno, curved trowel tamping it down worked at treat, was practically hassle free.
On to render this weekend, is it best to start at the top or the bottom when rendering?
|
|
petec
WFO Team Player

Posts: 232
|
Post by petec on Aug 29, 2013 18:29:49 GMT
Great work there Sir.... I rendered last weekend and found it easiest to work up from the bottom to the top of the dome. First coat goes on really well over vermicrete - the later second coat needs more care. We found it difficult to gauge thickness but if you get it all on relatively quickly and then trowel around you can get it pretty even and smooth Good luck with the next stage. Plenty of new ovens being born this summer  cheers Petec |
|
|
|
Post by suitord on Sept 2, 2013 13:46:11 GMT
Hopefully my picture of it wearing it's blanket with chicken wire should appear with this...
|
|
|
|
Post by suitord on Sept 26, 2013 21:25:32 GMT
So haven't been on the forum for a while, been busy and everytime I did try and upload photos I had issues. So have them on flickr now so they should insert Ok. Managed to complete my oven and have had pizza twice, along with baking some bread, roasting some beetroot and a slow roast shoulder of pork. so here is the progress as it happened....  blanket and chicken wire on!  vermicrete on...  scratch coat on...  All finished!!! |
|
|
|
Post by suitord on Sept 26, 2013 21:30:06 GMT
OK having real issues with the images!! If you want to have a look should all be at this link; www.flickr.com/photos/davidsuitor/sets/72157635630258114/Question: I have had practically no cracks so far, only little bit was 2 hairline cracks on external render. What is the best way to repair these? i feel blessed that have had no internal cracks so far, and these are the only ones, just want to get sorted before the frost comes!! |
|
|
|
Post by cannyfradock on Sept 26, 2013 21:51:43 GMT
Suitord They say that cracks are par the the course in a traditional wood-fired oven. Of course...no cracks are the best, but if they are only on the outside, it's probably due to moisture release?.....parge up with the same material as the cracks appear in. You may have to chase out the cracks to make them large enough to make a repair viable. In any case..it shouldn't affect the the oven when in use. Your flickr page is quite brilliant.....great photo diary!!!.....you can also put this page into your signature so it appears at the foot of every post you make......go into your "profile" and copy and paste the url of your flickr page into the signature box. In all honesty I don't know why your images didn't appear. All I can do is to ask you to look at this link... ukwoodfiredovenforum.proboards.com/index.cgi?board=uploadingimages Maybe one of the Mods or members can tell you better, what you are doing wrong...or not doing right in posting images.....I'm pretty "pants" in that dept. Terry |
|
|
|
Post by cannyfradock on Sept 27, 2013 20:18:16 GMT
Suitord I've tried to tamper with the pics from your flikr account, but it won't let me copy the large image. It will however let me copy the smaller images. As it let me right click on the smaller image.....I chose the "copy url image" I then clicked on the image icon ....above the angry smiley and made sure the cursur was blinking between the 2 img brackets....right click and choose the paste option. I get this.....  Your flickr account will probably let you get the "image url" from the larger pics.....try it.....you may have to ask for share...or something like that.....but if you keep clicking you should get the correct "image url".....best of luck Terry |
|
|
|
Post by cannyfradock on Sept 27, 2013 20:45:49 GMT
Suitord It took me 2 hours but I think I sussed out how to post pics from flickr on the forum.... Go to the bottom right of the large image and click on the square with an arrow to the right (more ways to share).....chost the "grab the html/bb code" option.......click the circle for bb code......a code will appear.....click on it and it should be highlighted in blue.......hold down the ctrl key and press the c key (copy)......go back to the forum and simply right click and choose the "paste" option....when previewed or posted the image should appear.... Trial.. 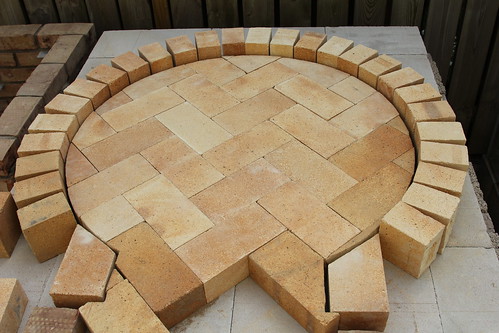 IMG_8657 IMG_8657 by David Suitor, on Flickr Terry |
|