|
|
Post by Byronius Maximus on Sept 29, 2016 20:21:52 GMT
Hi, After many months/years of procrastination, I have finally started an ove build and thought I'd start to post it on here. Only minor progress so far, but I quite like how it's looking. I bought a load of sleepers for the base: 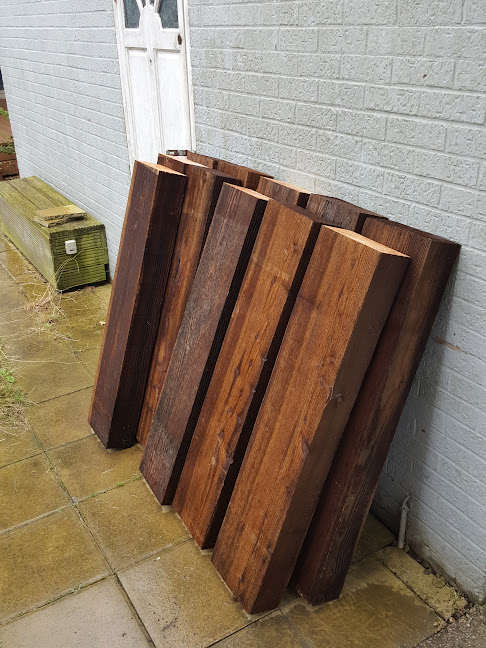 And after a bit of hacking away at my decking, I've built it up into something that I think will look pretty good in the garden: 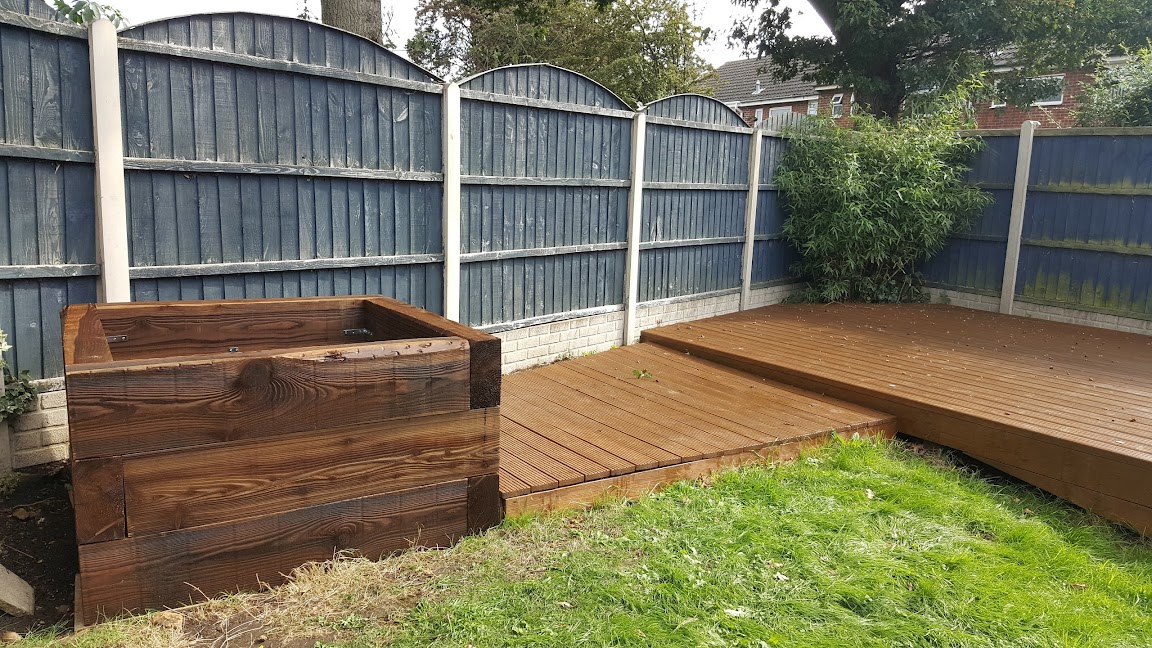 If it completely fails, I could probably turn it into a hot tub! I had worked out the dimensions beforehand, but I was still surprised by how big it looked when built up (1350x1350). Winding back a bit, after cutting away the decking, I discovered that the earth below was actually very solid so was able to just use a few old paving slabs as a foundation, not needing to dig down at all...I was initially stressing about getting this completely level but came to the realisation that this doesn't actually matter too much: 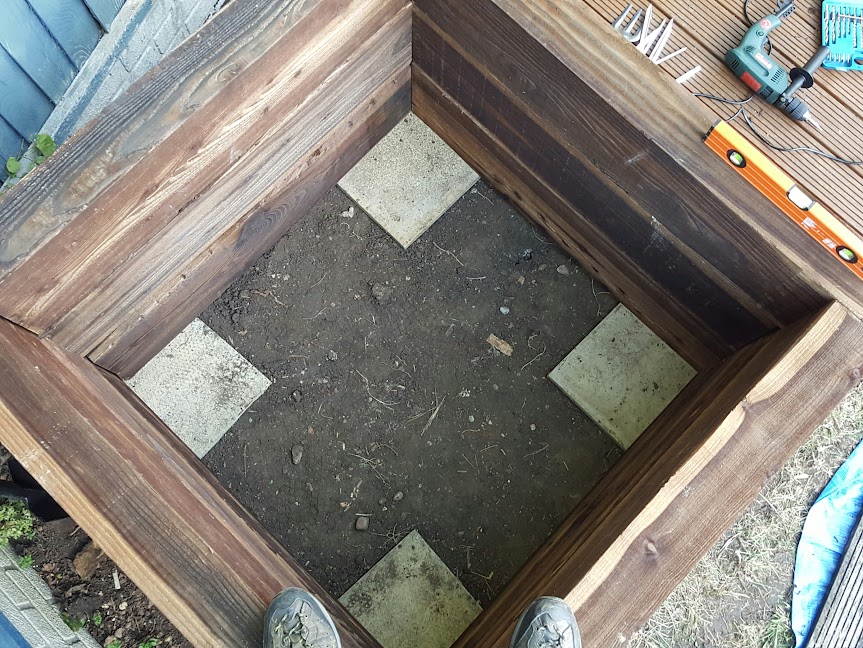 With that in place and a load of angle brackets and jointing plates used to keep it all secure, I've been filling the thing up with rubble. Foruitously, someone down the road has been doing a load of work on their house and had a skip outside with just what was needed. So this is how far I've got and am now debating exactly how to do the next step. 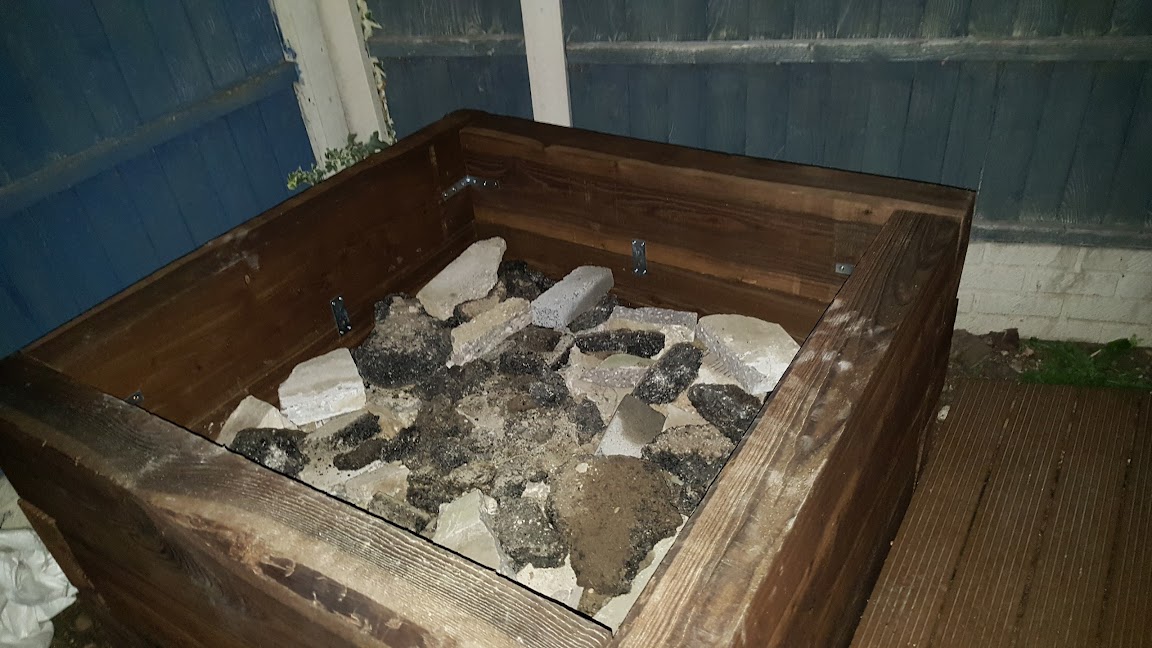 If I have my calculations correct, the inner diameter of my over will be 910mm, based on three layers of 70mm thickness each. Should be easily large enough! I need to fill it with a little more rubble and my plan to get the plinth/base complete is as follows: 1. a layer of sand on top of the rubble (probably a tarp beneath it so I don't just lose sand down the cracks!) 2. A layer of wine bottles on top of the sand, for insulation. I have had my friends drinking all the wine they can for this. 3. more sand on top of the bottles to create a level surface for my fire bricks to go on top. So, to those with much more experience than me, does this sound a reasonable plan? One concern is the whether weight of the fire bricks (and perhaps, the dome) might cause unwanted compression in the sand/bottle layers, thereby upsetting the whole thing. Any better suggestions? I am trying to avoid the use of concrete etc as this suits my limited skill better (perhaps I will get more ambitious if I build another one!). Looking to get around to this part of it this weekend, though I do not have the fire bricks yet as I am struggling to find suppliers in smaller quantities locally (Derby, and I only need 40 ish) - any suggestions? |
|
|
|
Post by downunderdave on Sept 29, 2016 21:08:33 GMT
1. a layer of sand on top of the rubble (probably a tarp beneath it so I don't just lose sand down the cracks!) 2. A layer of wine bottles on top of the sand, for insulation. I have had my friends drinking all the wine they can for this. 3. more sand on top of the bottles to create a level surface for my fire bricks to go on top. So, to those with much more experience than me, does this sound a reasonable plan? One concern is the whether weight of the fire bricks (and perhaps, the dome) might cause unwanted compression in the sand/bottle layers, thereby upsetting the whole thing. The under floor insulation is more important than most people think. For cooking pizzas it is important to maintain a hot floor and if you are losing considerable heat from the floor via conduction then you will probably need to re-fire the oven after about five pizzas or put up with pizzas that have soggy, not crispy bases. Empty wine bottles encased in sand may be very cheap but don't insulate adequately on their own. The best is 50 mm of cal sil insulation board (expensive) and this would be ideal over your bottle/sand layer. Next is to use 5:1 vermicrete (5 parts vermiculite, 1 part cement, 3 parts water), which is way cheaper than cal sil, but you need 100 mm thick, maybe only 70 if you cast it over your bottle/sand layer. It's disadvantage is that it contains lots of water that needs to be eliminated preferably before building over it, for it to insulate properly. There's no problem about building over the wine bottles because the load is spread over the whole area. |
|
|
|
Post by Byronius Maximus on Sept 29, 2016 22:47:39 GMT
Thanks for the reply. I'm a little surprised as the method I've described seems to be fairly common. That said, it would be great to be able to do roasts in there, which I'm guessing would need good insulation to avoid losing heat quickly from the base.
I was trying to avoid using things like cement, but vermicrete may be the way to go as cal sil or vermiculite board is pretty expensive. Will have a think on it but thanks for the tip.
|
|
|
|
Post by downunderdave on Sept 30, 2016 22:36:08 GMT
Thanks for the reply. I'm a little surprised as the method I've described seems to be fairly common. That said, it would be great to be able to do roasts in there, which I'm guessing would need good insulation to avoid losing heat quickly from the base. I was trying to avoid using things like cement, but vermicrete may be the way to go as cal sil or vermiculite board is pretty expensive. Will have a think on it but thanks for the tip. Yes, the method may be common, but that does not mean it is particularly efficient. The higher the temperature the greater the heat loss, so insulation is important. If you're on a limited budget then bottle insulation and a cob dome is ok, but you can do way better. Trouble is that it involves greater cost of materials. |
|
|
|
Post by Byronius Maximus on Oct 1, 2016 11:28:40 GMT
Thanks for the reply. I'm a little surprised as the method I've described seems to be fairly common. That said, it would be great to be able to do roasts in there, which I'm guessing would need good insulation to avoid losing heat quickly from the base. I was trying to avoid using things like cement, but vermicrete may be the way to go as cal sil or vermiculite board is pretty expensive. Will have a think on it but thanks for the tip. Yes, the method may be common, but that does not mean it is particularly efficient. The higher the temperature the greater the heat loss, so insulation is important. If you're on a limited budget then bottle insulation and a cob dome is ok, but you can do way better. Trouble is that it involves greater cost of materials. Yes, that's the trade off I guess isn't it? I set out trying not to use cement, concrete and such like, but I guess I don't know why - just because I've never used it before a slightly worried about getting it wrong. Not knowing much about vermiculite, is this suitable for this purpose: www.travisperkins.co.uk/Dupre-Minerals-Vermiculite-Insulation-Granules-100L-Bag/p/755408Would there be any benefit in just laying the granules in dry below my fire bricks to give insulation, or would this just mean I'd need a lot more of it than if I mixed with cement? |
|
|
|
Post by downunderdave on Oct 1, 2016 11:53:04 GMT
Yes, the method may be common, but that does not mean it is particularly efficient. The higher the temperature the greater the heat loss, so insulation is important. If you're on a limited budget then bottle insulation and a cob dome is ok, but you can do way better. Trouble is that it involves greater cost of materials. Yes, that's the trade off I guess isn't it? I set out trying not to use cement, concrete and such like, but I guess I don't know why - just because I've never used it before a slightly worried about getting it wrong. Not knowing much about vermiculite, is this suitable for this purpose: www.travisperkins.co.uk/Dupre-Minerals-Vermiculite-Insulation-Granules-100L-Bag/p/755408Would there be any benefit in just laying the granules in dry below my fire bricks to give insulation, or would this just mean I'd need a lot more of it than if I mixed with cement? No it's the opposite actually. When mixed with cement and water its volume will be reduced by approximately 20% because it tends to compact. Don't mix it in a mixer or the grains get degraded and it sticks to the sides and paddles of the mixer anyway. Use a barrow. If you build over loose vermiculite the weight of the floor and oven are likely to compress it. For under floor vermicrete mix 5 parts vermiculite with 1 part cement and 3 parts water. Give it a few weeks to dry well before building over it. For over the dome use a leaner (more insulative mix) of 10 :1 |
|
|
|
Post by Byronius Maximus on Oct 1, 2016 12:04:45 GMT
For over the dome use a leaner (more insulative mix) of 10 :1 So 10 parts vermiculite to 1 part cement? Would you recommend laying the fire bricks straight onto the (dried) vermicrete, or would a thin layer of sand be a good idea to give it something slightly moveable when the bricks expand (if that makes sense)? |
|
|
|
Post by downunderdave on Oct 1, 2016 20:45:51 GMT
For over the dome use a leaner (more insulative mix) of 10 :1 So 10 parts vermiculite to 1 part cement? Would you recommend laying the fire bricks straight onto the (dried) vermicrete, or would a thin layer of sand be a good idea to give it something slightly moveable when the bricks expand (if that makes sense)? Yes lay them straight onto the dried 5:1 vermicrete. The only reason you need a thin layer of sand is to act as a leveller if your bricks are not an even thickness, or you didn't get a good flat surface on the vermicrete. I suggest you cut and lay your bricks directly onto the dried vermicrete and then judge if they need a levelling layer. The usual is to use 50/50 sand, powdered clay.it can be done wet or dry, leaving it dry makes any floor brick removal down the track much easier. |
|
|
|
Post by Byronius Maximus on Oct 6, 2016 11:34:36 GMT
Yesterday I laid down the vermicrete, thanks for the advice on using it. I bought a 100 litre bag from Travis Perkins but think I got a little short changed as I measured out just less than 90 litres using my high-precision bucket. This has left me about 20mm short of the height I need for the fire bricks to go on, so I think I'll get another bag to top it up with and can use the rest when I get around to the dome.
Having never used concrete or cement or anything like it before, we weren't 100% sure on water quantities. In the end, we were measuring out 20 litres of vermiculite to 4 litres of cement, with around 6-8 litres of water each time. Checking it this morning, it seems a little brittle/flaky in places, but not concerningly so, and in other areas looks pretty good (to my eye). I figure that it isn't hugely critical, as long as the cement is doing the job of holding the vermiculite together and it won't move once the bricks are on top.
Photos to follow once I've started the next fill of vermicrete...
|
|
|
|
Post by Byronius Maximus on Oct 9, 2016 18:32:00 GMT
I should have mentioned above that I left a message in one of the bottles for a little surprise for whoever knocks this down at some point in the future (hopefully it isn't me next year when the whole thing falls down!).  With that done, I'm glad to say that I finally have the vermicrete at the correct height for the fire bricks to go on - it is set below the top surface of the sleepers by the thickness of a fire brick. I am wondering if I should have had it level, so that the bricks are raised and I can build the dome around the outside of the bricks, rather than on top, but I don't think this will be a particular big issue.   As said above, I used less water than recommended. I think this was because I was being over-cautious having never mixed cement or concrete in my life, I was really trying to avoid it going too sloppy. I think the resulting layer has ended up being a little too dry and I flake vermiculite away if I pick at it, though the centre is a little more dense. Even after a day, the mix was very dry but I will give it time to set properly. I'm slightly concerned that this will affect the insulating properties due to lower thermal mass (though I am guessing), but I think it will do the job...and this is all about learning anyway.  So once that is properly dry (the waiting is going to kill me), I'll place my fire bricks and then get on with the real challenge of dome building. Currently researching into clay suppliers and trying to establish what the difference between grogged clay and non-grogged is, and which I need...I have no idea! Until next time... |
|
|
|
Post by downunderdave on Oct 9, 2016 20:10:03 GMT
Using refined potters clay to build an oven is a crazy waste of your hard earned IMO. Nobody would contemplate building a mud brick house out of potters clay. If you dig in your own garden you should find a layer of suitable clay beneath the topsoil. It does not matter if there is some soil mixed with it. If you have no clay ask a local potter where you can source a natural deposit.
On your question of grogged vs nongrogged, it is ground fired clay added to the clay body to reduce shrinkage and rapid drying. For a cob mix you don't need frogged clay as the combination of clay with sand does the same thing. The usual mix is on part clay to two parts sand by volume.
|
|
|
|
Post by Byronius Maximus on Oct 10, 2016 11:39:26 GMT
I'm no gardener by any stretch, but I think the soil in my garden is very clay-ey. However, I don't really want to end up with a big hole in the lawn (I only have a small garden). But a good suggestion, I will see if I can get hold of some for free somewhere.
|
|
|
|
Post by zelige on Oct 10, 2016 18:00:12 GMT
Try googling Derby clay pits, Derby brickworks or Derby potteries for areas to scout out- all will be cited near deposits. Also riverbanks, ploughed fields, skips or friendly allotments.
|
|
|
|
Post by Byronius Maximus on Oct 24, 2016 18:15:19 GMT
Lots more work this weekend and I feel like I am making progress, with the first clay layer complete resulting in this:   There was lots of learning and making it up on the go. I found it quite hard to tell whether I had enough sand in the clay (I was mixing approximately 2 sand to 1 clay); when I did the drop test, it seemed spot on, but the clay seemed quite wet once it was all coming together in the dome. It does seem drier already this evening though, 24 hours on. I think I will add a layer of vermicrete over the top, then another layer of clay, and then possibly finish off with render as I'd like to weatherproof it without a roof. The main thing I'm wondering at the moment is how long do I need to wait before removing the sand former. I am inclined to wait a few days and then dig out the first bit (maybe the tunnel section) and then light a couple of tea lights, and gradually repeat this process. I am also torn between a 500mm and 1000mm length flue. Does this affect performance at all? The 500mm will be easier to support, but I may go full length if that gives a benefit in performance for the oven. |
|
|
|
Post by Byronius Maximus on Oct 24, 2016 18:18:07 GMT
Also, I realised that puddling is pretty hard work. A full day of dome building yesterday has left me quite tired! A couple more photos mid-build, if anyone is interested    |
|


