baldywills
valid member
 Project finished and enjoying the scran
Posts: 73 
|
Post by baldywills on Nov 26, 2017 8:17:30 GMT
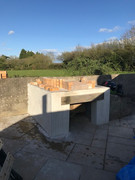
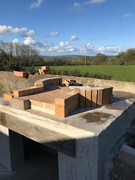
Hi, So I finally took the plunge after months of research and envious thoughts about other peoples pizzas. Have had the house for two years now but due to being away working overseas I have never had the time to indulge myself in a full project such as this. The plans I would like to follow loosely are the FB plans. I have laid the blocks and built up the walls, as suggested in the plans I filled every other void in the block wall with concrete. The base is situated on a slabbed patio and whilst I am aware of the weight bearing down I know that the patio was prepared in a solid fashion but I am counting on the weight being distributed over a larger area by using the wider hollow blocks rather than standard block. At the front instead of using a block bridge resting on angle iron I opted for an Oak lintel to span the gap. The piece of Oak is around 12 years old so should not have too much movement left in it (I hope). Once I render the base walls I plan on leaving the lintel proud so it can be seen as a feature. Once the build is complete it should match in nicely with a big Oak table and benches that will be in the same area. I used 18mm OSB to span the interior void and this was supported with a ridge of old decking boards around the inside of the void. I also used props to provide support underneath the middle and on the joint. The OSB will be able to drop down once its job is done but I will have to take a saw to it to take it back out through the gap. 12 lengths of rebar were added which I joined with stainless steel wire at the intersections. The rebar was laid on broken fire brick to support it and lift it up. The concrete making went quite well in my old mixer but I made the fatal mistake of miscalculating the ballast needed and ran out at the final corner. A quick trip to the builders merchants and a few extra bags sorted it. The slab is 10cm thick by 178 by 178 cm and sits on a DPC. I have just been punched in the arm and reminded that my beautiful wife also helped with the concrete mixing and laying and that I can't claim all the glory. As I have a healthy stock of the nighttime storage heater blocks I placed 9 of these in the middle of the concrete slab. I still plan on using either a slab of vermiculite or CS board underneath my oven floor but I am yet undecided on this. The photos show the stages of the base build and a picture of another little helper I had. Now to wait until the concrete has set before moving onto the next stages. This will give me time to prepare a template for the oven and build an IT. I am sure my better half also has a few other jobs around the house and garden that needs my attention before I get into laying bricks.        |
|
|
|
Post by Thomobigands on Nov 26, 2017 10:59:31 GMT
Looks good. Great start. So many Devon WFO builders on here.
More the merrier though, welcome aboard.
|
|
|
|
Post by oblertone on Nov 28, 2017 12:41:52 GMT
Welcome from EX21; I used a sheet of 25mm vermiculite under my floor of heater blocks (see build thread below) and it works just fine.
|
|
baldywills
valid member
Project finished and enjoying the scran
Posts: 73
|
Post by baldywills on Dec 2, 2017 19:27:13 GMT
Update.
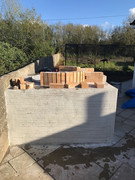
Gave the concrete plinth a week to set before taking the wooden shuttering (forms) off. I was a little worried as I did not treat the wood prior to pouring the concrete with any releasing agent. Thankfully it all released easily enough.
The concrete is not too bad but there are a couple of spots where it did not 'settle' fully and it is visible from the sides Am not too worried as the sides will be rendered thus hiding my clockwork and the concrete sides.
I have also cut my template out of OSB and cut my 50mm insulating board to the template.
Have centred my template on the plinth and marked its position. I can start to see it coming together now but don't want to rush into laying the bricks just yet. I will probably dry lay them first so i can plan the course.
My next step will be to lay the hearth bricks in my garage (in the warm and dry) and to mark out the oven template on them. Once this is done I shall make the edge cuts using my (yet to be made) jig and 9" grinder, number the bricks and then set them on the oven plinth before cracking on with the soldier course.
Also on the cards will be the creation of my IT to help me keep the distance and angles on the courses.
So looking forward to these next steps but also slightly apprehensive about bricklaying.
|
|
|
|
Post by oblertone on Dec 3, 2017 11:34:47 GMT
So looking forward to these next steps but also slightly apprehensive about bricklaying. With one notable exception none of the WFO builders on here had much if any bricklaying experience before starting their builds, it really is just a case of taking your time and planning ahead. You'll be fine. Whilst cutting your floor bricks in that garage sounds cozy, do give a thought to anything else that's in there when you start. Covering my bike in brick dust wasn't the cleverest thing I've ever done, not to mention splattering the wife's brand new car with mortar  Speaking of mortar, what are you intending to use? Proprietary brands of fire cement are available but are designed for kiln work at temps of +1200c therefore completely wasted on a WFO where you'll reach 550c at best. Experience has shown that 'Homebrew' is both cheap and effective for use in a WFO; it is also more forgiving to work than branded products. Homebrew = Sand Cement Lime Clay in the ratio 3-1-1-1 by volume. |
|
baldywills
valid member
Project finished and enjoying the scran
Posts: 73
|
Post by baldywills on Dec 6, 2017 7:36:20 GMT
Was thinking of using "Homebrew" and mixing it in small batches. I have plenty of builders sand is that ok or should I use sharp silver sand? I probably didn't explain about cutting the bricks, I shall be setting up the hearth bricks in the garage to mark them but shall be cutting them outside where I have set up an area where the dust will not be a problem. I have read many threads that have described the dust issue and I hope that I shall not make the same mistake. No progress yet this week as I have had plenty to do in the house but am hoping to get back outside tomorrow for a few days.  |
|
|
|
Post by oblertone on Dec 6, 2017 9:17:35 GMT
Builders sand will be fine; I used Wickes finest 'cos it was cheap and it worked well. I also used a cement mixer to make reasonable quantities, anything left over when I ran out of cut bricks was slathered over the exterior of the dome.
|
|
baldywills
valid member
Project finished and enjoying the scran
Posts: 73
|
Post by baldywills on Dec 29, 2017 17:14:59 GMT
Haven't done too much with he build over the last few weeks as I have started a new job and also had a bought of man flu. Todays task involved cutting the oven floor. I had laid the bricks out in the shed and marked them ages ago. I was going to use a 9" grinder to cut the curved bricks but after a few trys I was very wary of cutting something I shouldn't do!! I resorted to doing straight cuts with a Rage 3 saw fitted with a diamond blade and for the curves I used a small grinder fitted with a diamond blade with the bricks being held in a jig I created to keep my hands out of the way. The small grinder did not cut all the way through but I cut top and then bottom to leave a small uncut 'middle'. A tap with a hammer released the two bits and then I used the grinder to smooth the rough 'middle' bit. I felt fairly comfortable doing it this way and was happy to practice the grinding part of the task which I think may come in handy as the project progresses. Have attached two photos. One is with the new addition to the family (Rogue) who was checking out the H&S element of the task before I started and the second photo is the finished floor. I may recut a couple of bricks in the front row as I am not happy with the finish (practiced with a bolster). My Silicate board has got a little wet in the recent weather so that is now in the shed drying out hence I have a delay until I can lay the oven floor.   |
|
baldywills
valid member
Project finished and enjoying the scran
Posts: 73
|
Post by baldywills on Apr 24, 2018 19:00:56 GMT
  Not done too much recently due to the crap weather but plan on cracking on with it. I can't believe the bricks are not all the same size!! The dog has grown a bit since the picture on my avatar.  |
|
|
|
Post by oblertone on Apr 26, 2018 11:14:52 GMT
Fine looking Dobie dog, not often seen in sunny Devon.
|
|
baldywills
valid member
Project finished and enjoying the scran
Posts: 73
|
Post by baldywills on Apr 26, 2018 16:24:23 GMT
|
|
|
|
Post by Thomobigands on Apr 27, 2018 14:29:04 GMT
Looks really nice and with a great view. Landing area looks pretty big though? Will be good in terms of access but you will lose some heat through it.
You could narrow it slightly by building a second row of arch support walls on top of your cooking floor? Will still give you good access but would increase the ovens efficiency. Just a thought.
|
|
baldywills
valid member
Project finished and enjoying the scran
Posts: 73
|
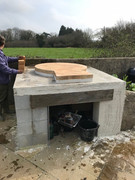
Post by baldywills on Apr 28, 2018 7:20:46 GMT
Cheers Thomo,
Am hoping it is sited is the optimum place, and I shall have horses from the neighbouring field watching me cook.
I planned the oven on similar sizes to Pizza Bob's on the FB site. The oven diameter is 42" with an opening of 20", I decided to flair the landing out to 24" so it should be easy to wedge a door nice and tight without the need of a rebate, it also gives me more space and a better angle on the landing to manipulate pizzas in the oven- well thats the plan.
|
|
|
|
Post by downunderdave on Apr 28, 2018 9:25:41 GMT
Cheers Thomo, Am hoping it is sited is the optimum place, and I shall have horses from the neighbouring field watching me cook. I planned the oven on similar sizes to Pizza Bob's on the FB site. The oven diameter is 42" with an opening of 20", I decided to flair the landing out to 24" so it should be easy to wedge a door nice and tight without the need of a rebate, it also gives me more space and a better angle on the landing to manipulate pizzas in the oven- well thats the plan. The first oven I built had no rebate for the door either. I tapered the entry slightly and the same with the door, thinking i’d get a nice tight fit. Forgetting about thermal expansion resulted in the oven cooling and contracting so tight around the door that it was extremely difficult to remove without damaging the oven. In fact it was lucky the contraction didn’t crack the oven casting. I now build ovens with a rebate so the door can sithard up against the face of the oven mouth, yet is a loose fitagainst the sides. |
|
baldywills
valid member
Project finished and enjoying the scran
Posts: 73
|
Post by baldywills on Apr 28, 2018 10:17:53 GMT
Thanks Dave, may have to rethink that plan then. lol
Thats what i love about this site, we all learn from previous experiences both good and bad.
Hope to post some more pics tomorrow- if the sun comes out. Off to watch Exeter Chiefs, eat pasties and drink some cider now.
|
|