baldywills
valid member
 Project finished and enjoying the scran
Posts: 71 
|
Post by baldywills on Jul 14, 2018 21:01:20 GMT
|
|
baldywills
valid member
Project finished and enjoying the scran
Posts: 71
|
Post by baldywills on Jul 15, 2018 21:03:19 GMT
|
|
baldywills
valid member
Project finished and enjoying the scran
Posts: 71
|
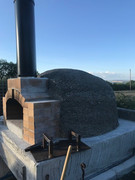
Post by baldywills on Jul 16, 2018 5:59:29 GMT
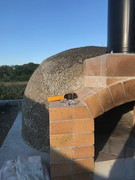
Nice work on the door. Still need to build mine. Was going to use 5mm steel. Yours must be good and weighty at 8mm. Will you wrap the handles? I was thinking to use several layers of thick cord or similar. Used the door for the first time last night. The oven was only 200c as i was cooking ratatouille, the door plate got up to 100c and the handles only 36c. It will obviously be different once i get to pizza temps so will keep my eyes on it. Opened it up this morning and I still have 120c. the insulation layer is doing well. |
|
baldywills
valid member
Project finished and enjoying the scran
Posts: 71
|
Post by baldywills on Jul 21, 2018 5:30:58 GMT
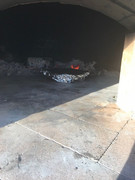
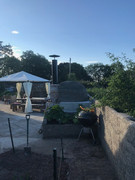
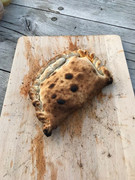
Thought I would share some pics of fire, everyone loves fires don't they? Also a couple of pizzas from last night. Am going to use the falling heat from friday nights pizza to cook over the weekend. As i have now completed the vermicrete insulation layer i do not get any heat loss from the dome so it will be interesting to see what heat I still have today and sunday. 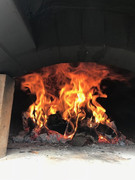 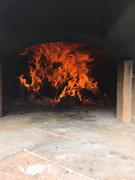 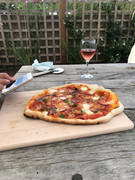 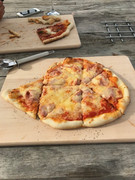 |
|
baldywills
valid member
Project finished and enjoying the scran
Posts: 71
|
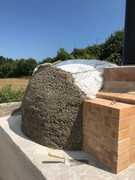
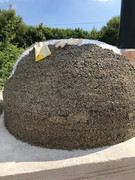
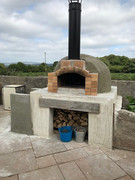
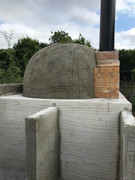
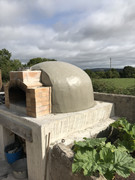
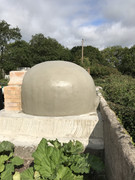
Post by baldywills on Aug 18, 2018 15:24:14 GMT
|
|
|
|
Post by ratboy on Aug 19, 2018 8:37:57 GMT
Morning mate,
What are you planning to render in? I'm leaning towards K-Rend.
Did you scratch in plain old OPC?
Great dome by the way, hope mine turns out like that!
|
|
baldywills
valid member
Project finished and enjoying the scran
Posts: 71
|
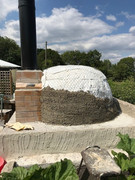
Post by baldywills on Aug 20, 2018 6:22:33 GMT
Hi,
Yeah used a render mix a recommended on this site, 8 sand, 1 lime, 1 cement plus waterproofer for the scratch coat. The final coat will see the omission of the waterproofer and only 6 sand.
I didn't have too much problem with the scratch coat (some people do)- it was a damned sight easier than the vermiculite layer. I used cardboard to give me a break between the render and my brick chimney to allow for heat expansion. I will fill the gap with some heat resistant silicon.
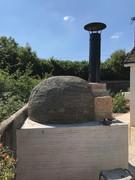
Thanks for the comment on the dome, believe me when i say it is not a round as it looks. I would say that it has character and up close you can tell it was made by a beginner but that is fine by me. I actually sat down yesterday to admire my work and I found myself sat there with a booming some on my face know that i had built this huge oven from nothing.
The final render coat will give me one last chance to level out any lumps and valleys.
I plan on giving it a coat of white sandtex to finish it off.
Cheers
Gary
|
|
|
|
Post by downunderdave on Aug 20, 2018 19:33:37 GMT
It is recommended for each subsequent render coat to be weaker rather than stronger if you do some research. I think it has something to do with crack resistance. 8:1:1 is pretty weak, (see attached link for mortar strength). I generally use 4:1:1, with the render enriched with plenty of AR glass fibres, then a 100% acrylic render thinned with water and applied in 3 coats topping the lime/cement. structx.com/Material_Properties_011.html |
|
baldywills
valid member
Project finished and enjoying the scran
Posts: 71
|
Post by baldywills on Aug 21, 2018 4:44:25 GMT
Cheers Dave,
As I have already carried out the scratch coat what is your recommendation for the final render coat? Bearing in mind the scratch coat went onto a vermiculite layer, i did think that the subsequent layers could not be stronger than the previous base.
Same mix as before or stronger? I do have the time,space and resources to do a couple of layers if I need to go to a 4:1 mix then go weaker..
Will keep an eye of this board for your reply.
Cheers Gary
|
|
|
|
Post by downunderdave on Aug 21, 2018 20:22:41 GMT
Hi Gary,
As you’ve already done one layer it wouldn’t be a good idea to do an even weaker layer over it so probably just do a 4:1:1 over it. You should dampen the surface before applying it though. Perhaps a proprietary premixed cement render would be easier. They are basically 4:1:1 anyhow. Most of them have some waterproofing added which makes the layer partially waterproof so water penetration is difficult but it can still breathe. You can tell when you start mixing it that it resists the water. Another thing you might consider is the addition of acrylic fortifier in the mix. Usually added at 50% acrylic and 50% water to the dry product. Most renderers use it on the final layer.
The outer shell is only a weather shell, you’ve done all the hard and important work. You have a nice working oven, good job.
Cheers,
Dave
|
|
|
|
Post by james9 on Aug 21, 2018 20:52:57 GMT
Dave/Gary, I'm in a similar position having used 8.1.1.WP mix for scratch coats and this came from one of the best builds on UKWFOF. I read the use of lime is the equivalent of one part cement hence the underlying strength is 8.2=4.1 which is pretty standard and stated on the plastering sand packaging. (I'm not a builder and have no specific expertise but I would say there's not much info on UKWFOF or FB about cement/lime renders as most people opt for acrylic layers like K-Rend) The first coat was to fill in the holes as the vermicrete was left for 2 months to dry, the render depth varied quite a bit but it set very quick c60mins. I put this down to the depth and not spraying the vermicrete with water. 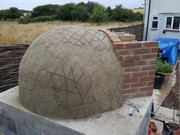 A week later the main scratch coat went on with exactly the same 8.1.1.WP mix but with the previous layer well sprayed with water, made the render a little looser and applied a deeper layer, anywhere between 10-20mm thickness making the render more workable particularly with a paint brush to smooth lumps out. This layer took at least 3 hours to firm up. 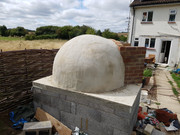 The lime has made the render much lighter in colour than the Cornish build, 3 days later the render is rock hard with little cracking. I didn't scratch it but the surface is much rougher than it looks due to the paint brush. My main concern is how effective the waterproofing is given it doesn't seem to repel water and what to do for the final render coat? I wasn't sure about using an acrylic render but it could make sense particularly for the water proofing. James |
|
|
|
Post by downunderdave on Aug 22, 2018 10:11:37 GMT
Hi James, The outer shell of a WFO is not the same as a rendered wall. IMO it requires a lot more strength to cope with the continual expansion and contraction of the inner oven. If you look at the following table I posted previously it gives strength of mortar mixed.(check different brews and their strengths on the table at the bottom of the link) The table shows that cement has a far greater bearing on strength than lime. Lime does however, impart more crack resistance and even minor crack healing. structx.com/Material_Properties_011.htmlMost renders are not recommended to be applied in layers any thicker than 10 mm or shrink cracks are more likely to occur.This is partly why two or three layers are normally used, although I do mine all in one go to save on time, I like to eliminate all the water from the vermicrete layer prior to rendering the outer shell because water is much harder to remove once you have rendered over it. Also wet vermicrete can swell and then crack the outer shell. I found this out when I cracked the outer shell of an insufficiently dried oven, although if you have a blanket layer underneath it will act like an expansion layer to cushion this effect. Remember that steam can exert enormous pressure, so a relief valve of some sort is also prudent IMO, but that's another story. Dampening the surface of the dry outer vermicrete is a good idea as it tends to suck the water from the tender. I like to wrap the whole shell in cling wrap to hold the moisture in the outer layer for a week to enhance strength. Generally a layer of chicken wire is formed over the dome for reinforcing, but I found this far too time consuming and now use random AR glass fibres in the mix instead. Be careful if selecting acrylic render, many are called acrylic but are really acrylic modified cement renders. A 100% acrylic render (more expensive) comes wet in a bucket while cement renders come dry in a bag. K rend have many different products, check to select the appropriate one. Hope this helps, Dave |
|
baldywills
valid member
Project finished and enjoying the scran
Posts: 71
|
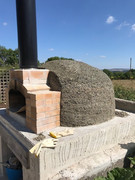
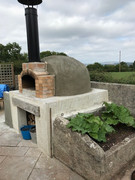
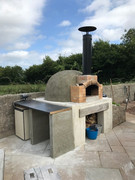
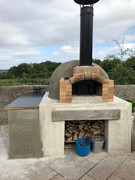
Post by baldywills on Aug 23, 2018 6:43:24 GMT
Hi James/Dave,
It is pretty clear from our discussions on here that there probably isn't enough information on this board about render. It may be useful for those that come after us (on the build status) if we started a new topic purely on render and finish types.
Whats your thoughts?
PS. i completed my final coat yesterday - stuck with the same mix, wetted the scratch coat thoroughly and thankfully the weather was perfect for application and drying purposes. Just got to wait for it to dry before applying the sandtex paint.
|
|
baldywills
valid member
Project finished and enjoying the scran
Posts: 71
|
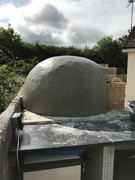
Post by baldywills on Aug 23, 2018 6:57:44 GMT
|
|
|
|
Post by downunderdave on Aug 23, 2018 8:08:13 GMT
A very nice looking build. The trick with the cardboard is to wrap it in plastic. This prevents it sucking the water from the render and not making it soggy. It also makes removal really easy. Maybe for the next oven you build.
Cheers
|
|