mrjl
valid member

Posts: 42
|
Post by mrjl on Jun 4, 2018 20:54:58 GMT
Music to my ears, Dave. Thanks.
I’ll have a read up of some guides/videos on the best practice for drying fires.
Plan is to leave it covered until the weekend and then do the insulation and insulating concrete layer next weekend. Weather forecast is cool and dry so hopefully not too intense on the drying of the first layer
|
|
|
|
Post by downunderdave on Jun 5, 2018 11:57:41 GMT
Music to my ears, Dave. Thanks. I’ll have a read up of some guides/videos on the best practice for drying fires. Plan is to leave it covered until the weekend and then do the insulation and insulating concrete layer next weekend. Weather forecast is cool and dry so hopefully not too intense on the drying of the first layer It doesn’t hurt to allow the sun and wind do much of the drying, so if weather permits take your time. Try to avoid direct impingement of flame on the dome. Briquettes or bbq fuel are a good way to avoid this using some small bits of wood to keep the fire going. If you see visible steam then you’re going at it too hard, back off. You can do it one continuous go, like keeping the fire going 24 hrs or do a bit, let it cool then start again the next day. This way some of the retained moisture will migrate back to the dried bits so the whole thing dries more evenly. |
|
mrjl
valid member
Posts: 42
|
Post by mrjl on Jun 5, 2018 13:04:50 GMT
Thanks, Dave. When do you think I should try the drying fire? Before the next insulating layers or a certain amount of time after them?
|
|
|
|
Post by downunderdave on Jun 5, 2018 19:38:13 GMT
I prefer to do the drying fires a week after completing the vermicrete layer, depending on weather conditions. The insulation wil even out the temerature(and thermal expansion) difference between the top and bottom of the oven better than if done without insulation. If you are really keen you can get a small cheap garden moisture meter and plunge it into the vermicrete layer. This will tell you when it’s dry. Alternatively you can feel the moisture coming out with your hand during the firing.
|
|
mrjl
valid member
Posts: 42
|
Post by mrjl on Jun 5, 2018 20:05:22 GMT
Thanks, Dave!
The top of the archway is only about 20mm thick at the front (in front of the chimney, much thicker between the chimney and the main vault). Do I need to rectify that? If so is the same sort of mix (minus the clay, I've run out) as the first layer best? I've got some ciment fondue and some grog if they're suitable replacements for clay.
Also worth asking the question about the best mix for the perlite layer. I bought supplies to make the mix 3 perlite:1 grog:1 ciment fondue, but that for a one concrete layer design. Now the plan has changed am I better off using a different mix?
|
|
|
|
Post by downunderdave on Jun 6, 2018 11:35:59 GMT
Thanks, Dave! The top of the archway is only about 20mm thick at the front (in front of the chimney, much thicker between the chimney and the main vault). Do I need to rectify that? If so is the same sort of mix (minus the clay, I've run out) as the first layer best? I've got some ciment fondue and some grog if they're suitable replacements for clay. Also worth asking the question about the best mix for the perlite layer. I bought supplies to make the mix 3 perlite:1 grog:1 ciment fondue, but that for a one concrete layer design. Now the plan has changed am I better off using a different mix? As you don’t have the clay but do have fondue a mix of 3 parts sand one part fondue would work ok for thickening the arch. The vermicrete mix for insulating over the vault is 10 parts vermiculite or perlite, one part cement 3 parts water. I usually throw a bit of clay in as well to make it more workable but as you don’t have any use a bit more cement or lime. Wear rubber gloves or you’ll regret not doing so. |
|
mrjl
valid member
Posts: 42
|
Post by mrjl on Jun 7, 2018 8:46:19 GMT
Thanks again, Dave!
I added another 40mm or so using the fondue/sand mix you suggested, so that's one less thing to worry about.
Next step is insulating the oven and then the perlite mix over the top, hoping for dry weather this Saturday in order to get that done.
|
|
mrjl
valid member
Posts: 42
|
Post by mrjl on Jun 9, 2018 17:35:00 GMT
 It’s done! Went pretty well once I got a workable consistency (4 parts water and a touch more cement). just the rendering left to do now. Thanks for all your advice, Dave! Couldn’t have done it without you |
|
|
|
Post by downunderdave on Jun 9, 2018 20:47:34 GMT
It’s done! Went pretty well once I got a workable consistency (4 parts water and a touch more cement). just the rendering left to do now. Thanks for all your advice, Dave! Couldn’t have done it without you Thanks, As you have found, the vermicrete layer requires lots of water and only less than half of this is taken up by the hydration process so there's lots of free water to eliminate. I find it best to allow the sun and wind to do much of the drying, so weather permitting allow at least a week before lighting any fires. Once it's dry you can do the rendering.The vermicrete layer may look quite dry after a week, but there will still be plenty of moisture trapped in deeper. A cheap garden moisture meter plunged into the vermicrete layer will tell you how dry it is. See attached experiment and remember that one litre of water makes around 1650 litres of steam. Vermicrete insulating slab copy.doc.zip (73.2 KB) |
|
|
|
Post by albacore on Jun 9, 2018 21:07:25 GMT
The trouble with waiting for the vermicrete to dry before rendering is that the dry vermicrete will give too much suction to your scratch coat and your render will be difficult to apply and weak - unless you hose down your vermicrete first and probably go back to square one!
I'd rather take my chance with applying the render to the vermicrete as soon as it's set, but still damp. Scratch coat first and top coat the day after if possible.
Then wait for the whole lot to dry out.
Nothing worse than trying to render onto a dry background.
Just my opinion!
Lance
|
|
|
|
Post by downunderdave on Jun 10, 2018 8:35:40 GMT
The trouble with waiting for the vermicrete to dry before rendering is that the dry vermicrete will give too much suction to your scratch coat and your render will be difficult to apply and weak - unless you hose down your vermicrete first and probably go back to square one! I'd rather take my chance with applying the render to the vermicrete as soon as it's set, but still damp. Scratch coat first and top coat the day after if possible. Then wait for the whole lot to dry out. Nothing worse than trying to render onto a dry background. Just my opinion! Lance Those were my thoughts initially too, Lance, but if you apply the render then wrap the whole thing in cling wrap it holds the moisture in the outer layer beautifully. Sometimes I do a rough coat then follow with a second the next day, but I now do the whole lot in one go, around 12-15 mm thick, with the cement render having a generous proportion of AR random mixed glass fibres added for strength. Because a 10:1 vermicrete has lots of air spaces between the grains it doesn’t suck out the moisture from the coat applied over it too much like a flat dry surface does. The important thing is not to have a lot of trapped moisture deeper in. I cracked two oven outer shells in finding this out, so now make sure it’s dry deeper in. Have done many ovens this way now and it’s a method that works well, for me at least. |
|
mrjl
valid member
Posts: 42
|
Post by mrjl on Jun 11, 2018 16:39:38 GMT
Thanks guys. I won't be able to render it quickly, I'm away all week. It's set to be warm and sunny most of the week so next weekend I’ll do a single thick layer of render and cover it as Dave suggested.
I'm going to use white cement and white render dye as I like white ovens. Do I need to put any lime in the mix or will the insulation stop it from getting too hot?
|
|
|
|
Post by downunderdave on Jun 11, 2018 20:35:58 GMT
Thanks guys. I won't be able to render it quickly, I'm away all week. It's set to be warm and sunny most of the week so next weekend I’ll do a single thick layer of render and cover it as Dave suggested. I'm going to use white cement and white render dye as I like white ovens. Do I need to put any lime in the mix or will the insulation stop it from getting too hot? If you are going away all week, then presumably you won’t be able to do the drying fires. After a week of drying in the sun it will look dry but certainly won’t be deeper in. Don’t be in a rush to get that render layer on. If it looks like raining just cover it. Regarding the lime, yes the addition of some imparts some elasticity to the final shell as well as some self healing of cracks. A mix of 4 sand, 1 cement, 1 lime by volume is pretty good so you can use that as a guide to adding some lime to your proprietary render mix.The lime seems to slow down the hydration process so keeping it covered for a week will help the damp curing of the render coat well. |
|
mrjl
valid member
Posts: 42
|
Post by mrjl on Jun 11, 2018 21:03:49 GMT
I'm back on Friday so I was going to light the first fire on Friday night, and then again the next morning and try to keep that going lightly all day. And then render on Sunday morning, all being well.
There's some light rain expected on Thursday so I’ll arrange someone to put the cover I've been using on then
|
|
mrjl
valid member
Posts: 42
|
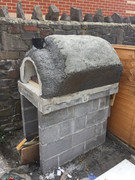
Post by mrjl on Jun 19, 2018 8:13:10 GMT
I did the drying fires over the weekend and once the top layer was nice and dry I did the rendering last night. I thought it was going wrong initially but having spoken to a friend who is a plasterer he told me that it always looks terrible for the first layer and to persevere. In the end it came out ok, probably going to look a little rustic but I'm not bothered about that. I just want it to stick on there and not crack! I've covered it as best I can and can leave it now for a while as I'm away again next week so it can have a couple weeks to slowly dry out under the cover.
When I'm back do I need to do another drying fire or can I just go for it?
|
|


