|
|
Post by ratboy on Jul 17, 2018 18:34:53 GMT
Hi all,
I've been here for a while now looking and learning but i thought it was time to introduce myself as my build is now underway (read: I started without knowing what i was doing and now need help!)
I'm in sunny (at the moment) Norfolk and have started construction on my outdoor kitchen this summer after laying the foundation 2 years ago!
Its an ambitious project to say the least for a middle aged bloke with no prior building experience but lurking here for some time gave me the inspiration to "Just do it" so here I am.
Ill post some pictures of my aim and the progress so far later as well as some (many) questions but i thought it rude to do so without properly introducing myself first.
I may start a build thread tomorrow but in the mean time i would just like to thank you all for your indirect help.
Ratters
|
|
|
|
Post by ratboy on Jul 18, 2018 8:36:08 GMT
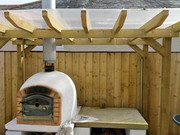
Morning all, I was going to start a Build Thread but couldn't find an appropriate category so until such time as i do you will have to put up with me here! So after deciding i "Needed" a WFO a few years back when we bought our first house things got out of controll. I now "Need" a full outdoor kitchen with a WFO. After getting lost on the internet for a few weeks researching, as i told the wife and getting nowhere i picked a base design that would work in our garden/space and went for it. This is the basic aim but will be modernized to match our new build house.  So the arches will be squared off and the junk on the left will make room for a wood store and maybe a tandoor, the right wing will be to slot in my massive Kitchenaid gas grill (free standing & removable) We should end up with something like this!  It will be rendered in white/grey K-rend and finished with black sparkly concrete counter tops. So that is the dream! The reality is this...  Cat and tomato plants not intended to be a permanent fixture! Build time taken: 8 Part time days
Actual time taken: 370 Real days (wife not happy)
So now on to the stupid questions!
As you can see I'm not up to WFO level yet hence not being able to find a forum category for it.
My first question is about the FireBox (I'm going to call it that) The area is massive, about 1m sq so I'm going to want to shrink it a bit.
My question is this:
What can i construct the FireBox out of?
It is going to be a woodburner so my initial thoughts were to cast perlite/vermiculite slabs to make the internal walls...
Any thoughts?
If you got to the end then thanks!
Any thoughts/ comments more than welcome.
I'm off to do some more bricking. Laters! |
|
|
|
Post by truckcab79 on Jul 18, 2018 9:49:12 GMT
Hi. Don’t beat yourself up about the time taken. Looks great so far.
I have a question for you though. The ‘firebox’ is that just going to be open-fronted or does it have a flue to the rear, exiting behind the pizza oven? In the example picture you showed that’s just the wood store below the oven, not a fire. I would have thought warmth from the oven itself would be sufficient if that’s what you’re after.
Apologies if I’ve misunderstood. Look forward to following the build. No excuse not to be cracking on with it in the weather!
|
|
|
|
Post by ratboy on Jul 18, 2018 13:25:04 GMT
Hey Truck, I'm gonna try to take the fire Flue to one side and the WBO Flue to the other in the stack.  Just been tidying some of the block work up as i wasn't happy with it! More blocks arrive on Saturday along with the Slate to finish or the bottom of the Wood Store. The reason for the Brick base is to tie it into the house and that wall in the background  Not the best bricking around but I'm happy!  |
|
|
|
Post by truckcab79 on Jul 18, 2018 19:42:14 GMT
Brickwork looks fine to me.
Im no expert but having just finished my build, for what it’s worth I found that for any brickwork that will be on show (like the red brick under the blockwork), if you scrape out about 10mm of the mortar while it’s still relatively soft, you can then go back and point up at your leisure. A mortar / pointing gun is also £15 very well spent. Saves a lot of time and mess.
For anywhere you don’t want mortar stains, just sponge it off with a car sponge before it dries. Way easier than getting it off later.
I presume you're rendering the blockwork as a final finish?
Love your kids’ personalisation in the concrete too. Nice touch that will be there for years to come.
|
|
|
|
Post by ratboy on Jul 20, 2018 17:37:16 GMT
Yep, K-Rend all the way to hide my nasty block work!
Realized that if i wanted a Tandoor id need to sort it before I finished up to counter top level which hopefully will be tomorrow.
Solution was terracotta flue liners from the reclamation yard @ a massive £2.50 each, will need two but got four just in case i crack one when i cut it.(mrs saw them and sent me back for 4 more for planters!)
So a base of Storage heater bricks on 2" of Vermicrete has gone in today, ill take some pics tomorrow when its set as it is all held up with props tonight!
Any ideas on the Fire Box question? I was thinking of reducing the size with cast Vermiculite/Perlite slabs but not so sure now having just used vermiculite/OPC mix, seems like it will never cure!
Smash out the block work tomorrow if they arrive early and then start thinking about the counter tops. Pour in place or cast of site?
Laters.
|
|
|
|
Post by truckcab79 on Jul 21, 2018 11:36:07 GMT
What about thermalite blocks to line, reduce and insulate the firebox. Perhaps around a stainless steel or stone inner box as they are quite delicate?
With regard to the worktops, I'd definitely cast in situ based on my experience of having once made a mould for a concrete windowsill which once cast I then realised I couldn't move!
There are lots of YouTube vids to look at, both in situ and 'off site' cast before you decide.
|
|
|
|
Post by ratboy on Jul 22, 2018 18:17:52 GMT
What about thermalite blocks to line, reduce and insulate the firebox. Perhaps around a stainless steel or stone inner box as they are quite delicate? With regard to the worktops, I'd definitely cast in situ based on my experience of having once made a mould for a concrete windowsill which once cast I then realised I couldn't move! There are lots of YouTube vids to look at, both in situ and 'off site' cast before you decide. Yep, ive decided to reduce the firebox to a manageable size with Thermalite seeing as that is what ive used throughout, will clad with fireproof board and hang slate slip tiles with heatproof cement, A'la...  The worktops will be cast in place, was gonna do them off site but would be too much hassle. Photos of the weekend work to come! |
|
|
|
Post by ratboy on Jul 22, 2018 18:30:24 GMT
So made a bit of progress this weekend, I am now up to counter top level finally! Realized i needed to sort the Tandoor now or not have one at all so sod it!  Lined with Storage Heater bricks on a 2" bed of Vermicrete (Wont be using that again!) When bricked in will be back filled with vermiculite. Actual cooking surface is a reclaimed flue liner, perfect fit. A bit more blockwork and all done bar 1 block and a lintel on the right hand side, couldn't be arsed mixing up more mortar, will do it tomoz.  This is where im up to.  And i mocked up the Firebox.  Happy weekends work. |
|
|
|
Post by downunderdave on Jul 23, 2018 3:03:20 GMT
So made a bit of progress this weekend, I am now up to counter top level finally! Realized i needed to sort the Tandoor now or not have one at all so sod it! View Attachment Lined with Storage Heater bricks on a 2" bed of Vermicrete (Wont be using that again!) When bricked in will be back filled with vermiculite. Actual cooking surface is a reclaimed flue liner, perfect fit. A bit more blockwork and all done bar 1 block and a lintel on the right hand side, couldn't be arsed mixing up more mortar, will do it tomoz. View AttachmentThis is where im up to. View AttachmentAnd i mocked up the Firebox. View AttachmentHappy weekends work. [ A WFO’s fuel consumption is roughly directly proportional to the volume of the chamber. I say roughly because it’s a bit like saying a one litre car will have 1/4 the fuel consumption of a 4 litre which of course is not correct because of efficiencies and power to weight ratios etc. Remember that if you double the diameter you increase the chamber volume by eight. I weighed the wood consumed when firing my 21” diam oven to pizza temp and it consumed 4 kgs. More fuel will be used if the oven of wood used is a little damp. |
|
|
|
Post by truckcab79 on Jul 24, 2018 7:22:50 GMT
Coming on well. That’s going to be a really impressive kitchen when you’re done. Looking forward to following your progress.
Make the most of this weather too!
|
|
|
|
Post by ratboy on Aug 6, 2018 18:34:57 GMT
Wanted to update on my progress but there is no space for pictures any more.
Sorry!
|
|
|
|
Post by truckcab79 on Aug 6, 2018 18:37:43 GMT
Wanted to update on my progress but there is no space for pictures any more. Sorry! Must be a glitch. I’ve got twelve pages on my build and loads of photos? |
|
|
|
Post by devontiger on Aug 6, 2018 18:46:09 GMT
Come on ratboy, stop teasing us....   Still working.  |
|
|
|
Post by ratboy on Aug 6, 2018 21:28:29 GMT
Unable to upload file FireBack.jpg.
Error: This forum has exceeded its attachment space limit. Your file cannot be uploaded.
|
|