guym
valid member

Posts: 43
|
Post by guym on Aug 8, 2018 19:08:20 GMT
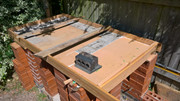  28 July 2018 Now for the first real challenge - the cantilevered concrete worktop. Lots of YouTube videos watched, lots of internet advice reviewed. Ultimately it still needs building. There were two options. 1. Cast the concrete on the ground then lift it into place. The big benefit is a much simpler shutter design. The massive drawback is - how on earth do you lift a piece of concrete that's 2m x 1m and 3.5 inches thick? Hence going for... 2. Casting the worktop in-situ. Much harder to create the shuttering. The cantilever needs supporting somehow. All of which creates the risk of collapse. Plus - if you get it majorly wrong - you kind of have to live with it. Anyway - this was the approach I decided upon. The basic method was this. Wooden shuttering as normal - level and square. Then under supports made out of 18mm MDF. I actually had to spend some money at this point - to buy the MDF sheet. I had it cut to the sizes I needed in store then got it home. The individual pieces were supported by timbers drilled inside the main walls. The remainder were supported by temporary brick towers. They look pretty sketchy but were actually very stable (and level - which was very important). Bit of cross bracing for additional rigidity. Quick squirt of silicone that I found lying about in the shed and that was about it. Most advice recommended oiling the substrate at this point to facilitate an easier removal of the shuttering once cured. We didn't do this and in truth it didn't seem to matter. Not sure if we were lucky or it didn't matter. With hindsight the one thing I would have done differently is raised the cross braced timbers higher. They got in the way when floating the final finished concrete. Also - the importance of pushing the concrete into the corners can't be underestimated |
|
|
|
Post by downunderdave on Aug 8, 2018 19:09:26 GMT
You will curse the decision to build hard up against the fence as it will make access at the back difficult, particularly as the walls get progressively thicker with the outer layers. However it is now what it is. Perhaps a partial dismantling of the fence could be possible.
|
|
|
|
Post by truckcab79 on Aug 8, 2018 20:23:55 GMT
Nothing wrong with that brickwork. Looking good.
|
|
|
|
Post by truckcab79 on Aug 8, 2018 20:27:55 GMT
Did you put any rebar or other reinforcement extending into the cantilevered section? If you did and it cracks then it will all hold together fine. If you didn’t it will fall apart as it has nothing tying it together.
Aside from the disappoinment that’s a big heavy lump to come down on your feet
Apologies if I’ve misunderstood the construction.
|
|
guym
valid member
Posts: 43
|
Post by guym on Aug 9, 2018 8:50:29 GMT
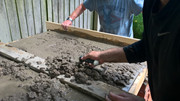
   28th July 2018 Finally we arrive at pouring the concrete worktop. First step was to cut the Rebar to size. Fortunately we had a full sheet leftover from some previous work. So, with the help of both my father-in-law and my brother-in-law, we cut two sheets of Rebar to fit perfectly inside the shutter. Both were set in the wet concrete. The total depth of the finished concrete is 3.5inches. The first sheet of Rebar went in at 1 inch, the second just over 2 inches. |
|
guym
valid member
Posts: 43
|
Post by guym on Aug 9, 2018 9:09:37 GMT
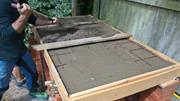  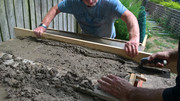 28th July 2018 We borrowed a friend's Belle Professional mixer for the morning and cracked on with it. Brother-in-law on the mix, Me on the barrow, father-in-law on the fill. It actually took fewer mixes than we anticipated. The mix was a damp (but definitely not overly wet) standard mix. The internet gives all sort of advice about concrete mixes for worktops. We had this in mind and also applied some common sense. It's worth noting that we didn't have any specialist equipment or materials. The Ballast was standard stuff from the merchant (arguably the aggregate was larger than we'd have liked - but it's what we had), we added a bit of standard Building Sand to give a smoother finish, then the Cement. We probably broke a fair few rules too. The Cement was well over its use by date. It had been dry stored in the shed for well over a year. The bags had gone rock solid. Once opened however, the cement was dry, powdery and fluffy. No particular solid pieces that wouldn't break up in the mix either. It was also a pretty hot day. Not ideal for working in. Main worry was that the heat would cure the mix too quickly - leaving it prone to cracking. Once again we got lucky. Less than one hour after I'd covered the job over with tarpaulin - the heavens opened and the whole atmosphere went damp and cooler. It stayed like that for the next three days. Ideal conditions. We must have done something good in a previous life! We did a rough level with a straight edge, followed by a fine float. The fine float was only applied to the cantilevered sections. These are the only areas that will be visible after the remaining structure is built. After three days of cooler damp conditions, the heat and sunshine returned. After four or five days I removed the tarpaulin and cross brace timbers. |
|
guym
valid member
Posts: 43
|
Post by guym on Aug 9, 2018 9:13:52 GMT
 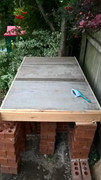 30th July 2018 Tarpaulin removed. Concrete has started initial cure. Pretty solid already. No cracks and a satisfyingly smooth finish in the visible areas. |
|
guym
valid member
Posts: 43
|
Post by guym on Aug 9, 2018 9:35:17 GMT
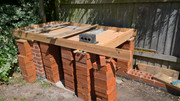
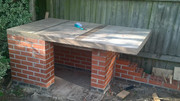  31st July 2018 Shuttering and temporary supports removed. We started to get a feel for how it had turned out. We were pretty pleased with the end result. Some nice clean lines and a good smooth top. Currently debating top coat. I love the current finish as it's pure and authentic. We could just seal it. However, I also happen to have some exterior grade Self Levelling Compound. This will give a glass-like shiny finished top coat - even when poured at just 3mm. I suspect we'll go with that Worth noting that I still haven't got around to removing the timber supports under the main oven area. You can still see the timber frame. I'll get around to this in the next couple of weeks, but don't foresee any issues - I'm just being lazy about getting in there on my hands and knees! You'll also notice that we've laid out the top course of bricks which will eventually encapsulate the dome. With the bricks in place, and allowing for the firebricks - the oven floor will be approx 1100mm at its widest point and 700mm deep - back to front. Downunderdave - Thanks for the feedback. It's a good point you raise about accessibility and something we've been thinking about. We'll undoubtedly build the back wall and corner up before we start the Dome. This should then help alleviate any future build access issues. |
|
guym
valid member
Posts: 43
|
Post by guym on Aug 9, 2018 10:02:40 GMT
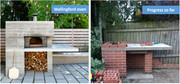 8th August This pretty much brings us up to date. Looking at the builds side-by-side you can see obvious differences. Firstly, the Wallngford Oven is clearly built to a very high standard. Ours perhaps less so, but still presentable. The Wallingford Oven also appears to be bigger in most ways - particularly the cantilevered worktop and perhaps the oven chamber area also. I'm not sure what bricks the Wallingord oven is built from either. The dimensions don't seem to match anything readily available off the shelf in the UK. This wouldn't have mattered much for our project anyway as we're using leftover materials wherever possible. I suspect we'll masonry paint the bricks on our oven once it's finished anyway. Additional spend so far is pretty minimal. There was a large sheet of mdf for about £20 - and that's it. However, we will soon be ordering the oven materials - Firebricks, Calcium Silicate sheets, Fire blankets, Vermiculite etc. So - we are definitely about the spend something. Next jobs are... To finish building the dwarf walls for the bench seat. We've decided not to cast a concrete seat top - instead we'll be building a wooden bench top. Someone mentioned "no-one wants to sit on concrete" - and although I'm now confident we could have got a great finish - a wooden top will be much much simpler. We've already spent another tenner on two premium deck boards. As pure luck would have it, the total length of the bench seat is 2440mm. Exact length of many sheet and timber products - including deck boards. They were on offer last weekend in Wickes at a fiver each. They'll get treated, then glued and screwed to the walls. Then it's on to the back walls, then the oven floor. |
|
guym
valid member
Posts: 43
|
Post by guym on Aug 9, 2018 10:07:14 GMT
 Click the image to see closer up - then click "Zoom" for a better view. Key upcoming questions: How many Firebricks do we need to buy for the Dome? Best mortar mix for the dome? etc etc We'd welcome advice and any thoughts/ feedback so far... thanks for reading. |
|
|
|
Post by truckcab79 on Aug 9, 2018 11:44:44 GMT
Looks fantastic.
I’d be very happy with the brickwork if I were you, and it’s in keeping with the 60’s aesthetic. Personally if you don’t like it I’d give it a really crisp render rather than paint it, but it’s your oven and I’m sure if you continue the way it is it will be superb.
A crisp new sleeper would make a nice bench top if you’re not wedded to the decking planks. Not too expensive either. Would suit the lines of rhe oven.
Enjoying watching the build.
|
|
|
|
Post by oblertone on Aug 12, 2018 10:09:04 GMT
For how many bricks go to the US site called Forno Bravo where you'll find a calculator for just this question. As to the best mortar, the favourite is called home-brew and is sand-cement-clay-lime in the ratio 3-1-1-1 by volume. If you want to cut costs try using storage heater blocks for the floor, they often come up on freecycle or eBay for not much money.
Good luck.
|
|
guym
valid member
Posts: 43
|
Post by guym on Aug 20, 2018 13:49:22 GMT
 20th August 2018 Little bit more progress made. Dwarf wall for bench seat is now finished. Father in law has also made up the bench seat top from the deck boards I got. It's treated and pinned together, we just need to glue and screw it to the wall once the mortar has cured. We also built the back and side walls of the oven area - which will be harder to reach once the dome is built. Wonder when my next post will be? Suspect there will be a bit of a gap now. Next job is to order the materials for the oven dome from Kiln Linings. Not sure how much progress I'm going to make once Autumn arrives... we'll see. As ever, feel free to comment. Thanks! |
|
guym
valid member
Posts: 43
|
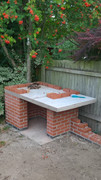
Post by guym on Dec 15, 2018 13:25:59 GMT
   15th December 2018 - Winter Update Hello everyone. Not much progress to update, but something to show! As previously mentioned, our oven is being built directly underneath a mature Rowan Tree. In truth we've hardly been in the garden since October time. I was looking out of the window the other day and noticed that lots of fallen Rowan Berries had collected on the concrete worktop. I popped outside to clear them off and found that they had stained the worktop. After brushing them off you can see the dark inky stains that remain. Clearly this isn't really an issue inside the oven chamber as that will be completely covered over, but on the cantilevered shelf it will be very visible. Although it's a bit of a shame it convinces us to apply a final coat of external grade self-levelling compound. It should provide a glassy smooth top. Then for future reference I'll need to make sure that the exposed worktop is somehow covered. You live and learn! |
|
guym
valid member
Posts: 43
|
Post by guym on Dec 15, 2018 13:29:26 GMT
 15th December 2018 Only other bit of progress is to say that the bench seat top is now in place. Nothing more until the Spring I'd say. Hopefully we'll get it all done by the end of Summer. Arrival of next baby in Jan/ Feb 2019 may however delay things. Let's see! |
|


