jons
valid member
 
Posts: 41
|
Post by jons on Feb 5, 2019 22:40:13 GMT
Anyone have any thoughts or advice on this... I originally wanted to make the arch out of a blue brick that has been used extensively in the back garden and forms the base that the oven sits on. I read in the build instructions that blue bricks are not advised. Because of that I’ve cut red brick but have not yet built the arch. For aesthetics the red brick will either need to be rendered and painted the same colour as the dome or I’ll need to paint the brick directly. Cheers Those bricks should be ok for the outer decorative arch, particularly if you leave an expansion joint between it and the inner oven castings. The decorative arch has no flame impingement so doesn’t get a massive, sudden temperature rise. Good news. I’ll use the blue brick. 👍 Cheers... |
|
|
|
Post by oblertone on Feb 6, 2019 16:00:04 GMT
Yes I did, two weeks of purgatory under a leaky gazebo ! I never want to see another tile cutter, ever  |
|
jons
valid member
 
Posts: 41
|
Post by jons on Feb 9, 2019 20:44:14 GMT
Got the arch built and the scratch coat on today. Before I could scratch the scratch coat though the rain came in. Pretty annoying. Forecast is for rain until tomorrow afternoon which means I might be wire brushing rather than sponging the first coat tomorrow. Anyway quite pleased with how it’s starting to look. Photos were taken an hour before the rain.   |
|
jons
valid member
 
Posts: 41
|
Post by jons on Feb 10, 2019 18:03:50 GMT
The render was soft enough to scratch this morning so I did. Before that though I sponged the surface to get rid of the trowel lines. While doing that the arch collapsed. Curses. Gave me another chance to build it again which was ok as it looks better the second time round. Got the final coat of render on this afternoon (just as 10 minutes of heavy rain arrived), put the damper in and the flue in place. Just need to sponge the render down when it goes off enough, point the arch, paint the dome and cook some pizza! Looking forward to the end!    |
|
|
|
Post by truckcab79 on Feb 10, 2019 22:02:24 GMT
Looks great. Very neatly rendered. Can't believe how quickly you've got to this point.
Shame about the arch. How come it collapsed? Did you tie it back to the main structure or is it effectively free-standing?
|
|
jons
valid member
 
Posts: 41
|
Post by jons on Feb 10, 2019 22:41:31 GMT
Looks great. Very neatly rendered. Can't believe how quickly you've got to this point. Shame about the arch. How come it collapsed? Did you tie it back to the main structure or is it effectively free-standing? The arch had pushed out at the top of both sides. I.e. both side were leaning out a bit. I guess outward forces and gravity did for it plus I may have disturbed it when I was sponging the front of the dome. Although I was gutted at the time it didn’t take long to rebuild it and it definitely looks better this time. Not taking the form out for a few days though! The arch is wired to the dome in four places. Bought some galvanised wire and looped it through the chicken wire and pressed it into the mortar between some of the top arch bricks. |
|
jons
valid member
 
Posts: 41
|
Post by jons on Feb 11, 2019 20:23:38 GMT
Staying with the arch theme does anyone have any thoughts about when to remove the form? Some people say straight away, some say after 24 hours and I’ve even read after a week. Having had one arch collapse I’m now nervous!
Also the arch I built which follows the instructions regarding the dimensions of the form needed four bricks either side of the keystone not three as shown in most of the photos. The bricks are standard size - 215x102x65mm.
Lastly I’m not quite sure the arch design follows the normal laws of physics as the abutment would normally be constructed to absorb and return lateral forces. Another reason for my nervousness!
Cheers!
|
|
|
|
Post by truckcab79 on Feb 12, 2019 8:26:32 GMT
This time of year I'd be inclined to leave as long as possible to make sure the mortar has a good bond. Even zoomed in I can't quite see but it looks like you have spacers in between some of the bricks. I'd remove those, scrape out all the joints and point the arch to get as much mortar in there as possible. No expert, just my opinion and what I did. I'd be concerned about the arch being separated from anything else. I understand the whole gap thing for a thermal break, but it makes it pretty flimsy. In my case I followed instructions, gapped it, tied it in, then mortared the joint, then did the brick covering. Even if it cracks it can't go anywhere. Are you doing similar with your final render? ie will it cover the brick arch partially?
|
|
jons
valid member
 
Posts: 41
|
Post by jons on Feb 12, 2019 10:16:42 GMT
This time of year I'd be inclined to leave as long as possible to make sure the mortar has a good bond. Even zoomed in I can't quite see but it looks like you have spacers in between some of the bricks. I'd remove those, scrape out all the joints and point the arch to get as much mortar in there as possible. No expert, just my opinion and what I did. I'd be concerned about the arch being separated from anything else. I understand the whole gap thing for a thermal break, but it makes it pretty flimsy. In my case I followed instructions, gapped it, tied it in, then mortared the joint, then did the brick covering. Even if it cracks it can't go anywhere. Are you doing similar with your final render? ie will it cover the brick arch partially? The first attempt at the arch the weight of the arch pushed the sides out. I put some brick spacers in to make sure the side bricks wouldn’t squash down. I’ll take them out tonight and get the arch pointed. I’ve already done the final coat of render but can see the value of extending the render over the back of the arch. Seems like a good idea... thanks for the advice |
|
|
|
Post by downunderdave on Feb 12, 2019 10:24:12 GMT
If you render the outer shell over the brick arch at the sides and the top it will give the outer decorative arch sufficient support and become an integral part of the outer shell, especially if you tie it in. A small gap between it and the inner oven and the floor allows free expansion of the inner oven and floor without placing stress on the outer arch. It’s as an expansion joint that’s more important than as any thermal break. It will reduce heat by conduction but 10 mm or so will be next to nothing stopping radiant heat. At around 400c expect about 0.5% expansion. That’s a few mm every time you use the oven.and a major reason most manufacturers recommend laying the floor bricks loose. At the top of the arch and the sides however, if the arch is mortared hard against them expect pressure to be exerted there.
Regarding the removal of the arch form the most important thing is to ensure it can drop by placing wedges under the form. A few days after laying the arch should be sufficient but remove it carefully.
|
|
jons
valid member
 
Posts: 41
|
Post by jons on Feb 12, 2019 21:12:40 GMT
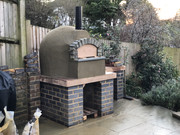
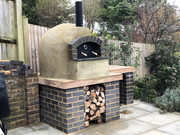
Found a post about a fallen arch today and someone advised inserting metal rods through the arch joints and into the outer dome. So that’s what I’ve done tonight. The arch feels really solid unlike the first attempt. Took the form out, gently! Felt I had to as I wanted to point it and didn’t want to do the inside later. So all done now bar the painting (and some decoration) and attaching the chimney cap. Roll on the weekend...   |
|
|
|
Post by truckcab79 on Feb 12, 2019 21:29:00 GMT
Very nice. You’ll be glad you reinforced that arch I’m sure. You’d have always worried about it falling again otherwise I’m sure.
Are you oiling the oak sleepers? They won’t need it from the point of view of weatherproofing but it might help you remove any inevitable food spills. No harm if not, it’ll just look well used and well loved!
|
|
jons
valid member
 
Posts: 41
|
Post by jons on Feb 12, 2019 22:31:39 GMT
Very nice. You’ll be glad you reinforced that arch I’m sure. You’d have always worried about it falling again otherwise I’m sure. Are you oiling the oak sleepers? They won’t need it from the point of view of weatherproofing but it might help you remove any inevitable food spills. No harm if not, it’ll just look well used and well loved! Yep you’re right. I was worrying about it and it wasn’t a lot of effort to sort it out. As for the sleepers I’m thinking about planing or sanding the extension to even out the levels and make it more food friendly. I want it to look rough and ready but because food will be a big feature it needs something doing to it. Sanding and oiling may well do the trick. |
|
jons
valid member
 
Posts: 41
|
Post by jons on Feb 13, 2019 15:45:18 GMT
Couple of daylight shots...   |
|
jons
valid member
 
Posts: 41
|
Post by jons on Feb 13, 2019 21:53:06 GMT
Heating the pans before the cook. Just getting used to the fire management really. Fun though 😁  |
|