scotsoven
valid member
 now have a usable oven
Posts: 28
|
Post by scotsoven on Aug 26, 2019 19:21:26 GMT
Ok thanks for the advice
|
|
scotsoven
valid member
now have a usable oven
Posts: 28
|
Post by scotsoven on Aug 27, 2019 19:37:45 GMT
|
|
|
|
Post by downunderdave on Aug 27, 2019 20:44:25 GMT
Filling any voids from the inside should be done before any drying, while there is still moisture in the casting. Remove the newspaper to inspect the surface. A stiff scrubbing brush should work if it doesn’t come away easily. You need to force the home brew mix, peanut butter consistency, hard into the voids. Something like a butter knife is a good tool for this operation.
|
|
scotsoven
valid member
now have a usable oven
Posts: 28
|
Post by scotsoven on Aug 27, 2019 21:51:29 GMT
Ok thanks for the advice will do this tomorrow
|
|
scotsoven
valid member
now have a usable oven
Posts: 28
|
Post by scotsoven on Sept 6, 2019 19:30:51 GMT
|
|
scotsoven
valid member
now have a usable oven
Posts: 28
|
Post by scotsoven on Sept 7, 2019 15:50:32 GMT
|
|
|
|
Post by oblertone on Sept 8, 2019 7:59:20 GMT
Excellent progress, hope the weather holds for you. As to the hearth exit, it's certainly easier if the surround is level with the cooking floor as it makes moving things about a lot easier. Personally I'd level it all the way around purely for aesthetic reasons, but the front is a definite. Remember that you'll be cooking on retained heat the day after a pizza session so moving casseroles and bread tins about is easier on a level surface. If using tiles, try and use waterproof render and exterior grade tiles. It might be worth sealing the under oven insulation before casting a further plinth, silicone will do the job and it'll prevent damp transfer into the oven vase.
|
|
scotsoven
valid member
now have a usable oven
Posts: 28
|
Post by scotsoven on Sept 8, 2019 14:41:46 GMT
Thanks for the advice oblertone, ye though i would just go for it so this morning took advantage of the dry weather. 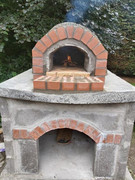 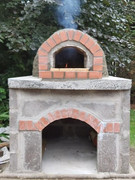 Plan is to get some of the red terracotta tiles and bring up to the same level as the harth. Will tile the rest of the flat area around the dome with the same tiles once i get dried out in a few weeeks and get the render on. Was thinking about mosaic tiles for the front edge but will have to see what i can get on the cheap. Still it two minds about putting a roof over the whole lot? |
|
|
|
Post by oblertone on Sept 15, 2019 7:12:20 GMT
Mosaic tiles don't have to be expensive; I used standard plain tiles and waterproof adhesive on mine. It took a while as I covered the entire dome (see build thread below) but the effect is pretty good.
|
|
scotsoven
valid member
now have a usable oven
Posts: 28
|
Post by scotsoven on Sept 20, 2019 20:24:12 GMT
Obletone, thanks looked at your post that is one impressive oven👍 lovely tile work, like the idea it is movalble. I was only thinking of tiling around the flat area round the dome with red terracotta tiles then doing the front edge of this with mosaic tiles. Have seen some people online using broken tiles to create paterns cheep and good looking. I have now got the render done on the base walls, this is harder than it looks on utube videos but a wet sponge does wonders 😁. Will render the dome tomorrow ✊🤞I have had 14 curing fires tonights got up to 312 deg C think i have got most of the moisture out but from what i have read there will still be some present as i only put the vermiculite layer on two weeks ago, however i need to make the best of the unusually good weather. Still haven't noticed any cracks sure i will get them when i go for the BIG fire but apparently every oven gets them? I have fitted the chimney (single wall stainless pipe i got free from work) but removed as i am going to put a roof over the dome. As the chimney pipe comes through the apex ridge my thought was to weld a angled sheet to match the roof angle around the chimney with a 200mm overlap. Hope this will solve the issue of heat transfer and keep the water out🤞 will post some pics once i get to this stage to better explain. Thanks to everyone who takes the time to post on the forum, without your advice and experiences i wouldn't of got this far, or maybe i would have but with a oven that didnt perform or last considering i was originally think of gym ball with vermiculite cast dome😱. 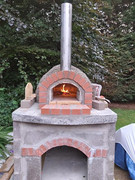 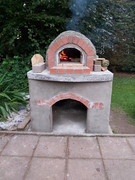 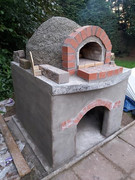 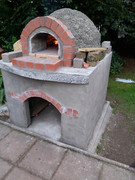 |
|
scotsoven
valid member
now have a usable oven
Posts: 28
|
Post by scotsoven on Sept 27, 2019 15:59:17 GMT
|
|
|
|
Post by oblertone on Sept 27, 2019 18:03:47 GMT
Have you done a series of progressively larger curing fires ? Without rereading the whole thread I'm not sure; however, firing a wet oven up to pizza temp (soot free) will not only take ages but be potentially damaging to the structure.
|
|
scotsoven
valid member
now have a usable oven
Posts: 28
|
Post by scotsoven on Sept 27, 2019 18:36:35 GMT
Yes done a load of small fires getting gradually upto over 300 degC before rendering last Saturday. Have kept it under cover all week so hoping if a light a small fire tomorrow morning then gradually build up in the afternoon hope it will be ok🤞🤞🤞 have two small cracks in the render maybe about a inch long so plan to touch up but thought i would wait till after i fire as it gives somewhere for the moisture to go and if i get any more its easier to patch up at the same time. Do you think this is to soon???  |
|
|
|
Post by oblertone on Sept 28, 2019 9:40:49 GMT
If you're happy you've done enough firings then go for it, the worst that can happen is that you'll get some cracking, and there aren't many WFO's without.
|
|
scotsoven
valid member
now have a usable oven
Posts: 28
|
Post by scotsoven on Sept 28, 2019 18:36:39 GMT
|
|


