|
|
Post by rhodrigo27 on Aug 31, 2012 16:56:08 GMT
|
|
|
|
Post by rhodrigo27 on Aug 31, 2012 16:57:53 GMT
|
|
|
|
Post by rhodrigo27 on Aug 31, 2012 17:01:33 GMT
Once i had topped out I left it for a week drying and then I have lit a series of small fires to ensure it is fully dry before I put on the insulation vermecrete and render on!  Shows the small fire and u can see the interior of the dome Will take some more snap shots over the weekend of the progression made! Any advice , tips or critiques much appreciated! |
|
|
|
Post by cannyfradock on Aug 31, 2012 17:25:23 GMT
Rhodrigo
I see you have re-build your arch with angled bricks. That's a lot of work.....well done for having the patience in doing this. I hope the dome arch transition went well. Most of us copy other picture diary builds to complete this part, but no 2 builds are the same, so it's good to see you are passed this stage.
Can't give constructive criticism as all seems well. The outside of the dome always looks messy.....that's the way it is.
It looks like you have enough room left for an entrance arch. Make this slightly larger than the inner arch so the inner arch creates a rebate for the door .....many people (like me) never get round to making a door, but the rebate is important if you want to bake bread.....or cook lon, slow casseroles etc.
You now need to create a vent for your chimney in the entrance arch......in case you are not sure on this procedure........look to your internal arch.....you have 6 half bricks. On the entrance arch you will have 6 full length bricks.....except....the middle 2 bricks will only be 2" wide. This will leave a hole of 5" x 6" (ish).....enough to put a pot on.......look at other builds to see how this is done....or shout out if you're confused.....I can give you some "links" of this process, if you're not sure.
Terry
|
|
|
|
Post by cannyfradock on Aug 31, 2012 17:32:45 GMT
p.s.....love the bow touch......  Terry |
|
|
|
Post by rhodrigo27 on Sept 1, 2012 10:03:10 GMT
Terry,
What is the best ratio for the vermecrete? And how many 100l bags of vermiculite would you recommend?
Ps think I earned that bow!!
|
|
|
|
Post by cannyfradock on Sept 1, 2012 10:51:07 GMT
The standard ratio for vermecrete is 6:1 by volume.....plus water to bind. A normal builders bucket is 25ltls......which is about 3/4 of a bag of cement.
Depending on the size of the dome it takes between 2 to 3 100ltr bags of vermiculite.
Mixing the stuff is difficult and putting it on is also a "faffle". I use an empty 1 ton ballast bag and empty 2 bags into it the night before I want to use it. I then add about a bucket of water and pull the bag from side to side to cover the vermiculite with the water. The next day I add the cement....and again pull the bag from side to side to mix the stuff up.
Some people rig up a small shuttering at the base to start off with. It doesn't bind very well, but once you have started the ring it gets easier the further you go up.
Best of luck
Terry
|
|
|
|
Post by bookemdanno on Sept 2, 2012 7:31:22 GMT
A slurp of Pear...a slurp of the normal...a slurp of Pear...  Nice work Rhodrigo! I really like the position you chose for the oven too! |
|
|
|
Post by rhodrigo27 on Sept 2, 2012 11:33:07 GMT
Hello, Cheers guys it's getting there. Little update on yesterday's work! Built the front arch and installed a thermocouple as I decided I would follow suit and install a digital thermometer as it will be used for bread and roasts too!  Mock up of the arch before cutting the bricks, |
|
|
|
Post by rhodrigo27 on Sept 2, 2012 11:34:46 GMT
|
|
|
|
Post by rhodrigo27 on Sept 2, 2012 11:36:01 GMT
|
|
|
|
Post by rhodrigo27 on Sept 7, 2012 9:10:44 GMT
Hello, Well had a big nights work last night, finished at 10pm under flood lights!!! So last night we put on the insulation blanket, covered with chicken wire, the twisting of the wire with plyers was a really really useful tip!!! then I put the chimney on, using home brew and offcuts from the build, we then started the layer of vermecrete, I placed a layer around the outside of the slab to and build up from this, it went on fairly easily as long as we took our time untill we got above vertical! It was a weird thing to mix! here are some pics 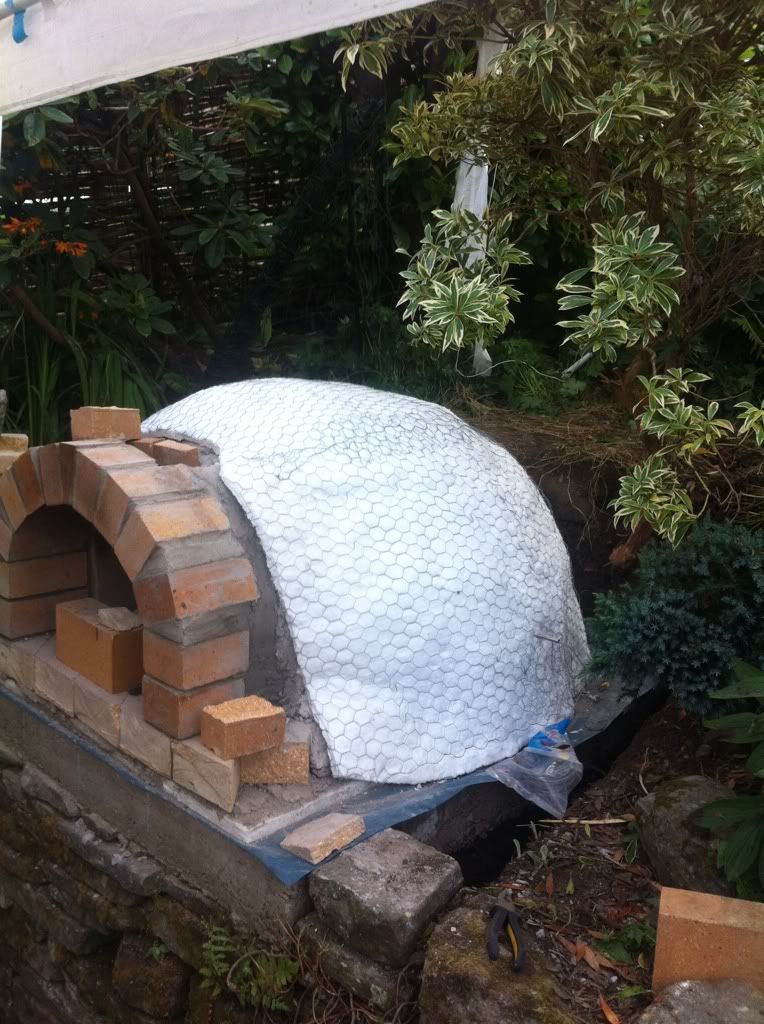      Mother busy at work on the back!   Under the precariously placed marquee!   I am now away for a week, and then we are going to add the render!! |
|
|
|
Post by cannyfradock on Sept 7, 2012 9:27:27 GMT
Rhodrigo
Brilliant progress. Love those pics. I like the way you eventually cleared an air gap around your oven. The tip on the pliers is something I will also try next time.
The vermecrete layer looks tip top (I still have problems working with that stuff). I like the way you created the vent with the limited space of just one brick. We have recently had a member who asked how to create a vent having only one brick as the entrance arch. I hope he/she sees your post.
Great work.....looking forward to seeing the next stages.
Terry
|
|
|
|
Post by faz on Sept 7, 2012 11:29:40 GMT
Plenty of progress - I bet you can nearly taste the pizza now!!
One quick question - it looks like the vermicrete butts right up against the soil at the rear of the oven. Have you thought about how you will keep moisture going from the soil into that layer? Or am I not looking at the picture right?
|
|
petec
WFO Team Player

Posts: 232
|
Post by petec on Sept 7, 2012 12:38:13 GMT
fantastic
- well done - your example in limited space is helping me plan my entrance area too.
Rgds
Pete
|
|