|
|
Post by reburner on Sept 15, 2012 8:29:54 GMT
My Vitcas arrived this week so here are some pics of my current patio/outdoor kitchen project. The entire project. The outdoor kitchen is going against the wall to the left of the patio doors. The pizza oven will go on the far end of that at the corner of the house. 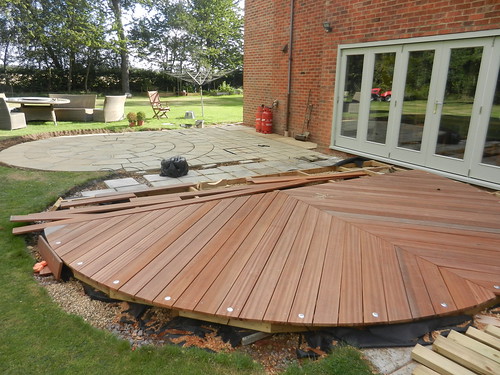 The oven 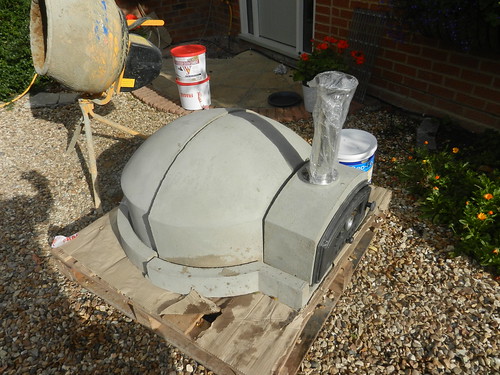  The site of the oven with some blocks dry laid to show the base construction pattern. The oven comes with an insulated base. My intention was to build the block base in the pattern shown then top with 4*600mm paving slabs, then a layer of blocks on their side, render the lot then place the oven on top. 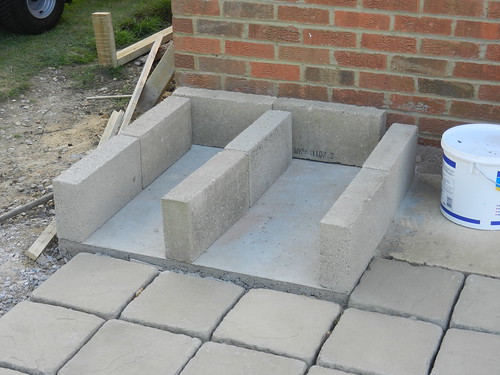 I am planning to insulate the oven with blanket, chicken wire and fire cement. Insulated like that and with a block 'splashback' behind the oven I'm not anticipating any problems building so close to the house. Anyone got any comments/suggestions. Will post up more pics as build progresses |
|
|
|
Post by cannyfradock on Sept 15, 2012 9:33:46 GMT
Great start. Looking forward to the rest of the build. One point.... Try to leave an air gap between the oven and the house. i.e....calculate how much insulation will go on the dome so the finished job will still be clear of the house wall.
OK...2 points.....Always follow your suppliers instructions to the letter. It will validate your guarantee and only THEY will know the best way to make that oven perform to the best of it's ability.....saying that, I might be tempted to lay a DPC under your first block.....or/and on top of your first block to avoid any rising damp that may hold in the area next to the house wall.
Terry
p.s.....love the patio and decking.
|
|
|
|
Post by reburner on Sept 15, 2012 9:52:53 GMT
Cheers Terry,
There is a 150mm gap between the house wall and the back wall of blocks to start with (I know the picture looks like they are up against the wall) and in addition I will build a single high block wall behind the oven.
Also I asked Vitcas about what to put underneath the oven base and they said I could place the floor of the oven directly on block pillars or on a block or fire brick base.
|
|
|
|
Post by cannyfradock on Sept 16, 2012 8:00:19 GMT
It seems strange to me that they say.."they said I could place the floor of the oven directly on block pillars or on a block or fire brick base."
It seems that they just want you to put the oven on a solid and sturdy base....not sure on the fire-brick route.(they may actually draw heat out of your oven floor) I presume the base of the oven is made from refractory concrete. A lot of Modular oven suppliers suggest the same as what many of us do when building a Pompeii i.e make the last layer of the base thermolite blocks on flat. They are a great insulator and act as a fire stop, stopping any heat from escaping below the floor of your Modular oven.
When setting out your walls (calculating the finished height of the oven floor) the general rule of thumb is to make the floor at elbow height for the person who is going to work the oven.
Terry
|
|
|
|
Post by bookemdanno on Sept 16, 2012 13:10:40 GMT
That is some nice looking Decking there! Iroko?
|
|
|
|
Post by reburner on Sept 16, 2012 20:25:14 GMT
It's actually Balau. I finished the circle today and installed the rest of the LED lights and it looks pretty good.
But now you mention it I have an Iroko worktop for the the outdoor kitchen. given the UK weather it would seem oiling it is not going to be sufficient protection. I was leaning to coating it with something like Ronseal 10 year varnish. Anyone got any better suggestions?
Oh and Terry I was planning on using Thermolite blocks under my base after much reading on here. Thanks.
|
|
|
|
Post by bookemdanno on Sept 17, 2012 12:36:26 GMT
I'm not sure... i think that Iroko is a very naturally oily wood for a start and so long as you keep on top of the oiling it'll be fine. It'll probably have more trouble with long hot summers than winter. If you get a good quality finishing oil i think it'll be fine.
Also, i'm not sure how well a varnish will adhere to Iroko due to its oiliness. You might end up sanding and varnishing more than oiling!
Try asking your hardwood decking supplier?
|
|
|
|
Post by reburner on Sept 18, 2012 19:48:28 GMT
You're not wrong. After some research i've found out that you basically have the choice of leaving the iroko unfinished and it will gradually fade to grey or treat it to keep it nice and shiny. if you choose the latter you can pretty much guarantee it will need redoing every year.
|
|
|
|
Post by reburner on Sept 19, 2012 7:47:12 GMT
Have now cut and laid out 2 layers of blocks for the outdoor kitchen. The 'holes' at the front are for doors I will build. The gas bottle you can see is for the hob in our kitchen (no mains gas) and I need the inlet pipe lowered by about 30cm so it will fit under the worktop. Had real problems finding anyone who will come out and work on LPG. 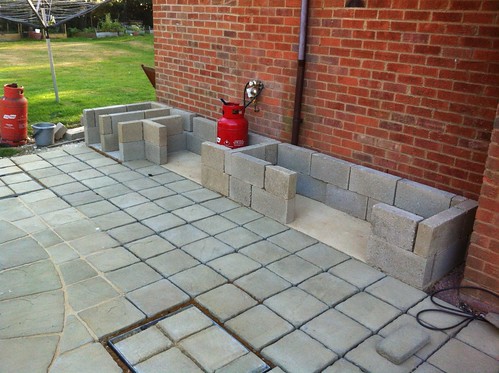 |
|
|
|
Post by reburner on Sept 22, 2012 20:41:33 GMT
10 hours work today and I now have a base 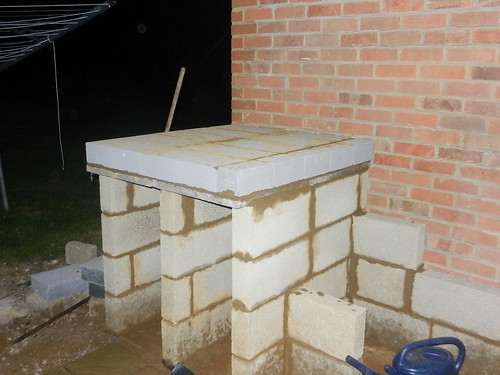 |
|
|
|
Post by cannyfradock on Sept 23, 2012 10:14:22 GMT
Reburner
Good progress.....I bet you're itching to get firing' n 'bakin.
Your base looked a bit high (normal height is elbow height) but I calculated your finished height of your hearth and it works out (I think) 110cm.........my elbow height....perfect.
Terry
|
|
|
|
Post by reburner on Sept 23, 2012 11:05:57 GMT
Yep it's just about my elbow height. Oven is now in place but had frustrating morning as it didn't all quite fit together properly. It also weighs a ton lifting it up to that height. When I put the two base parts together I ended up with a lip in the middle of the oven. I corrected that by laying a very thin layer of sand under the whole of the front piece. However when I put the two parts of the dome in place they wouldn't drop into the base and I had to chisel a little bit off the bottom outside face of the front to get it to drop into place. By the time it squeezed it into place it very slightly moved the base sections apart and I have a small gap (2-3mm) on one side of the centre of the oven. I guess I can fill this with fire cement. Here's a couple of pics. None of the finished oven as the heavens opened as I put the front door on. 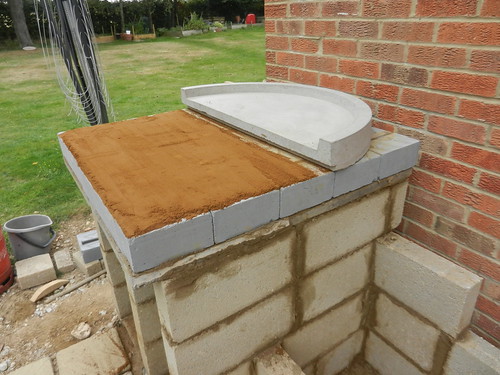 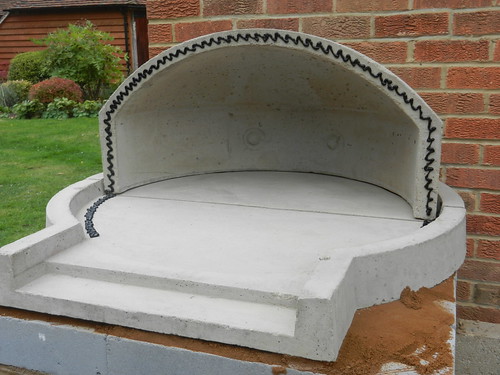 |
|
|
|
Post by cannyfradock on Sept 23, 2012 17:00:15 GMT
I haven't put a segmented modular oven together, but members have voiced their frustration on getting "all the bits" to line up. I've read the instructions on many different Modular ovens from various suppliers and some give a tube of fire-cement to fix the segments "with a mastic gun)....others give a pot of fire-cement .....and others say leave the (dome) segments dry to allow for expansion.....regarding the gap on the hearth ask advice from Vitcas first. The main thing is that there's no lip on the rear half which may catch the pizza peel (although even that could be easily remedied).....
Terry
|
|
|
|
Post by tonyb on Sept 23, 2012 17:02:21 GMT
Having to pack one half sounds like poor quality assurance from the company, did you contact them about it? I don't think your solution will cause any problems, just disappointing for you.
|
|
|
|
Post by reburner on Sept 23, 2012 20:36:12 GMT
Yep it was a bit disappointing and as it is obviously cast in a mould I was surprised at how far out it was. I had the wherewithal to rectify with a bit of bodging but anyone who bought one of these and thought it would be like putting Lego together would be mistaken. The instructions on this one are also very sparse saying something like 'put the oven together and use a bead of mastic on joints'
Anyway it is together now and opening the door and looking into the oven gave me a disproportionate amount of pleasure (especially as it was pissing down).
|
|


