smarty1964
member
 The Mk I Oven - Mk II Soon - I Hope...
Posts: 14
|
Post by smarty1964 on Sept 24, 2012 1:42:09 GMT
Hi Reburner Looks like you are going well, overall would you still recommend the Victas despite your setbacks. I should be home in a couple of weeks and have already contacted them about delivering to the Isle of Man... At the end of the day, issues like this soon get forgotten when the end result is good and the first cooking takes place without the dome cracking into pieces. When I built the first one in france the joints were left dry and we had to do some 'fitting' to get it all to line up. The kit used then was a own brand from a french DIY Chain costing €600. Cant wait for more photos and perhaps for the real oven 'pervs' a video of the door opening and closing  . |
|
|
|
Post by reburner on Sept 24, 2012 6:19:10 GMT
Yep would still recommend it. Now it is in place it is a very solid piece of kit with a good sturdy cast iron door. Next step is to light a couple of small curing fires and then get on with the insulation. I'll keep the pics coming and a video shouldn't be beyond my capabilities.  |
|
|
|
Post by bookemdanno on Sept 24, 2012 12:55:24 GMT
I'd say it's probably "par for the course" to have to fettle and jiggle a pre-cast oven. I doubt they fit all the bits together gefore shipping. It's just a pick each part from a pile to a list.
Then its not until "mr customer" has to fit it all together and one bit with a plus tolerance meets with another of a plus tolerance and you have a issue to deal with.
Not necesarily a QC issue as all parts pass individual inspections.
|
|
|
|
Post by reburner on Sept 25, 2012 8:41:36 GMT
OK, here's the latest update. Sunday night I lay awake fretting that the oven wasn't quite positioned right (I still had that little gap in the centre) so I got up yesterday and in the pouring rain I pulled it all apart. Breaking the seal of the mastic was quite some effort. I jiggled everything around and got it all in a much better position then redid the mastic, put it together and gave all the joints, including the joint in the middle of the floor a coating of fire cement. I just left the front section holding the door off. Felt much better afterwards but was soaked through  In the meantime I emailed vitcas about the door. As you can see in the pictures below there is a gap at the bottom where the door joins the front section of the oven. I asked Vitcas if this was right as it did not provide a seal when the door was closed and rendered the sliding vent on the door a bit superfluous. 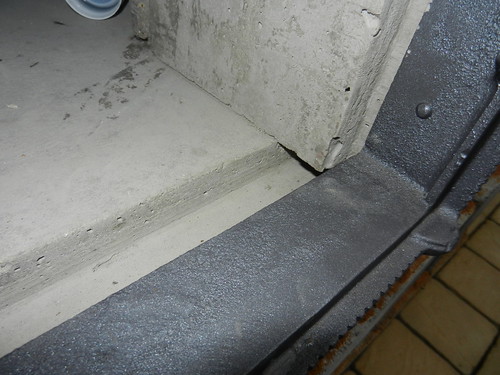 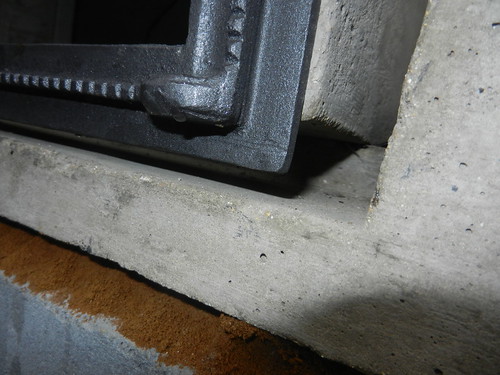 They replied saying it was like that as some customers didn't wish to use the door and built their own arch but I could fill the gap with fire cement if I wish!! So onto this morning I have refitted the front section on the oven and removed the door to fill the gap. I have also sanded down all the fire cement joints I filled yesterday using 60 grade abrasive on my Fein multimaster. Aim today is get the door back on and then the flue and then I should be able to light my first curing fire tomorrow. Vitcas recommend a couple of fires before you begin the insulation. |
|
|
|
Post by tonyb on Sept 25, 2012 9:14:47 GMT
Hmm not overly impressed with the fitting or the explanation. I accept that tolerances on this type of industrial casting may be high, but I would expect them to put the pre-cast bits together before shipping as reasonable QC. I'm sure I had plenty of bodging to do on my own home made wfo. As previously posted, I'm sure these wil quickly fade from memory once you get up and running, its just a little disappointing at the time.
|
|
|
|
Post by reburner on Sept 25, 2012 9:37:30 GMT
Agree Tony. The explanation didn't make a lot of sense and it seems you wouldn't use the oven as it came with the door and the gap. Anyway I took the cast door off and clamped a wooden batten across the front and have filled that whole cut out section with fire cement to the level of the oven floor. Bizarrely the bottom of the door is about 1cm higher than the oven floor so when I refit that I'll need to slide some more fire cement under that otherwise it will fill with debris over time. But as you say these teething problems will hopefully fade in time. I hope I'm not going into too much detail on the thread but I thought it would be useful for anyone building a Victas as there seems little customer information about them on the forums. Now it's nearly all put together I'm chuffed with it and can't stop peering into the dome. Does everyone do that? I'm also close to the insulation blanket and chicken wire stage. I've got a special mastic to stick the blanket on but has anyone got any tips for this bit? |
|
|
|
Post by bookemdanno on Sept 25, 2012 12:11:33 GMT
Dome peering? Oh yes! Entrance arch peering too...oh and Chimney! |
|
|
|
Post by cannyfradock on Sept 25, 2012 18:27:01 GMT
Reburner
You will never go into too much detail. Your input and stage progression with your oven is invaluable.....to many of us now and to members in the future who want to take the same route as you.
I admire your patience in disassembling the oven and re-assembling....just to get it right.....or better.
Normally the insulation blanket goes on dry (without mastic) but please follow Vitcas instructions to the letter.....allbeit sparce in detail....You say Vitcas recommend curing fires before the insulation goes on. I agree. Even on a self build, as soon as the dome is built.....start those curing fires!!....I don't know the Vitcas oven but many Modular ovens need a gradual process of curing the oven.
One good tip we've had recently is to pinch the chicken wire with pliers or a pair of nips and this will keep the blanket snug.
Use a retractable(long blade) Stanley type knife to cut "darts".....or V shapes in the insulation blanket to make sure it fits "like a glove" on the dome.
Another tip (from the same member?) is to wrap the chicken wire in one continuous band around the base of the dome......THEN cut the entrance arch out AFTER it's been pinched in place.
If you try to fill any big gaps (between door and dome) with fire-cement, you may find that it will never go hard. Fire-cement (the ready mix in a pot stuff) can only be used a couple of mm's thick. It depends on what product you are using !!!. If big gaps are filled with this, check after a few days if it's gone hard. If not, scrape out and use refractory concrete or homebrew.
Terry
|
|
|
|
Post by reburner on Sept 25, 2012 18:33:32 GMT
Cheers Terry. Very useful advice. I'm actually using the Vitcas dry mixed fire cement that will go on after the blanket. I've got two 20kg tubs.
I'll burn curing fires for a couple of days whilst I finish the rest of the blocks for the outdoor kitchen and then crack on with the insulation.
|
|
|
|
Post by reburner on Sept 25, 2012 20:16:29 GMT
And we have fire  |
|
smarty1964
member
The Mk I Oven - Mk II Soon - I Hope...
Posts: 14
|
Post by smarty1964 on Sept 26, 2012 3:09:01 GMT
Now it's nearly all put together I'm chuffed with it and can't stop peering into the dome. Does everyone do that? [/quote] I did too and so did the cat! |
|
smarty1964
member
The Mk I Oven - Mk II Soon - I Hope...
Posts: 14
|
Post by smarty1964 on Sept 26, 2012 3:14:37 GMT
Cat QA Inspection Passed... Attachments:
|
|
|
|
Post by faz on Sept 26, 2012 17:29:17 GMT
My cat also played a part in my build. He seemed pretty happy here even though the insulation wasn't even finished PS sorry for turning this thread into a cat thread - MEOW.  |
|
|
|
Post by reburner on Oct 9, 2012 18:45:00 GMT
So I have had 4 curing fires and got the oven up to working temp. A couple of hairline cracks surfaced but Vitcas said that was to be expected. I measured the temperature around the cracks and there was no heat variation. Today I applied the insulating blanket (pics below). Vitcas advised a whole roll which was more than enough to apply 2 layers. It was very easy to do and any slight mis-cuts could be easily patched. The adhesive supplied wasn't really needed as the fibres on the blanket seemed to attach themselves to the oven. The second layer just stuck to the first. I wore latex gloves and a long sleeved sweatshirt as the fibres were quite irritating. Should have worn a mask as well really. I cut the blanket with a Stanley knife. I just roughly cut the pieces to length and then trimmed them as necessary when they were positioned on the oven. This was a real easy part of the build and quite satisfying. Hopefully tomorrow I can get on with the chicken wire and the fire cement covering. 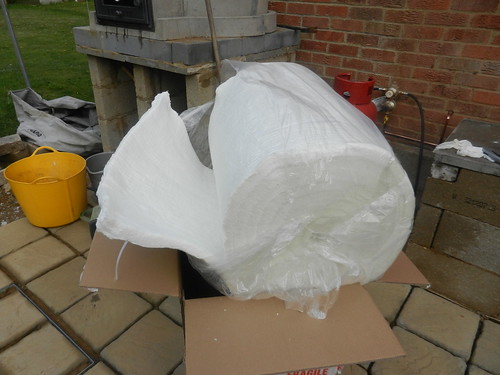 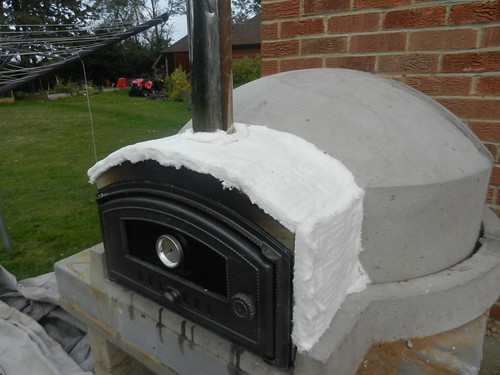 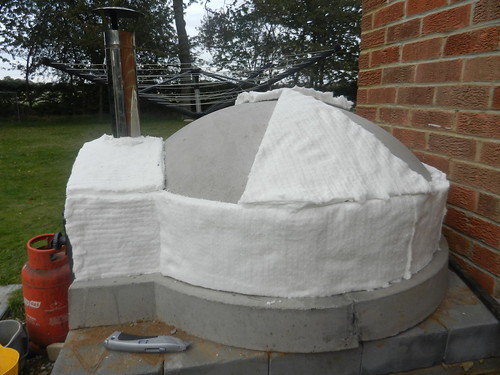 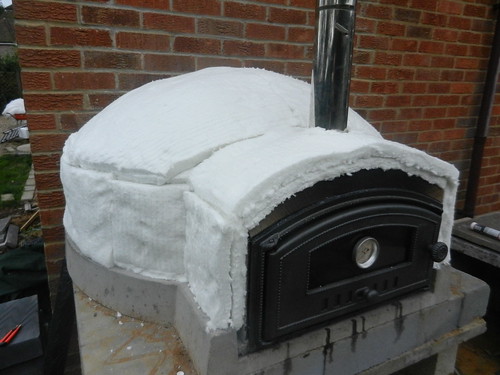 |
|
|
|
Post by cannyfradock on Oct 9, 2012 19:25:50 GMT
Reburner
It looks like it's all starting to come together for you. Keep your eye on those hairline cracks. As long as you go slowly, slowly with your curing fires then the cracks should stay small.
As I've mentioned I'm not familiar with a Vitcas oven build but it seems you are a little short in width for the final coats. I also don't know what sort of "fire cement covering" they use. You can always "fix" a piece of timber temporarily on each side to help lay the final coat. It will be fixed to the chicken wire and be supported by the rest of the slab so the timber can be removed once the final coat is dry.
You can't be far away from your first pizza party!!
All the best with your finishing touches......
Terry
|
|


 .
.


