|
|
Post by marudge on Aug 18, 2013 16:41:33 GMT
Did the first render coat today. I used the homebrew mix 4:1:1:1 Sand:cement:lime:clay. It mixed really well and was lovely to work with. It stayed workable for plenty of time so I could get a good finish......however....now it has started cracking. I guess this will be down to the warm'ish' conditions and the fact there is no mesh in it. I am not worried about it as this will be all covered by the thermal blanket, vermiculite and then more render. But this really was my practice coat so I want to learn as much as I can from this so I get the final render coat right (although that one won't have clay in it). For the final render I intend using 5:1:1 sand:cement:lime - does that sound about right? Will it be as workable as this mix was? How do I make sure it doesn't crack like this coat has? 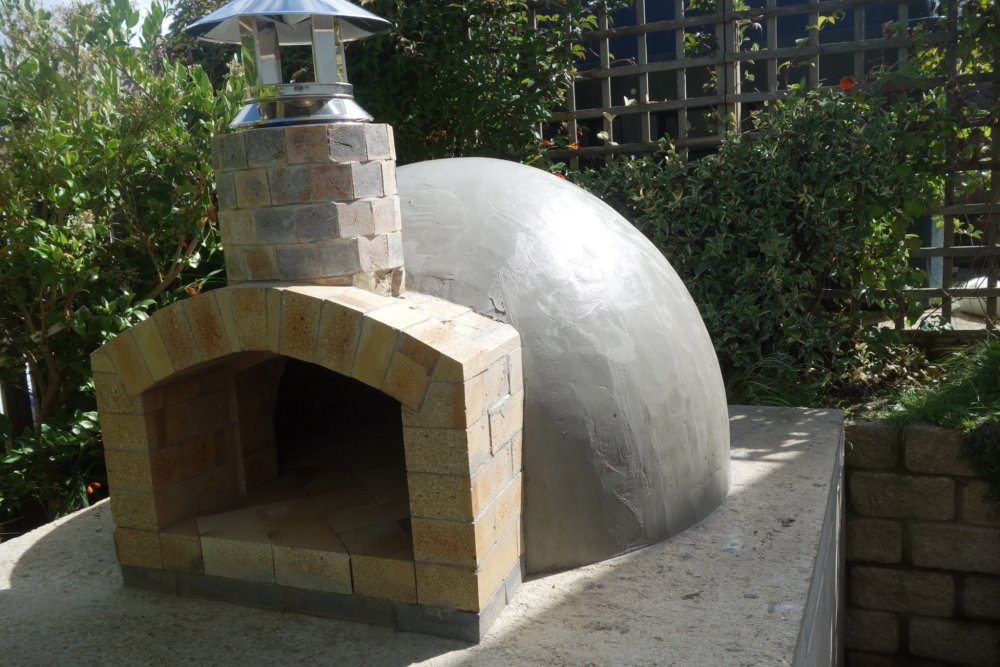   Thanks Mark |
|
adm
WFO Team Player

Posts: 164
|
Post by adm on Aug 18, 2013 17:31:16 GMT
Mark,
That looks beautiful. I wouldn't worry about the cracking on the render coat there, you'll never see it once you have blanket, mesh and outside render on and I am sure it won't affect the thermal characteristics of the oven in the slightest.
I do have a few questions for you though.....I am aiming at a very similar build and wonder if you could talk a little about how you cut your bricks and what sort of jig you made for the angles etc, etc...
|
|
|
|
Post by cannyfradock on Aug 18, 2013 17:54:32 GMT
Marudge
Now then.....I'm only really another enthusiast on this forum so I am truly impressed with your hearth, arch and chimney.
At the stage you are at, you normally see some of the bricks and a load of parging up from the refractory mortar. It looks like you have tidy'd this stage up by laying a thin coat of mortar over the ugly bits. The natural drying process will have caused this thin layer to crack. As you are laying a thermal blanket on top of this you could leave this...as it is to allow natural expansion/contraction of the dome.....or fill with a lime and water "wash"....I would be tempted to fill the cracks with the lime wash as this will give a bit of elasticity to the that render layer.....I always see something new on every build so either of the above suggestions will probably work?
The final render coat needs to be really applied in 2 coats. A "scratch" coat with waterproofer in the mix....and a final finish coat.
Terry
n.b....When lime is used on a final render coat I have been taught that the lime % equates to the same as the cement % so on a standard 4:1 mix .....I would use an 8:1:1 mix of sand, hydrated lime and cement. This is...of course up for debate and I invite any contradiction to my last comment. ....(I'm still learning)
|
|
|
|
Post by marudge on Aug 18, 2013 18:32:19 GMT
Mark, That looks beautiful. I wouldn't worry about the cracking on the render coat there, you'll never see it once you have blanket, mesh and outside render on and I am sure it won't affect the thermal characteristics of the oven in the slightest. I do have a few questions for you though.....I am aiming at a very similar build and wonder if you could talk a little about how you cut your bricks and what sort of jig you made for the angles etc, etc... Hi adm I will put up some pics of the jig I used but the 2 main posts I started with are below: www.fornobravo.com/forum/f28/twist-tilt-2802.html - This is Hendo's twist and tilt guide. This is well worth reading and understanding as it was the best explanation of what happens to the bricks as you go up that I could find. I followed Hendo's technique up to about course 6 but then the cuts got too steep and I could not hold it in place. www.fornobravo.com/forum/21/my-42-pompeii-oven-build-northeast-18900-5.html Scroll down to post #44. Read the posts and links. The chart from JG31 is especially worth looking at and printing a copy. Now go the next link www.fornobravo.com/forum/21/my-42-pompeii-oven-build-northeast-18900-8.html Scroll down to Post #79. Although boylanta says he used this jig for higher bevel cuts I wished I had used this all the way through. Drawing 2 lines, cutting one way and then the other is far more accurate than other methods. The final complication is tapering the bricks. It seems in the US and Australia you can get ready tapered bricks but I have not seen them here. I cut a taper on all my bricks using a simple jig.....but I have to say it was inconsistent and I am not totally convinced it was worth all the extra effort! That should be enough to get you going. I will try and lay up some shots of how I cut my bricks to help. |
|
adm
WFO Team Player
Posts: 164
|
Post by adm on Aug 18, 2013 19:50:34 GMT
Cheers Mark,
I have read through some of those FB threads already - but as I am not yet up to the stage of cutting my bricks, I haven't really grasped the intricacies of it yet. I will probably reread these all many times....
I do have a big monster of a wet table brick saw, and the cutting disk rotates from vertical to 45 degrees, so I think that should allow me one axis of movement for cuts, then it's going to be a matter of making up a jig for the other axis I will need and then getting my head around how it all works, plus practicing a bit....or a lot!
Lovely build anyway - I hope mine comes out half as good!
|
|
|
|
Post by bookemdanno on Aug 19, 2013 12:46:43 GMT
Did you use builders, or soft sand?
Generally you'd use a washed plastering sand or a mix of washed soft and sharp sand for a render coat. The Sharp sand creates a stronger mix, due to the angular grains locking together.
I'd think that using cement, Lime, and Fireclay makes the mix too rich which can lead to the cracking too. Based upon what Terry mentioned you've got three binders in there now, with only one aggregate.
I'd leave it now, or maybe a slurry (limewash) might be useful, but the way you've so elegantly cut your bricks, your oven would be just fine with no mortar used. Its mechanically sound in its construction, and any additional weight upon it will only make it stronger.
|
|
|
|
Post by marudge on Aug 19, 2013 14:11:37 GMT
Did you use builders, or soft sand? Generally you'd use a washed plastering sand or a mix of washed soft and sharp sand for a render coat. The Sharp sand creates a stronger mix, due to the angular grains locking together. I'd think that using cement, Lime, and Fireclay makes the mix too rich which can lead to the cracking too. Based upon what Terry mentioned you've got three binders in there now, with only one aggregate. I'd leave it now, or maybe a slurry (limewash) might be useful, but the way you've so elegantly cut your bricks, your oven would be just fine with no mortar used. Its mechanically sound in its construction, and any additional weight upon it will only make it stronger. Hi bookendanno - thanks for the reply. I used builders sand. I will add some lime wash to fill in but keen to learn so that I get the final render coat right. Can you give me a steer of mix? I intend doing - HT blanket next, then a 2" layer of vermiculite (a bit of overkill I know :-)) then the render coat. Terry recommends a scratch coat but I was wondering of the vermiculite layer would, in effect, act as a scratch coat. Advice appreciated. Thanks Mark |
|
|
|
Post by bookemdanno on Aug 20, 2013 12:59:01 GMT
I suppose you could do it in one pass, straight onto the vermiculite but you really want to get it 20-25mm thick. It might be tricky to get it on that heavy. You need to be able to apply it with enough force so that the grains lock into the backing coat and the keyed surface, or it just drops off. Hence the usual two pass regime, of around 10-15mm. You could still manage to render in one day though, if all prepared and go for a focussed early start!  You don't have to wait for the scratch coat to dry right off, just green enough so that you don't flatten out the keyed/scratched surface of the first coat. Guys have rendered straight onto the blanket, so vermicrete will provide a better/more stable background, but again not in one pass. Terrys mix ratio should be good too, with waterproofer added as per the manufacturers details. Waterproofer can deaden the mix though, but the Lime should counter that. Either go 50:50 washed soft and sharp sand, or get already mixed plastering sand. Use a bucket, old ice cream tub or something to gauge your ratios too. This makes the mixes uniform and keeps the colours close in split mixes. I like to have my render similar to my mortar, nice and well mixed and fluffy, like cake mix. Probably a bit drier than many render mixes i've seen used. Its a bit trial and error really to get it how works for you best. But you can always scrape it off and start again! have you set any curing fires into your dome yet? you'll need to start these very lightly at first, building from just paper and card, through kindling, to fingerlings before getting into vermicrete layers. Then continue more of the small fires but for longer duration to drive out moisture within the vermicrete before rendering. You don't want to trap water within the layers before adding what is a sealing outer shell of waterproofed render you see. The water turns to steam and pressurises with high temperature firings, finding a weak spot, and steaming cracks appear all over your once lovely render! I'd advocate taking time over this particular area and not getting too much heat into the dome too early. You also need to make sure that rainfall cannot ruin all the work in drying and seasoning too, so a gazebo is a big plus at this time of year. Its best not to rush the curing of freshly laid mortar/concrete either, or you weaken it. Give it a chance to react at its own pace, then get drying it out. Your dome should be fine right now for some heating, but once the Vermicrete is on, let it do its own thing for a few days til it starts to lighten in colour, then build up the heat levels again. These fires are sort of doing two jobs, in driving out the bucketfuls of water held within the bricks, mortar, etc and seasoning the oven with cycles of heating and cooling up to higher and higher temperatures. I'm being very conservative in my guidance to you as you've created a wonderful oven so far. I rushed my build at this stage due to over excitement and not really understanding the consequences (story of my life!), and paid the crack man...heavily. All a learning experience though!  |
|
|
|
Post by marudge on Aug 21, 2013 19:53:36 GMT
Great advice bookemdanno - that is really helpful - thanks. I was wondering about when to start the curing fires.......so I've started. I did 2 yesterday both kept below 50 C. First was paper and the second was a small amount of kindling. Today I have done 3 more kindling fires - kept at about 50 C, then 75 C then 100 C. The last 2 curing fires seem to have started to force the moisture out as you'll see from the photo. The cracks have stayed about the same size but seem to have a useful function in letting the steam out. I guess I just continue with this for a week or so gradually increasing the temperature?  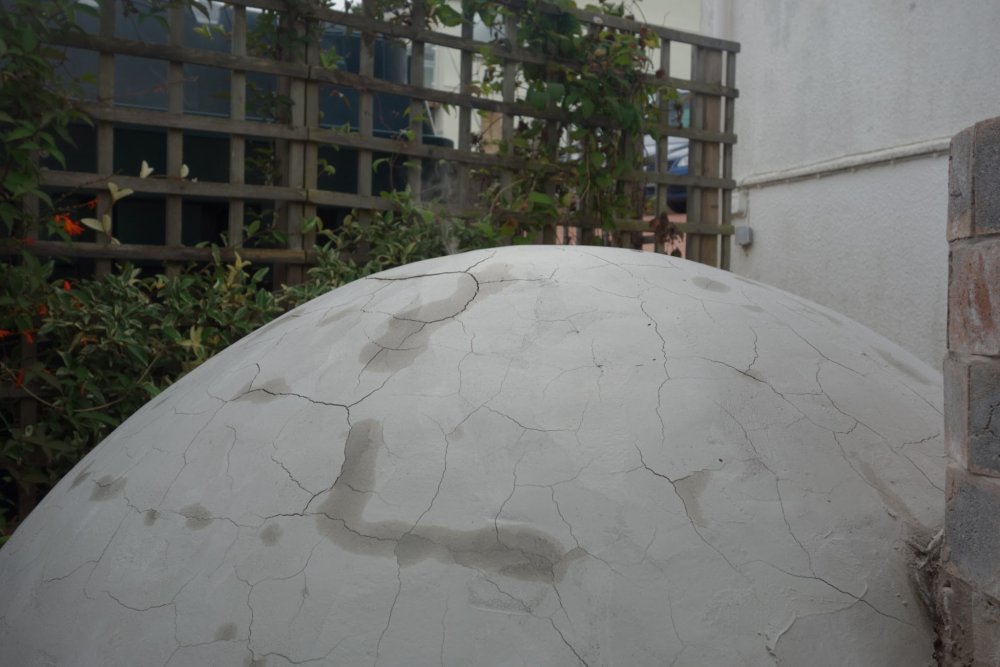 |
|
|
|
Post by bookemdanno on Aug 21, 2013 21:06:20 GMT
Perfect Mark, I'd say keep the fire temps now in the range that have created steam until you see a noticeable change. Keep any rainfall out too. Then think about your insulation layers.
|
|
|
|
Post by marudge on Sept 1, 2013 19:45:31 GMT
|
|
|
|
Post by bookemdanno on Sept 2, 2013 14:31:05 GMT
Quelle Classe! Ingenious use of the Trellis panel. I love the way that every oven and its build/builder has a unique touch all of their own! |
|
petec
WFO Team Player
Posts: 232
|
Post by petec on Sept 2, 2013 17:47:56 GMT
lovely accuracy ..... starting to make some of the FB forum builds look a bit "casual"  cheers Petec |
|
|
|
Post by cannyfradock on Sept 2, 2013 18:59:20 GMT
Marudge
What a fantastic set of photos .....unfortunately they are too big for our forum (too many pixels) so it pushes all the text on your thread ...and the 40 most recents threads...into next week (it's difficult to read what's going on).....I shall try to re-instate them a little smaller so it doesn't affect the general affect on the forum.
Terry
|
|
|
|
Post by cannyfradock on Sept 2, 2013 19:18:16 GMT
Marudge
Normally if someone posts a pic too large....or too small...or upsidedown etc.....I change the pic to a link....the re-instate as a full picture (within our forums format). I tried to do this with your pics...but somehow it won't work....whoops. Sorry.
Could you please re-post the pics with smaller pixels...or just post the image url to all images so I can re-post them at the correct size. If you just post the "image url" I can re-instate them at the correct size ....in your original post and then delete my message/post.
Terry
p.s...I feel a bit of a twat as those pics were really informative in a crucial stage of the oven build.....sorry Marudge.
|
|