|
|
Post by dirtlover2005 on May 31, 2014 21:54:01 GMT
Well its about time I put a thread on here. In the last couple of weeks I've started my mega low cost build. The aim here is to build something that will cook a pizza and maybe the odd loaf for as cheaply as possible. Its a long old story but the bottom line is neither myself or my wife have brought in a salary since July 13. Our company got truly shafted and we've been through the mill but the light has been turned back on at the end of the tunnel and we're moving in the right direction. Reading the threads on here and dreaming of cooking pizza has been a welcome distraction 
I've been scouring the freebie sections of Gumtree, Trade-it and local Freecycle sites for a few weeks now!!
Ok the build so far -
The base is - well I'm not sure really!! I got these from a guy who was pulling them out of his garden - he bought the house of a guy who worked on the railways and thought they came from there. All I know is that they are reinforced and super heavy !!!

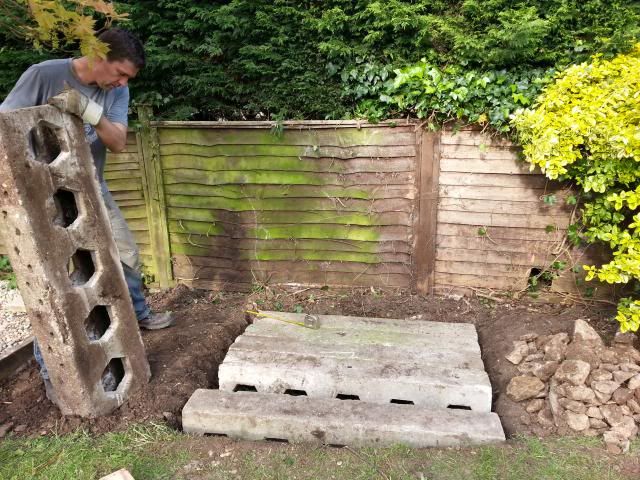

Any ideas what they are??
Ok so I've got them down and level on a bed of stone and sand.... Well I say sand it was actually the mortar we cleaned off 40 concrete blocks that had been used as an outside wall ...
Said blocks have now been used for the wall of my base -
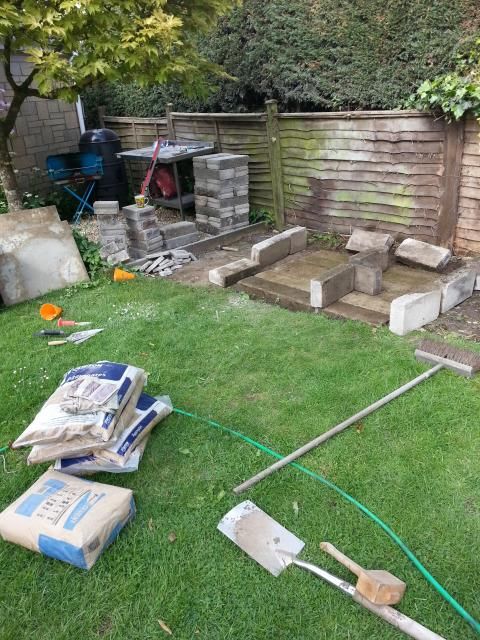
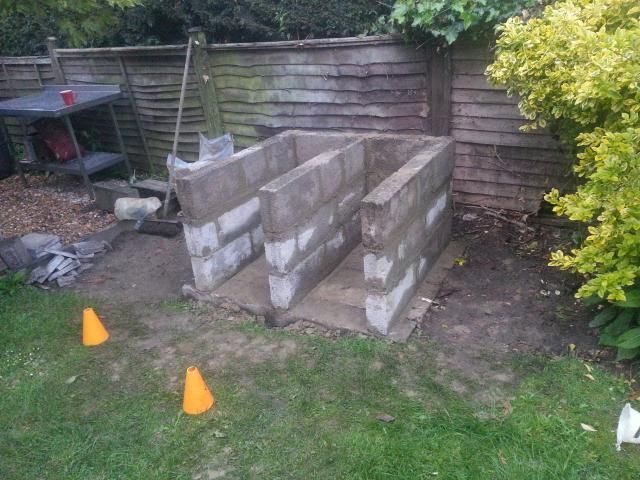
No sniggering at the back - I'm no builder as you can see. The walls have had another layer on today and on top of this will go 4 x 600mmx750mm slabs I got for the extortionate price of £2 each . Then will come a layer of Thermalite blocks - which I think will be a purchase - then a 80cm dome out of storage heater bricks. Now there are not too many threads on the use of storage heater bricks and in my quest I have been lucky enough to receive 2 varieties - the normal purpleish jobbie and these monsters!! -
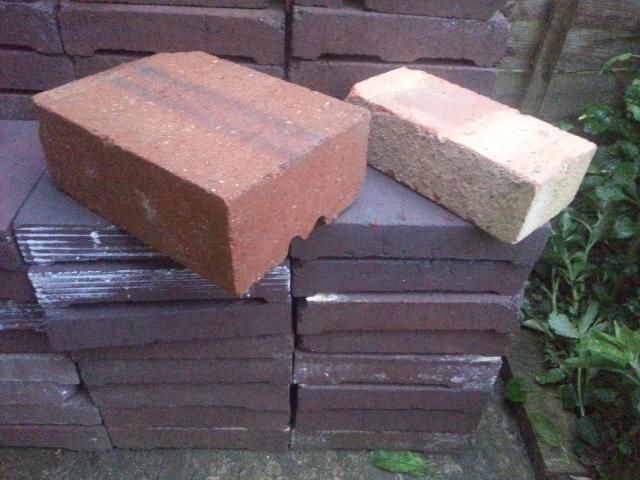
I have put a standard brick by the side for comparison. Initially I was thinking of these big boys for the hearth and cut down for the soldier ring with the purple jobbies for the main part of the dome. Any thoughts?
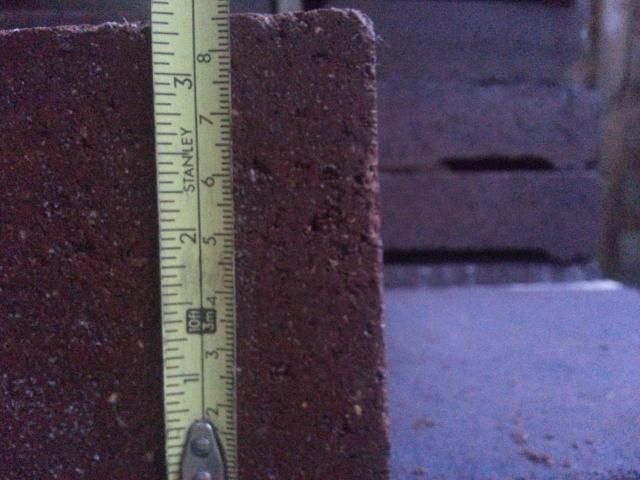
At 3&1/4 inch or 85mm are these too thick for the hearth? That's quite a lot of thermal mass.
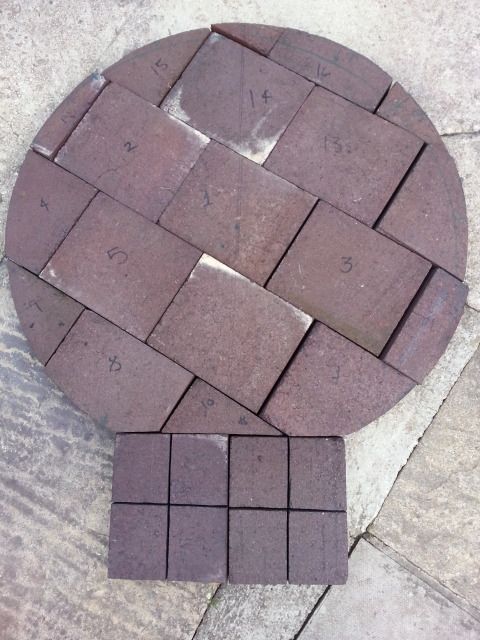
Tomorrow my plan is to draw out a base template and try to work out if I have enough purple jobbies to use flat (giving a depth of 3"ish) or on end (giving a depth of up to 2" depth).
I have seen 1 dome oven build on Youtube where the bricks were used on end -
The plan would be to wrap in thermal blanket, vermicrete and a waterproof render. Any pointers, guidance or cost saving tips will be gratefully received !!
Cheers
Andy
|
|
rokdok
WFO Team Player

Posts: 130
|
Post by rokdok on Jun 2, 2014 22:17:02 GMT
Great bit of recycling Andy , no idea what those great lumps of concrete are. The hexagonal holes are a bit mysterious Looks like the concrete should be stacked and then hexagonal metal bars fit through them. Did you get them from Hinckley Point or Sellafield by any chance ? RD
|
|
|
|
Post by bookemdanno on Jun 3, 2014 12:26:19 GMT
Hiyas! Like the plans mans! I too built on a budget, and the oven works just fine. Finding stuff to use becomes a real art, and part of the fun too.
The idea of the bigger bricks for a hearth, then using the others for a dome is just fine.
Faz built his oven using exactly the same bricks, he quartered them i believe. Check his build thread out.
I used the same in my hearth, with Quarry tiles over. They cut easily, but lots of dust.
No idea on the foundation blocks, but i've seen similar used as walling systems to shore up earthworks, etc.
|
|
|
|
Post by dirtlover2005 on Jun 4, 2014 19:42:21 GMT
I think Bookem could have it with the retaining wall idea
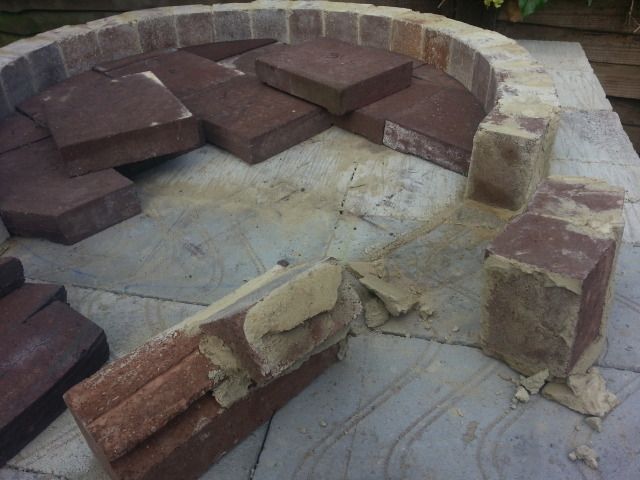
Managed to do a bit more over the weekend - next layer of blocks and topped with the 60x90cm slabs.

I went with using the purple jobbies for the hearth in the end mainly because of the height difference - while it would be ok for me the good lady is a foot shorter so somewhere between our elbow height will be good. The big jobbies I'll cut and use for the soldier ring and entrance arch..
I just put some bricks that I had part cut to show the landing/ entrance but I quite like the look..
These will be resting on the score of the weekend - 30p Thermalites!! A facebook request was answered by a local roofer who had 25 stacked in his yard that he wasn't going to use. Result.
I did spy some old chicken wire there too - that maybe a later call.
Hopefully I'll mortar the thermalites on one evening this week and then cut some more bricks ready for when I can get some fire clay. I did speak with the local Jewsons but it'll take 10 days to get it in stock so I'm on the hunt to see if I can get some by the weekend. |
|
|
|
Post by dirtlover2005 on Jun 26, 2014 8:18:01 GMT
Well I've been slowly making progress on the oven...
Collected my 30p blocks and laid them on a bed of regular mortar. I was then itching to get on so bought a bag of fireclay from an ebay seller (potterypro) as Jewsons were saying it would take them 10 days to get in. It was £9.95 with £10 next day delivery which to be honest I thought was pretty good.
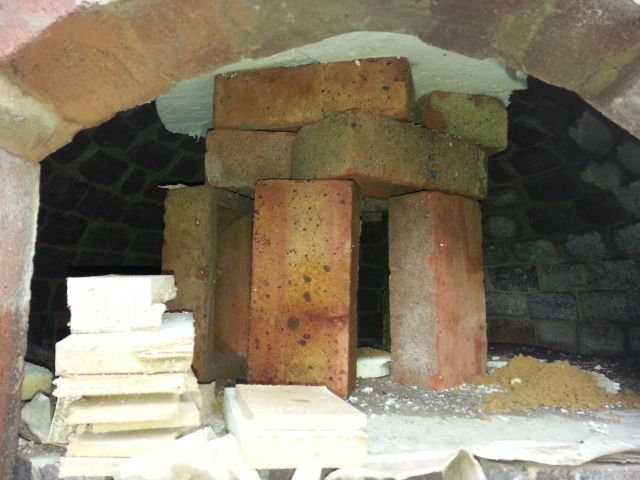
I cut the larger storage heater bricks down and used then as a soldier course and pillars for the internal arch.

The cat seemed to like it!
I left this for a couple of days and then laid the hearth. I did a bit of a dry run to check the fit was ok - a couple of bricks needed a quick trim and it was really tight by the arch entrance and annoyingly I loosened one of the pillars and 1st soldier when trying to get a brick back out. 
I laid the hearth on a dry 6.1.1.1 homebrew mix - they went down pretty well - and cleaned up the pillar and re-glued!
More brick cutting !! Its never ending. I'm using a 4.5" angle grinder and diamond blades - the cheapy ones off ebay are just that and don't last too long even with soaking the bricks. The grinder packed up a couple of days ago - it was fairly old anyway so I have bought another from screwfix for £20 and a decent blade. It would have been nice to but the mitre saw that is on offer for £49.99 - seems a bargain and I know a couple of others have used it on here. I think that they are definitely the way forward but as I was getting on ok with the grinder I went down the cost effective route!
Talking of money saving I must say a massive thank you to Docfester! He kindly let me have the materials he had left over from his build so for an hour's detour home from a work meeting and a few token of my thanks beers I have more than enough insulation and fireclay! Whatever I have left I'll put up for grabs on here to share it around a bit. Also got to see the Doc's oven and I can say it looks as good in the flesh as it does in the pics. He has also since reported great pizza inspiring me to crack on!
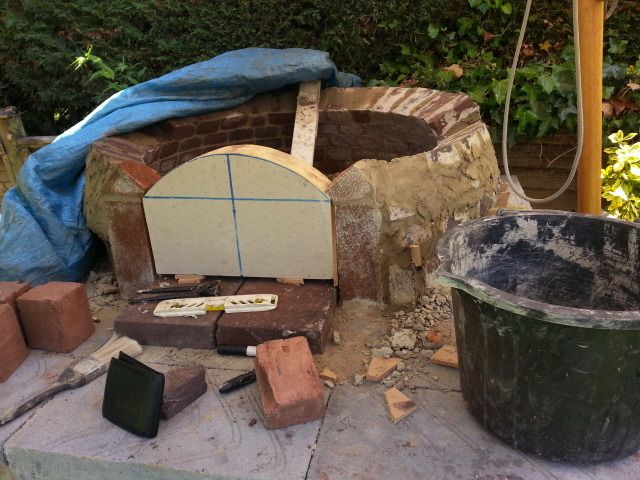
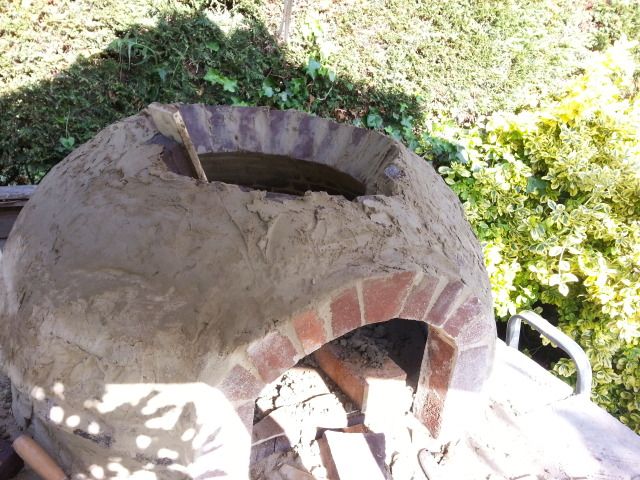
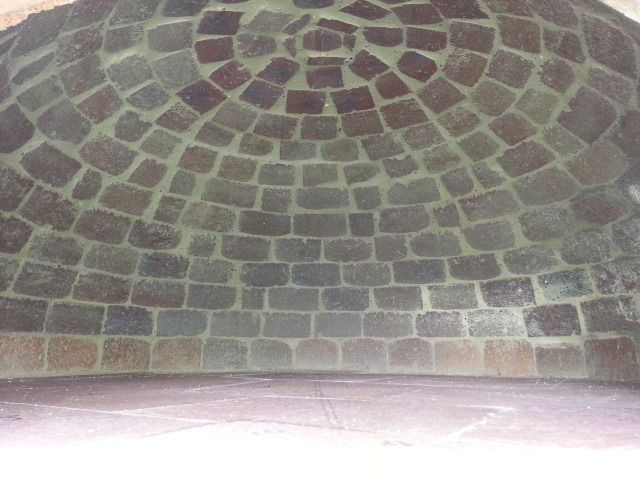
The next few pics tell the story - I cut each purple brick into quarters at first and now down sixth's as the dome is getting higher. The arch was built from the larger heater bricks cut down to size. I think I might run out of the purple bricks so I have cut some more of the larger jobs down and will put a ring of those in - hopefully it will look quite nice.

I know the forecast at the weekend isn't the best but I really want to get on with this now!
|
|
rokdok
WFO Team Player
Posts: 130
|
Post by rokdok on Jun 26, 2014 19:42:46 GMT
Loks really nice DL, like the chunky key on the arch RD
|
|
|
|
Post by diagdave on Jun 27, 2014 21:06:06 GMT
Hi DL Looking good, I too am in the process of building a Storage Heater oven (i'm only on the 2nd layer of the dome) but I am going to be a few short. If you have any left please give me a shout.
Dave
|
|
|
|
Post by cobblerdave on Jun 29, 2014 11:13:27 GMT
G'day Dirtlover
that's coming along really well, really impressed that's its used and recycled!
G'day big Dave
why don't you start a build thread so we can follow you progress
Regards Dave
|
|
|
|
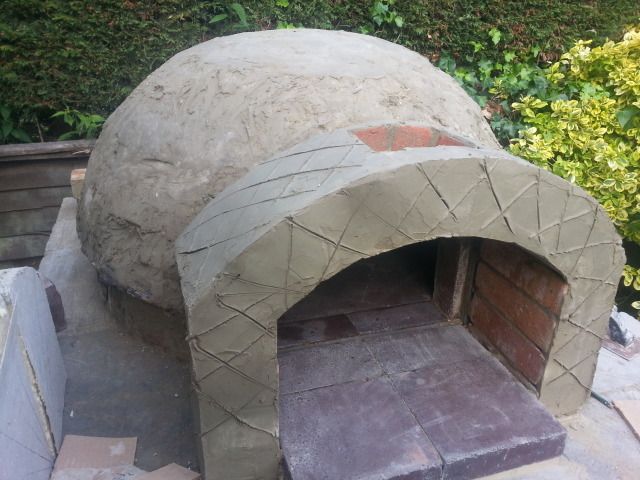
Post by dirtlover2005 on Jun 30, 2014 15:47:49 GMT
Thanks RD and Dave Brizz and Dave Oz!
Dave Brizz - I think I'll only have a couple of storage heater bricks left. Freecycle was may best source - I put wanted adds for old / non working heaters on 3 local sites. I had to go and pick up some more on Friday to finish the dome. I also picked up about 30 old clay bricks and some halves for the exterior arch but SWMBO thought they were a bit too orange so plan B is now to use ordinary London bricks and cut the brown heater bricks to dress the arch.
I few pics from this weekend's work -


I've started the arch too but will have to get a pic of that this evening.
One question - should I be starting small curing fires yet or misting the dome - I've read both lol |
|
|
|
Post by dirtlover2005 on Jun 30, 2014 19:29:46 GMT
|
|
|
|
Post by dirtlover2005 on Jun 30, 2014 19:30:56 GMT
|
|
rokdok
WFO Team Player
Posts: 130
|
Post by rokdok on Jun 30, 2014 19:43:04 GMT
Looks amazing Andy well built. You've really got on with this build. Re the curing- I am no export but would have thought that with this lovely warm dry weather there is probably plenty of moisture being slowly sucked out of the mortar and bricks as it is.I would leave the curing till later- most people seem to get cracking when they start the curing fires and you might avoid that. I haven't started curing yet but will do next week - the simple reason is that I don't want the hassle of erecting and rejecting the gazebo-it's awkward against the wall and in the flower bed. I'll be sealing the outer dome sat the weekend but I have to say it is looking pretty dry. Cheers Paul
|
|
|
|
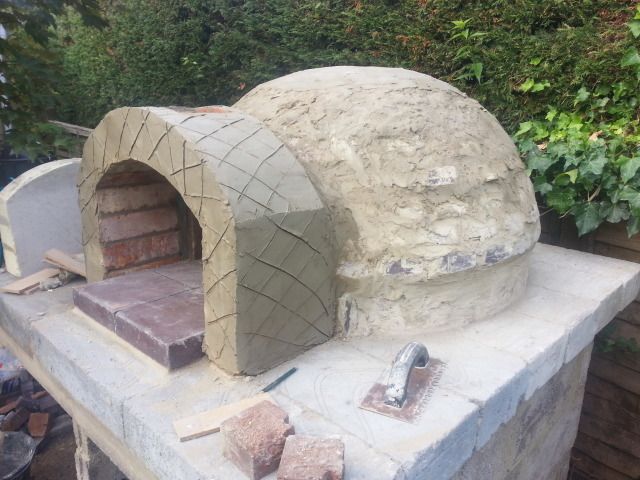
Post by dirtlover2005 on Jul 6, 2014 20:19:53 GMT
Guys I could do with your advice ! Due to space I put a single brick arch - rather than the normal brick and a half. The Chimney hole I have left is 4"x5" on the inside of the arch and 5"x6" on the outer curve of the arch. Originally I wanted a terracotta chimney pot but they all seem a bit big. I have been given some 4" black flue - is this too small? I was thinking maybe some 6" flue inside a chimney pot.
Questions are-
Is the hole in the arch too small?
Should I pull it down and start again?
If the hole is ok is the 4" flue too small?
The oven is 80cm diameter (31")
Sorry for the questions - its just I really don't know how it will work !!
|
|
rokdok
WFO Team Player
Posts: 130
|
Post by rokdok on Jul 6, 2014 22:11:49 GMT
DL, 4 inches would be a bit small for a flue diameter I think. 6'' sounds good - it's the same diameter as mine and I've lit a couple of fires today and the draw is fine on a 90 cm oven. I would be inclined to extend your hole further down the arch on both sides, so that there is then some space for the smoke to gather before it goes up the chimney. . This smoke chamber works well for This is what I have done - I cut some bricks 1" thick to bridge the arch where you've cut. It's difficult to explain but if you take a peek at my build you'll see what I mean. I don't think you should pull it down. RD
|
|
|
|
Post by dirtlover2005 on Jul 7, 2014 21:17:32 GMT
Thanks RD - I'll get busy with the little angle grinder hopefully tomorrow evening and see what can be achieved with a little carefull cutting.
|
|