barney
WFO Team Player

Posts: 119
|
Post by barney on Apr 12, 2013 21:46:37 GMT
So here we go, I'm now a member, I've made my introductions, I've got the discount code from Kilnlinings and have even used the special Jewson account; so it is time to give something back and share my progress on building my WFO in Cambridgeshire. Back in September I bought a new house, my first, on a small estate on the edge of a village. With the land my own I decided to set about constructing my dream of a WFO with worksurfaces and wood store. I had spent a long time designing, redesigning and re-redesigning when a rather serious set of problems with my new house left me with some extremely contrite developers and the offer of considerable help with my build. The first thing they did was to cast me a nice concrete slab for the base, complete with DPM and rebars, in the corner made by my garage and the back of next door's:  They did a really nice job, more professional than I would have (obviously), but not beyond my capabilities I hasten to add.  |
|
barney
WFO Team Player
Posts: 119
|
Post by barney on Apr 12, 2013 21:50:50 GMT
They weren't finished there though. With their offer of help the constraints on costs for the base had gone out of the window and I was frantically rethinking the whole build. In the meantime they had a bricky twiddling his thumbs over Christmas, so the next thing was to get some walls up:  I came back from the in-laws in Italy to find the above in the garden, imagine my joy! |
|
barney
WFO Team Player
Posts: 119
|
Post by barney on Apr 12, 2013 22:01:06 GMT
By now the foreman is even getting interested in what is happening in the garden of this plot and decides to get back to his roots by shuttering up for the top slab. This was done differently to how I might have imagined, with inserts left to make the walls appear to go through the whole slab (a nice touch as you will see later). The whole thing was poured one afternoon when they were doing foundations elsewhere on site, I was at work and had to wait for a few days to even get to see what had happened.  Now it was my turn to get in on the action though. A set of diamond sanding disks made short work of polishing up the side slabs to a glass-like finish, so they're suitable for work surfaces and kneading/working dough.  I didn't even have to use a wet polisher, just made do with a disk sander, a hose and some very thick rubber wellies! If I had poured the concrete I would have added some decorative stone, but you can't look a gift horse in the mouth... |
|
barney
WFO Team Player
Posts: 119
|
Post by barney on Apr 12, 2013 22:11:12 GMT
It's all well and good having someone doing all your hard work for you, but I do want to have some ownership over this oven, so they kindly let me take over the construction. Of course they have to supply the bricks, sand and cement to ensure I get a good match (  ), but it's my turn to try my hand at bricklaying. This is where the problems start, why doesn't anyone on here talk about how frustrating that is? I can't believe anyone would do this for a living! My measurements also turned out to be a little phooey, so the back wall (originally intended to follow that below) became a little bit tricksy:  Worked out OK in the end though and with the boundary walls complete it is starting to look like a serious build.  |
|
barney
WFO Team Player
Posts: 119
|
Post by barney on Apr 12, 2013 22:21:54 GMT
I thought at this point I was getting the hang of lining up tiny components in about seven different dimensions (why isn't it just the same as Lego by now?), but the side walls went up slowly and with a fair bit of cursing whoever invented this crazy system and decided bricks should be so small.  That isn't parallax or some trick of the lens, those walls are as wobbly as a weebil and as square as a pizza! But they are made by my own fair hands, so it's ok, I can put it down to amateur authenticity. Next I need to prepare the oven floor (raised and insulated slab) ready for when the fire bricks eventually arrive (as soon as the budget is sufficiently buoyant) so I can actually start on the fun bit: constructing the oven! |
|
|
|
Post by faz on Apr 13, 2013 7:07:05 GMT
Nice looking build, should be stunning when completed  Something to think about now, before you get too much further - if the slab is cast right up against the side of the house (and I couldn't quite be sure from the pictures) you'll need to have a think about how to stop water getting between the new brickwork and the side of the house, otherwise you might get damp inside. And again this might not be a problem but I can't tell from the pictures, is there a reasonable fall on the counter tops so that rain water can drain away easily. I have a couple of spots on mine where water pools and it is a bit of a pain. |
|
|
|
Post by cannyfradock on Apr 13, 2013 9:21:49 GMT
Barney Lovely bit of work. I also had the same concerns as Faz when I saw it, but looking back over the pics it looks like the bricky's have left a space between your base and the new build. I also noticed poly membrane sticking out from the back of the concrete so they seem to have all bases covered re-damp. Please keep in mind his comments as you go as you don't want any area that may hold water. Can't quite work out what the walls you built will be playing in your set up. Are they to become part of your vault or enclose the vault? Terry p.s....love the polished concrete. Wanted to do that on Rob's build ukwoodfiredovenforum.proboards.com/index.cgi?board=pompeiioven&action=display&thread=677 .....but I thought you had to use a special water fed grinder...couldn't afford to hire one of them. |
|
barney
WFO Team Player
Posts: 119
|
Post by barney on Apr 13, 2013 9:24:26 GMT
Thanks Faz,
There is a good gap between the build and the wall, about 100mm, but I was a bit surprised to see that the guys that laid the bottom slab allowed it to go right up to the wall, well below the DPC, but I worry a bit about what would happen if any movement occurred. They're only garages though, so it's not too concerning.
The fall on the surfaces isn't as good as I had hoped, but the polishing and waterproofing has helped reduce any pooling, I'll probably keep them covered over winter so they don't get too mucky anyway.
Hoping to get it all finished by my birthday at the beginning of June (including the decking it will be set in) so there should be lots more pictures over the next few weeks.
|
|
barney
WFO Team Player
Posts: 119
|
Post by barney on Apr 13, 2013 9:36:44 GMT
Hi Terry,
Thanks for the comments. The walls will just be enclosing the vault and holding all the insulation in, with a nice little roof over the top hopefully. All will become clear...
I also couldn't afford a water fed grinder, and I'm glad I didn't bother because it took a while to do and so was nice that I didn't have to rush it all to get the tools back in time. I bought a Silverline variable speed sander for less than the cost of hiring a water fed one, thinking if I got just this job out of it I would be quids in, and it is still going strong so I'm happy. You do need to be able to set a low speed (about 2,000 RPM) so a grinder is out of the question. I just alternated between hosing down the surface (as much to remove the grit as anything) and sanding it down wet; probably a little bit risky in terms of electric and water, but I had no problems. The main trick is to really get the majority done with the coarse grit, the finer ones take progressively less and less off as they polish. I've got loads of wear left on the finer grits of the set, though I did use up the coarse one on this, smallish, job so get extra if it is a big area. Some suggest casting on a surface which is as smooth as possible to start with, but there was no way I was casting this outside and trying to turn it over and lift it on!
The finish is fantastic and really worth the effort, though you do get absolutely filthy in the process!
|
|
barney
WFO Team Player
Posts: 119
|
Post by barney on Apr 13, 2013 22:05:44 GMT
So today, in unusually warm sunshine, I managed to complete the base for my oven by adding a raised slab under-filled with vermiculite insulation.  Hopefully that will keep the hearth of my oven hot while protecting the reinforced concrete slab from excessive heat, which would cause the steel bars inside it to expand and lead to all sorts of disaster. Last section of 900mm pressed concrete paving slab in and vermiculite brushed into all the edges and I'm ready to start constructing the vault on top as soon as the fire bricks and cement get here.  But first my daughter wanted to test it for structural integrity (I think she believes it is going to be some kind of super-wendy-house).  Wood store is already cluttered... |
|
barney
WFO Team Player
Posts: 119
|
Post by barney on Apr 23, 2013 9:54:17 GMT
I am currently experiencing that strange mix of frustration/impatience/anticipation (which I have sensed in other build posts) as the 5-7 day delivery time from Kilnlinings seems to stretch into infinity.
I have an overwhelming desire to start a fire and, as yet, no oven to start it in. Trawling these boards and watching videos of people cooking pizza is only compounding my agitation.
Roll on Friday! (current weather forecast: bad)
|
|
barney
WFO Team Player
Posts: 119
|
Post by barney on Apr 29, 2013 11:17:31 GMT
So after a slightly frustrating wait and 'wasted' day on Friday waiting for my delivery from Kilnlinings (personal call from Liam to apologise that their courier was useless), I finally got on with the construction of the main part of my oven this weekend. I started off by building the back wall and laying out the floor, mortaring down the outside edge bricks to prevent any movement later:  Next it was time to get some supporting walls up for the main arches and my form in place:  With no little trepidation I began constructing an overlapping joint arch for the main oven. My calculations were a little off (mental note: the circumference of the incircle of a polygon is considerably smaller than the sum of the polygon's sides), which is why I have an odd half brick in the centre. No one will know once it's all together, as long as it stays up.  Weather wasn't particularly kind either with showers coming and going, which is why it is well covered. Middle arch and chimney area were next up, once I had sorted out my sizes using this handy calculator so that I didn't end up with odd numbers of bricks again.  And then, after much jiggling and cursing, a reasonably even front arch which, being all that will be seen eventually, had to be of an acceptable standard. I think I almost managed it...  Was hoping to fill in all the gaps with home brew mortar, plug some of the holes with custom cut infills and get the chimney sorted as well this weekend, but now realising that was a little optimistic in the timeframe. Now I have to look at it for a week until I can get the time to work on it again! |
|
|
|
Post by turkey on Apr 29, 2013 14:19:27 GMT
looks very good especially the front arch, very even brick spacing.
fingers crossed the weather is good for you so you can continue the good work.
|
|
barney
WFO Team Player
Posts: 119
|
Post by barney on May 6, 2013 21:39:17 GMT
Nothing like a sunny bank holiday weekend for getting some progress on the WFO build! First off there was filling in all the joins and getting the front up to hide the dodgy work going on behind: 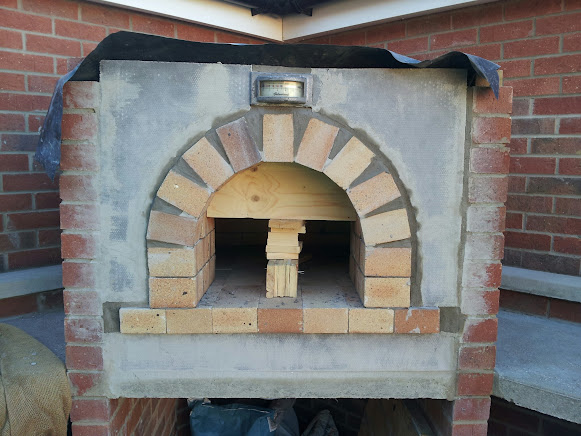 Here's a close up of the retro temperature gauge I found on a old choke furnace at work, yes that is 1,000 degrees centigrade max temperature, not sure how accurate it is, but it looks great!  The flue was on next and a quick coat of paint to hide the fact the front is mostly made out of a dodgily carved up paving slab.  Even I'm starting to think it is looking quite smart. With everything in place it is time for the WFO forum 'money-shot':  It's turned out a little taller and thinner than I expected, only time will tell what impact this has on the burn. Speaking of which I had just enough time left on Monday evening for a curing fire which hopefully even Terry would think was suitably restrained.  The heat transferred nicely through the brickwork over about an hour and a half and the chimney functioned well. I moved it around a bit to spread the heat which was well retained in the bricks even from this small burn. A couple more of those and I'll be able to get the insulation in, roof on and start cooking! |
|
barney
WFO Team Player
Posts: 119
|
Post by barney on May 17, 2013 10:30:21 GMT
The most well insulated loft on the estate:  Filled the whole roof space and down the sides of the oven with loose vermiculite and now just finishing off the roof with some tiles a friend gave me and hoping for a proper firing this weekend, if the weather is kind enough. More pics to follow shortly. |
|


 ), but it's my turn to try my hand at bricklaying. This is where the problems start, why doesn't anyone on here talk about how frustrating that is? I can't believe anyone would do this for a living!


