|
|
Post by pjm5755 on Sept 22, 2013 20:14:24 GMT
I used to regularly visit the Forum to get ideas on building an oven, and had the objective of building one myself. This idea all started when at my wife's parents near Naples over 20 years ago, and seeing the way pizza were made, cooked, and tasted. Each year I said I would do something and finally did it last year and the Forum was a great inspiration. With all this though, I do feel guilty of not sending in regular reports, photos and updating on progress on my Pompeii oven construction that completed around a year ago. My concern was that it might all fail, the oven wouldn't get hot enough, or it might just end falling to bits, so I just went ahead and built it over a few months and didn't share it with you all. I'm pleased to say, it works, and cooking pizza is a great social experience with friends and family. Its so cheap and really enjoyable. My oven probably cost about £300 or less, its about 0.9m internal diameter, but I did have a load of second hand bricks for the lower platform and bought cement, sand, second hand engineering bricks for the dome, vermiculite and used quarry tiles. I'm sure some will offer criticism, but it doesn't have a ceramic blanket. Through all this, I have to say I'm not a builder or have ever laid bricks, but have attached a couple of pictures to show what is possible by anyone. I've attached a photo of one of the cooked pizza, the finished oven and a photo inside, but would be pleased to share some experiences, for example, to make forming the dome arch, or placing the vermiculite quite easy, well it was for me and might help others. Just let me know if anyone would find this useful and I can add photos of the build. Just not sure if the ones I have uploaded are on this message! They didn't!!! Attachments:
|
|
|
|
Post by cannyfradock on Sept 22, 2013 22:18:21 GMT
Hello PJM.. We did get 1 picture.....and a very good picture it is. Have a look through this thread which explains how to upload pictures or multiple images on the forum... ukwoodfiredovenforum.proboards.com/index.cgi?board=uploadingimages Your not on your own in not putting the correct insulation over or under the oven dome. My first guess.....and it was a guess, at building a wood-fired oven was the oven that is still in my back yard  ...very picturesque...but pretty crap in design. Not enough under hearth insulation and not enough insulation over the brick dome. I think I'm the only member on the forum with a pizza oven in my back yard, that actually don't get to use it. I knew no better at the time so I created the first UK forum for wood-fired oven enthusiasts in the hope that a few members may join so I could pinch their experience and knowledge and learn more on a subject that I find fascinating. Through the old forum....and now this forum I have gained enough knowledge, that I can now pass on advice to others and have built about a good dozen wood-fired ovens up and down the country for various people and community projects......I still have a crap oven in my own back-yard...a re-build is well overdue. You mention about not wanting to post any setbacks or failures whilst building your oven....not many people do this...but, and it's a big but...when people have posted setbacks and also posted pictures.....these type of posts get the biggest response and the most support in the way of advice. These type of posts in my opinion are far more informative to newbies wanting to build their own oven than the perfect builds which are equally as informative as a guide. Please feel free to post any pics of your build......the good, the bad and the ugly.....the initial aim of the forum is to assist any budding wood-fired oven enthusiast in sourcing materials and building his/her own "Bread oven". Of course there are many other subjects discussed on the forum and very often the members will go off on their own tangent and create threads which are outside my expertise...but equally interesting to follow. Welcome aboard.... Terry n.b.....PJM....if you have a blog or you tube vid you can add this to your signature (click on "profile" and follow instructions) |
|
kipper
WFO Team Player

Posts: 125
|
Post by kipper on Sept 22, 2013 22:18:56 GMT
nice oven pjm.I for one would like to see more pictures of the construction.I find it fascinating to see the different methods and outcome.that pizza looks delicious.can't wait to get mine finished.
|
|
|
|
Post by bookemdanno on Sept 23, 2013 12:36:43 GMT
Hey Pjm, if you have the time to post it i'd love to see more photos and a brief rundown of how your build went and your solutions to the problems you had. I certainly do not want this forum to have the feel of being "elitist" or not being responsive to those in need of help. We're here for all who want to build an oven, regardless of their skills level and the little "fails" or troubles that people have are a learning experience for all of us. Opening oneself up to constructive critique by starting an build thread is a massive step, but also so very helpful as there's such a wealth of knowledge on here, which is all self learned. We have a lot of members, and even more lurking behind the scenes, and i'd like to see more popping out to introduce themselves and "bare all" in build threads, etc!  You look like you've created a perfect little pizza oven there, as i see pizza, and a nicely cooked one to boot! Well done! |
|
|
|
Post by pjm5755 on Sept 23, 2013 21:40:53 GMT
Thanks for the comments and I will send some photos of the build, but unfortunately it only seems to allow one photo per reply when from my pc, unless I upload to photo bucket or something like it. Am I doing something wrong with the photos from my laptop, or it just restricted to one at a time? Paul Attachments:
|
|
|
|
Post by Gaelceltic on Sept 24, 2013 1:03:12 GMT
Oven and pizza both look fantastic Paul, well done.
|
|
|
|
Post by bookemdanno on Sept 24, 2013 12:11:11 GMT
That is a fantastic piece of work there Paul, very well done!! and you said you never laid a brick before...yeah...right! |
|
|
|
Post by cannyfradock on Sept 24, 2013 18:50:32 GMT
Paul
Nice photo....love the finish.
The way to post multiple pictures o the same thread is to use the "image icon"...just above the angry smiley. Your correct in saying that you have to post the pictures on photo bucket or any free image hosting site...I use "image shack". If you click on the image icon on this site this.. [img][/img] will appear......go to where you have uploaded your pictures and right click on the picture...left click on the "image url" option....return to this forum and make sure the cursor is blinking between the 2 img brackets.....right click and choose the paste option.
Click the preview button at the foot of the post to see if it has worked. If the images are too large then it will make the text dissapear....if so simply re-size them smaller.
If this works you can post as many pics as you want in the same post...just keep it real.
Never be pressured into posting pics......we love seeing them, but it's entirely up to you.
Terry
|
|
|
|
Post by pjm5755 on Sept 24, 2013 19:14:48 GMT
Like most people, I had ideas in my head on the oven, but just wanted to be sure of its size, so did a dry run with bricks on the patio - hopefully the picture will upload. I did produce some sketch drawings that I may even copy, but quite rough and penned on a long train journey to kill some time! The base was excavated, concreted using a borrowed mixer, then the big challenge, could I lay the bricks as I have never done any before. Started with engineering bricks and even put in a dpc on second course. Just hope pictures upload, here goes Paul [ 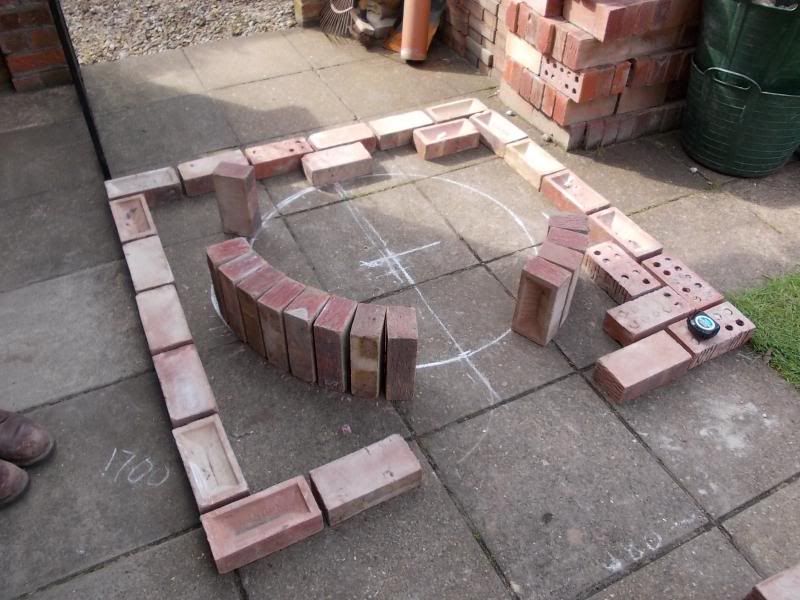 i 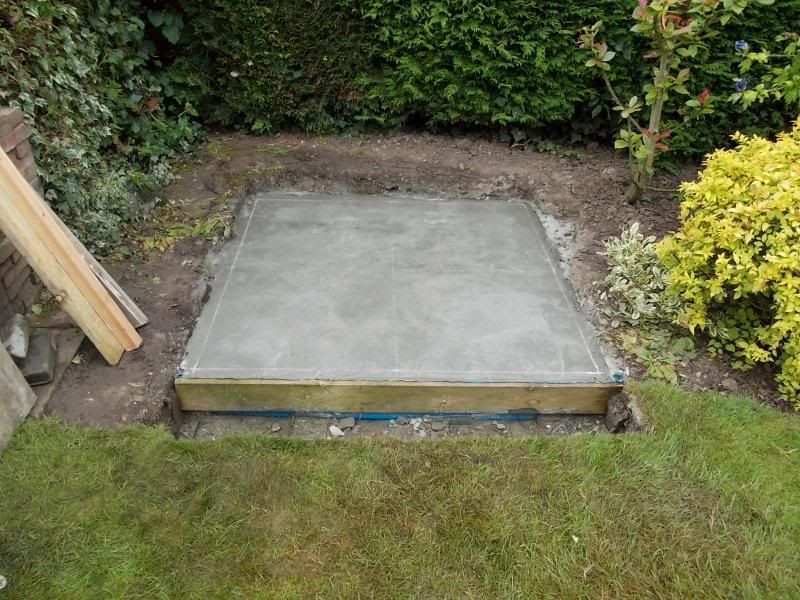 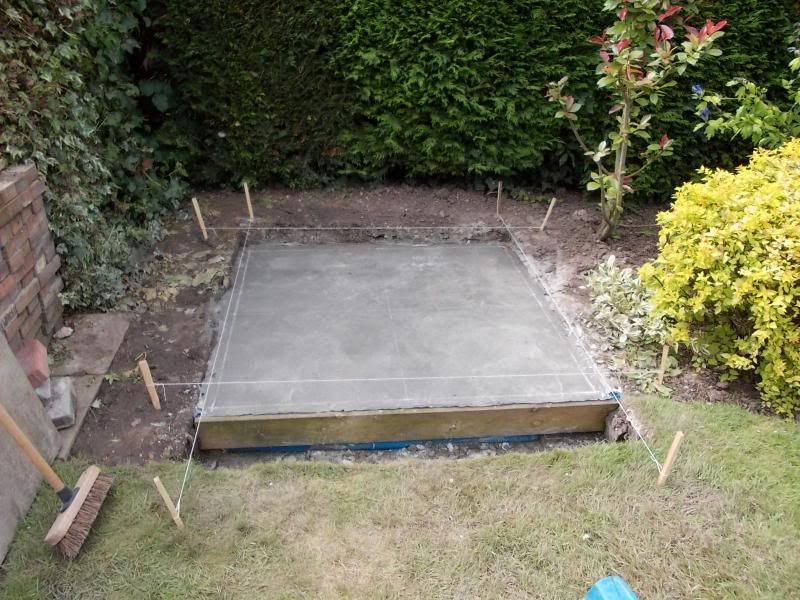 i 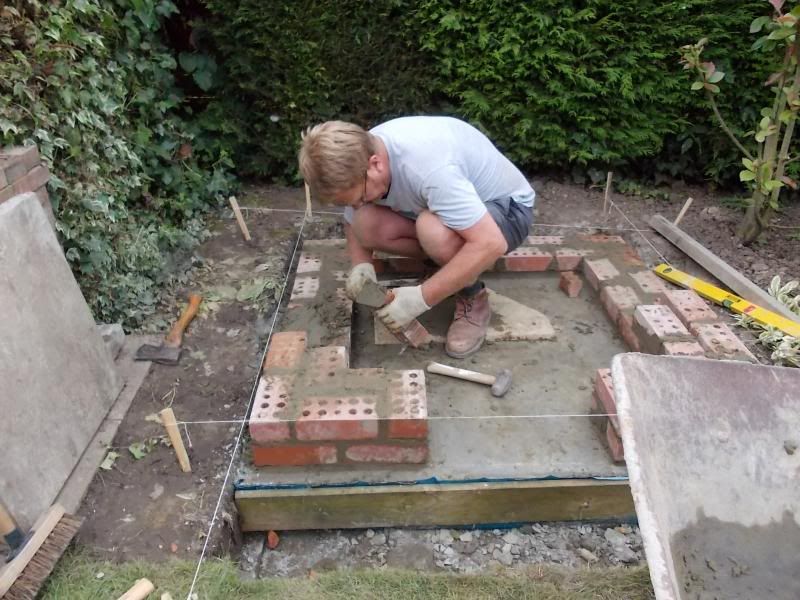 mg] |
|
|
|
Post by pjm5755 on Sept 24, 2013 19:42:12 GMT
oops, something wrong with the photos, they are too big, or what?
|
|
|
|
Post by cannyfradock on Sept 24, 2013 20:46:01 GMT
Pjm ....nothing wrong with pictures. There's a couple of letters sticking out from the side of the pictures...  but they're fine. Any larger and i wouldn't be able to read what you have written. Interesting build photos Paul.......keep em comin. Terry |
|
|
|
Post by pjm5755 on Sept 25, 2013 17:55:08 GMT
I'm not sure why but I said the internal diameter is 0.9m, its not, its 30", about 760mm, but still a suitable size for a pizza. Anyway, with the base in and the first few courses of bricks laid, I dry laid the bricks for the arch to see what size it should be and then cut some board to the right size and made a former. The same size was used for the arch to the oven, but the one at the bottom is my wood and log store. Once the arch was in, the brickwork continued up to the level I wanted to have the oven platform, so the first half of the build is just to support the oven. I took my time and laid the bricks carefully to try and keep it reasonably tidy, although its all a beginner and amateur build. I didn't want to put up all the temporary works and formwork for the platform, so fitted a pre-cast concrete lintel and then cut four 50mm thick 600mm square paving slabs for the platform. They only required slight trimming and are supported by the inner course of bricks and the lintel. Most of the weight of the oven is around the perimeter, where the slabs are well support by the brickwork and only have one edge of each paving unsupported. It all sound very quick progress in this text, but it took its time with a bit of work each evening or at week-ends. More to follow. Paul [ 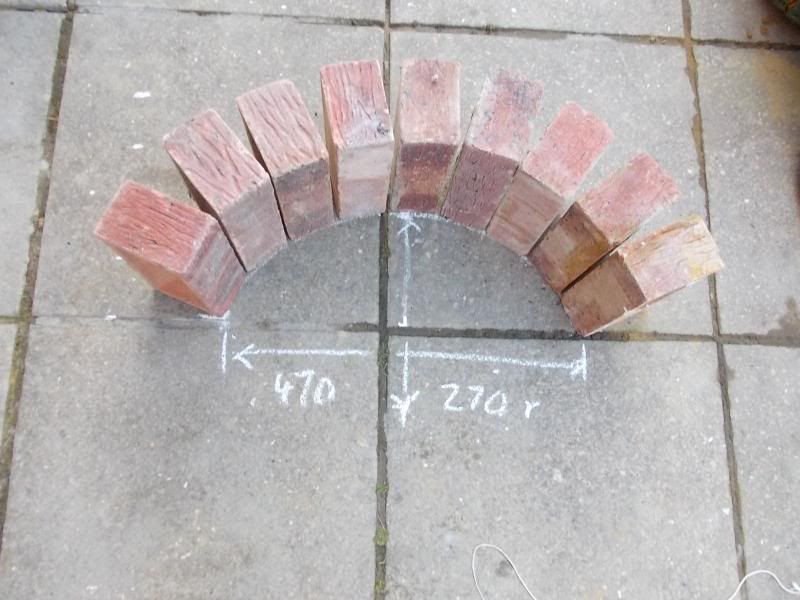 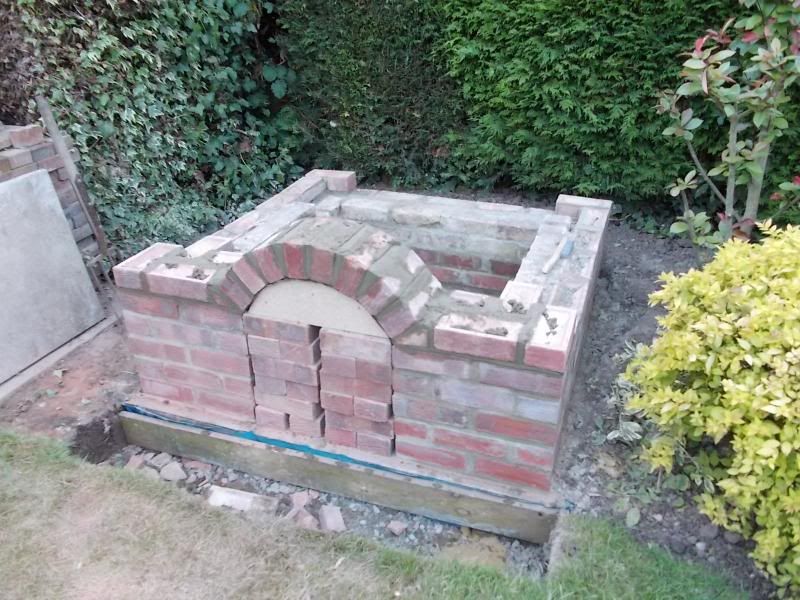  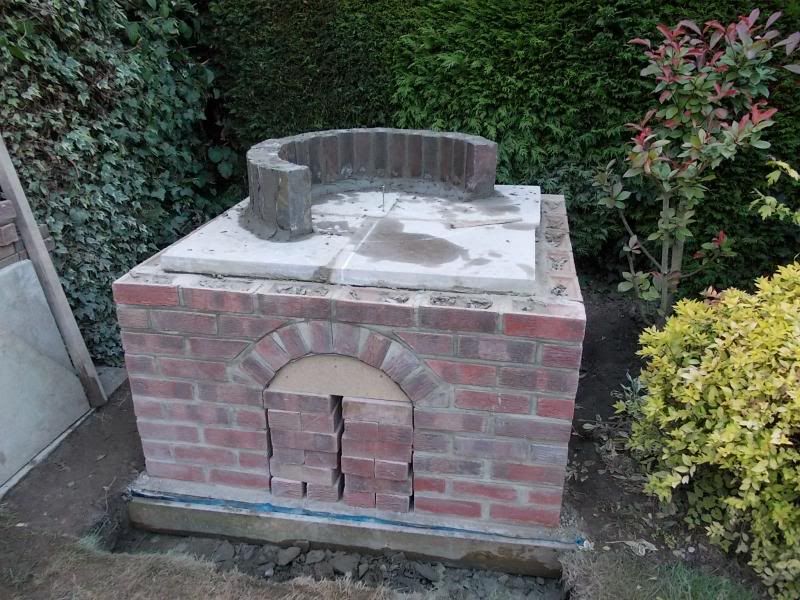 |
|
|
|
Post by pjm5755 on Sept 26, 2013 19:57:44 GMT
With the concrete slabs laid, the first course the oven bricks were laid in header layout to get the smooth radius. They are Blue engineering bricks second hand from the reclaim yard as were the slabs and quarry tiles for the floor of the oven, or whatever the technical term for it...hearth?. I bought the vermiculite from Jewsons through the Forum deal, although when I went back to get a third bag that the put on the quoted, they said they were losing money on the price and charged the full amount. I wanted some powdered clay, but they said the couldn't get it, so it was built with sand, cement and lime mortar - it hasn't fallen down .......yet! At the front of the oven I laid bricks as it increased in height for the front opening and arch. The bricks for the courses in the oven as they formed the dome was through the use of a simple piece of wood hinged at the bottom and fixed with one screw to allow it to rotate, with it all fixed to a big concrete block to keep it in position. On the slab base, a 100mm layer of vermiculite and cement mix was laid inside the dome to keep it insulated and the heat on the quarry tiles, which seems to work. Incidentally, I didn't find mixing and placing the vermiculite a problem, even on the outside of the finished dome, where there is about 100mm layer. I just filled a rhino bucket / trug (?) about 2/3 full, then add a scoop of cement and just pass the mixture from one bucket to another until mixed and having added water to make it wettish but not sloppy. The base was easy, but the outer part of the dome was placed by a handful (in rubber gloves)and place it in layers not too thick, say 50mm thick each handful. Once dried and a day or so later, the next layer, and so on. I'll add photos later of the vermiculite on the dome, but it wasn't difficult if patient. For the base of the oven, the quarry tiles were laid with a cut edge gap of about 5mm from the bricks to try and prevent any cracking or lifting as they expand when hot. Anyway, I hope this story is not too slow, or fast, and of interest. Paul 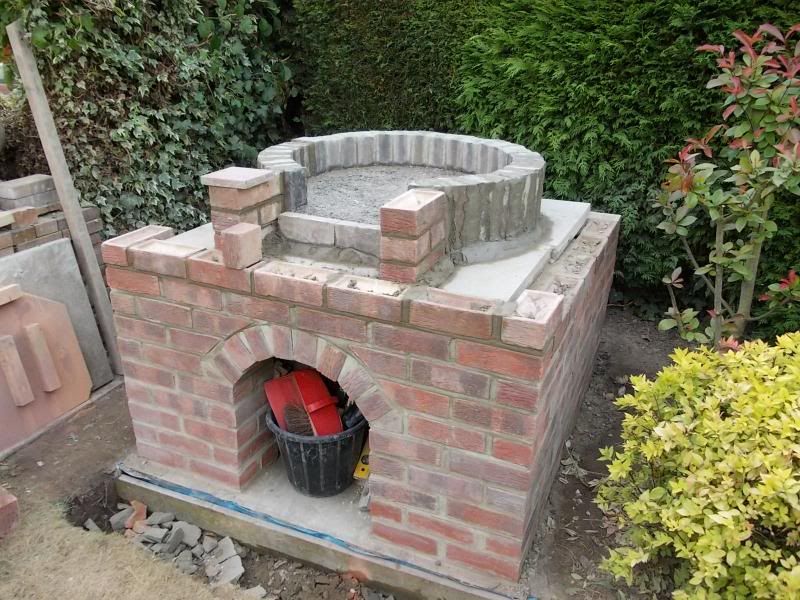 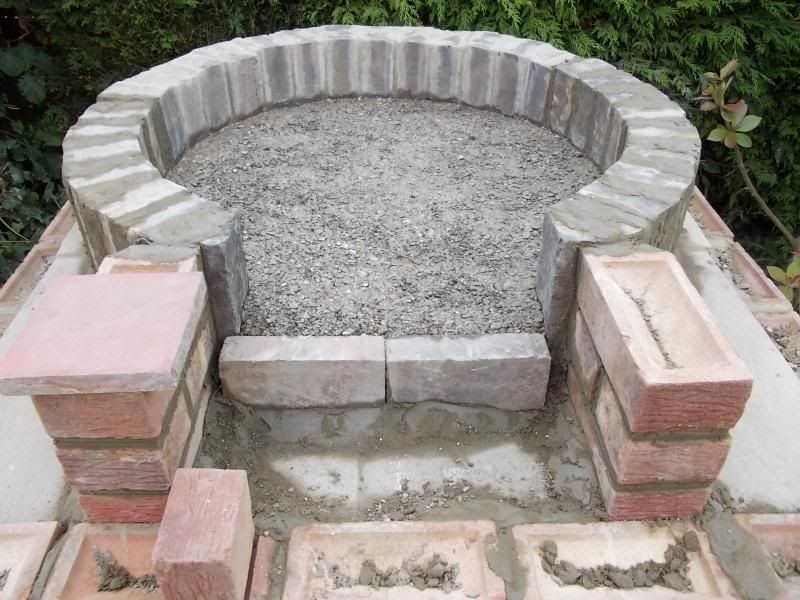 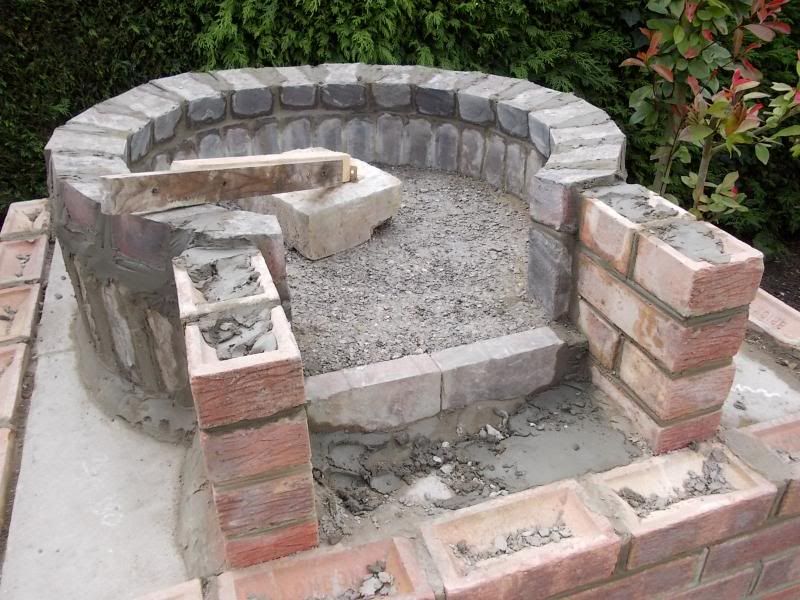 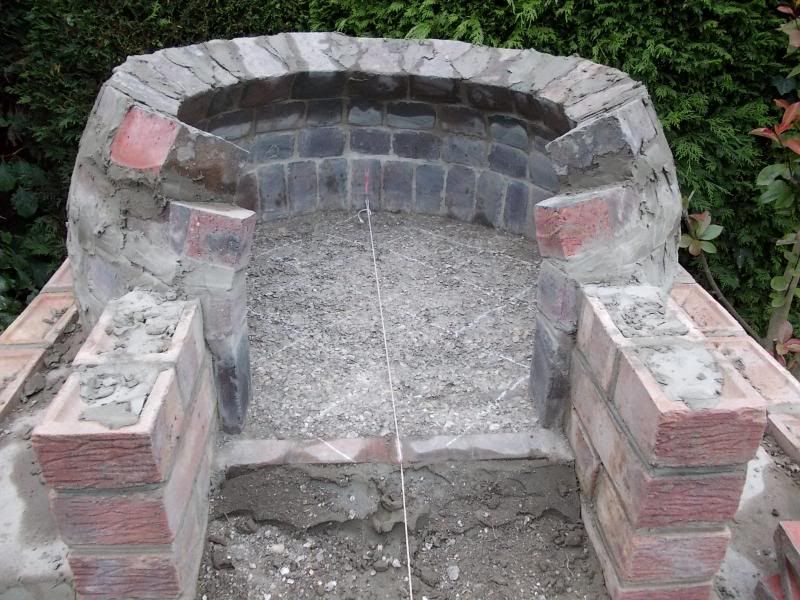 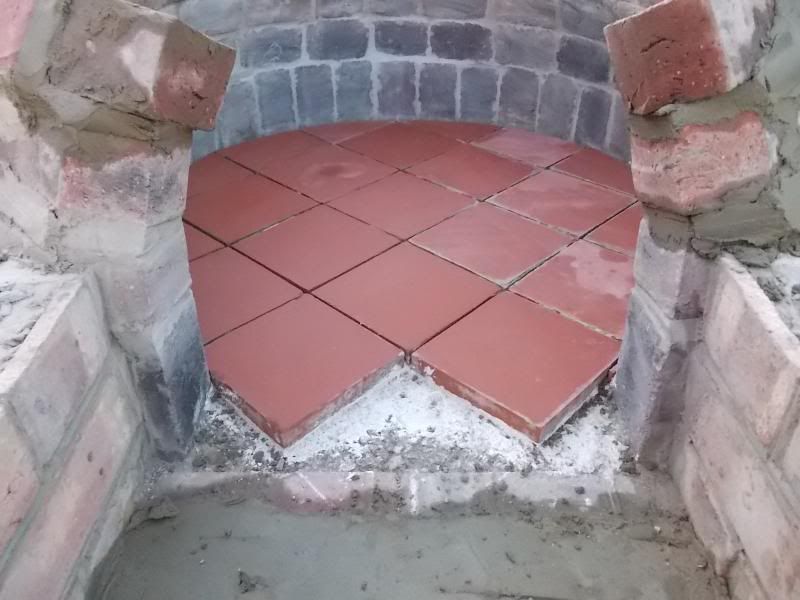 |
|
|
|
Post by pjm5755 on Sept 26, 2013 20:09:32 GMT
One of my earlier posts has photos in a line making it a wide page. Can anyone move or delete them to stop the page being so wide from that point onwards?
Paul
|
|
|
|
Post by cannyfradock on Sept 26, 2013 21:20:48 GMT
Paul...
... "Anyway, I hope this story is not too slow, or fast, and of interest"
Your thread is not slow...or fast and yes...it's interesting.
Although most builds follow the same theme, not one of them is the same.....yours also is individual. I always build my internal arch first , then build the dome rings into it....others like yourself do the opposite. Every different avenue of getting the dome/arch transition to work.......works, whichever way you go about it.
Nice to see you've used the old fashioned quarry tiles as an alternative to a fire-brick hearth. Some members have had problems using the new style quarry tiles, but they are only about 15mm thick. The old quarry tiles are about 25mm thick which gives them a much better chance of working under intense heat.
Sorry about the Jewsons deal. I am dragging my feet a little in sorting out a new deal with them. (if they don't give us a trade deal equivalent to the best trade deal for major players, then I'll get a better deal from another nationwide supplier).
Can't see any problem with your previous pics......they're a bit large, but still work within the pixel requirements of this forum. Please quote the post number (#) within that thread and which picture within that post......maybe I can help...I doubt it, as I'm pretty naff with pixels and things, but maybe a Mod can help if you still think it's a problem.
Don't forget that your dome rings go slightly out of a perfect circle to make the dome transition.
Terry
|
|


 but they're fine. Any larger and i wouldn't be able to read what you have written.


