rokdok
WFO Team Player

Posts: 130
|
Post by rokdok on May 21, 2014 20:48:36 GMT
Darrell, As Docfester said. I used a T-hinge for mine which was loosely bolted to a piece of hardboard to fit inside the hearth. Where I differed, I think from Docfester is that I made the piece of wood that is screwed onto the hinge a bit longer so that it went the entire width of the brick that it was being held against. The bit of timber screwed underneath and across it marked the internal width of the oven. This meant that you could loosely put your brick in place on the mortar, put the IT on it and when you tapped the top of it with a mallet you then got the exact angle that the brick should tip towards the middle at and also when you tapped the outside of the brick inwards against the IT it was at the exact radius. I hope this makes sense. Cheers RD Heres a not very good pic of it. 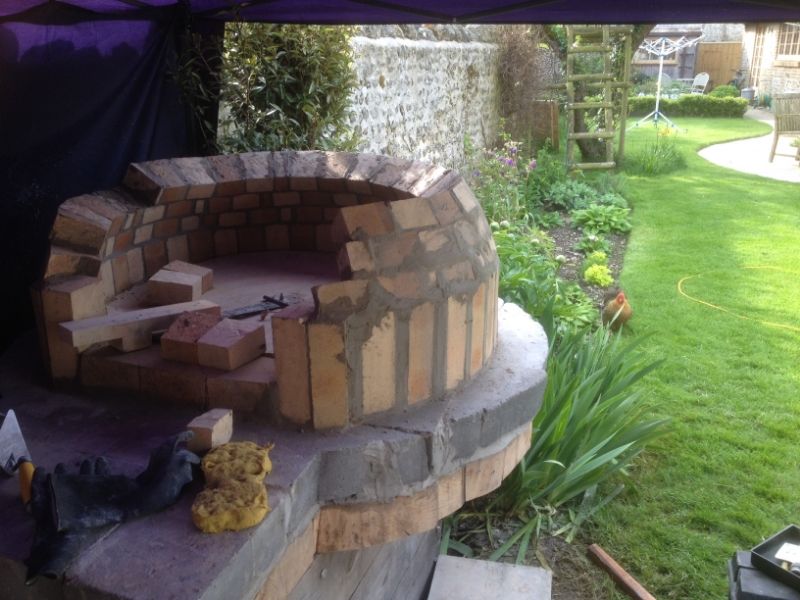 |
|
Bo
valid member
Posts: 75
|
Post by Bo on May 22, 2014 8:21:45 GMT
Mine was very similar to yours Rokdok, it worked brilliantly. I was surprised at how well my dome turned out!!
|
|
|
|
Post by darrellme on May 22, 2014 8:47:51 GMT
Great advice, many thanks :-)
|
|
|
|
Post by darrellme on May 23, 2014 16:54:47 GMT
oh, I just realised I'd asked about whether I should level a slight dip in the middle of the hearth to get it as near to flat as possible before building the oven dome on it, any thoughts, I've attached a couple of pictures   My firebricks arrived the other day so I can start building the dome as soon as the weather lets up a bit, very excited......I wasn't when they delivered it and expected I would have a forklift, when they realised I hadn't they literally just dumped the pallet in the middle of our drive so I had to carry all of them by hand, now that was hard work haha |
|
|
|
Post by docfester on May 23, 2014 20:54:20 GMT
Hi Darrell,
That really depends on how you are going to insulate the hearth, if you are adding a layer of thermo blocks I'm sure the dip could be ironed out when they are mortared down but remember to start with an outside brick (high point) and use that as a level base for the entire hearth. The firebrick base needs to be as level as possible to get a nice close join for each brick.
I'm no perfectionist and personally wouldn't worry too much. Hope you dodge the showers this weekend and look forward to seeing more build shots.
btw Same thing happened with my firebrick delivery and swear the bricks got heavier towards the bottom of the pile!!
Pete
|
|
|
|
Post by darrellme on May 23, 2014 21:01:03 GMT
I'm using the silicate board from kiln linings which is about 2.5" thick, wrapped in foil and then the bricks placed on top. I guess I could always try it out and see whats it sits like, i.e. cut the board and the bricks and put them on the hearth to see what happens :-)
|
|
|
|
Post by darrellme on Jun 2, 2014 13:09:53 GMT
Anyone know of a good place to get some fireclay, it appears to be like rocking horse poo
|
|
Bo
valid member
Posts: 75
|
Post by Bo on Jun 2, 2014 16:10:14 GMT
Jewson's got some in for me. Kiln linings also do it.
|
|
|
|
Post by docfester on Jun 2, 2014 21:39:28 GMT
Don't like to admit it but I have a bag and a half of fireclay left over from my build.... along with vermiculite, roll of insulation blanket etc etc. Think I over estimated my build!
Pete
|
|
|
|
Post by darrellme on Jun 3, 2014 21:16:23 GMT
Hahaha, nice going Pete, I'd probably be the same, however I'd be (potentially) willing to take the fireclay and insulation blanket off your hands, just depends on where you are really as it would obviously be cheaper to collect in person. Let us know what you'd want for them and where you are and we might be able to sort something out :-)
|
|
|
|
Post by docfester on Jun 4, 2014 6:01:44 GMT
PM sent Darrell.
|
|
|
|
Post by darrellme on Jun 15, 2014 16:02:46 GMT
Finally managed to get some time to work on the pizza oven this weekend so thought I'd give an update and also try and milk some information from people :-) Heres the laid out floor with the template used to mark the bricks  Here's the layout of the floor after cutting the bricks. I can't recommend getting a 255mm evolution mitre saw with a diamond blade, went through these bad boys like they were butter. I tried doing some of the first cuts (on the right of the picture) with a 9" angle grinder but it just didn't seem half as quick and accurate as the mitre saw. The curved cuts got better as I went round from right to left working out the best way of getting the angle done. Man those bricks produce a lot of dust even after soaking  So, here's a question or three 1) I'm using calcium silicate board, 2" thick, should this be wide enough for the entire dome to sit on and not just the oven floor ? or can I simply cut it to the shape of the oven floor and have the soldier course of bricks starting from the hearth (with no insulation underneath them ? 2) If the soldier course of bricks don't sit flush against the sides of the oven floor, is this a problem and would I simply use some homebrew to fill in the gaps ? I think thats it for now :-) D |
|
|
|
Post by cannyfradock on Jun 15, 2014 18:40:36 GMT
Darrell
When I build a Pompeii oven I always lay my first ring course, then lay the hearth bricks up to the circle. I lay a herringbone pattern within the first ring, then cut my fire-bricks to fit the gaps. I make mostly straight cuts, but sometimes I make 2 straight cuts on the same brick if the length of the brick must be cut. This leaves a gap of between 5 and 15mm which I fill....and force into the gap with semi-dried homebrew left over from laying my first ring course....if that makes sense. A birds eye view of the hearth will see the somewhat uneven line of the outer circle of the hearth, but when you peer into the oven after completion...or even after the first couple of dome rings are laid, the outer circle of the hearth always looks as if it's been precisely cut.
Some members lay dome on top of hearth bricks but I find it's easier to lay the hearth....up to the outer first ring. Regardless of method, the underhearth insulation should go to the extremities of the circle.
I've already answered your 2nd question......use homebrew to fill the gaps. If you get a good homebrew mix it will have the same refractory values of the 42% alumina content fire-bricks......or near as damn it.
Terry
|
|
rokdok
WFO Team Player
Posts: 130
|
Post by rokdok on Jun 16, 2014 14:41:02 GMT
Darrell, I did mine a bit different to Terry, as like you I'd already cut my hearth bricks to shape. I laid the hearth bricks first and then laid the first ring abutting them up to the hearth, If you do this rather than Terry's way you will end up with a slightly larger oven than you anticipated as you will need to mortar the first ring up to the hearth. If you've got plenty of insulation board I don't think it would do any harm to extend it to lay the first ring on. This would mean that the dome is insulated from the bottom as well as the outside too. It's great that everyone's builds are so different. Are you going to lay a soldier/ sailor course or flat 1/2 bricks for the first ring ?? Cheers Paul
|
|
|
|
Post by darrellme on Jun 19, 2014 8:03:41 GMT
I had to look up the soldier sailor reference as I had no idea what it meant haha. I'm planning on setting the first course as a half brick on its edge and as you mention butt them up to the hearth. I don't think that the mortar will be that thick to make much difference to the dome size to be honest so it should be all good.
I'll confess I had already cut the insulation board before posting my question and had failed to take into account the dome part.....that was an expensive mistake as it meant I had to order some new board from Liam, oh well, lesson learnt I guess/hope.
D
|
|


