|
|
Post by h12rpo on Aug 15, 2012 11:29:44 GMT
Looking at some of the builds on here I notice an ingenious rotational type of tool for determining the dome angle of each course of bricks - Is there some guide on how this is constructed?
Terry seems to use a different (cardboard?) type of former/guide which has an advantage of providing some support I guess, but I havent seen anyone using a dome of wet sand which could be simply dug out afterwards? Anyone tried that?
|
|
|
|
Post by Fat Bob on Aug 15, 2012 11:35:16 GMT
Yup did it that way and used small terracota tiles putting the fore edges together and letting the rear fan out.
|
|
|
|
Post by faz on Aug 15, 2012 11:44:33 GMT
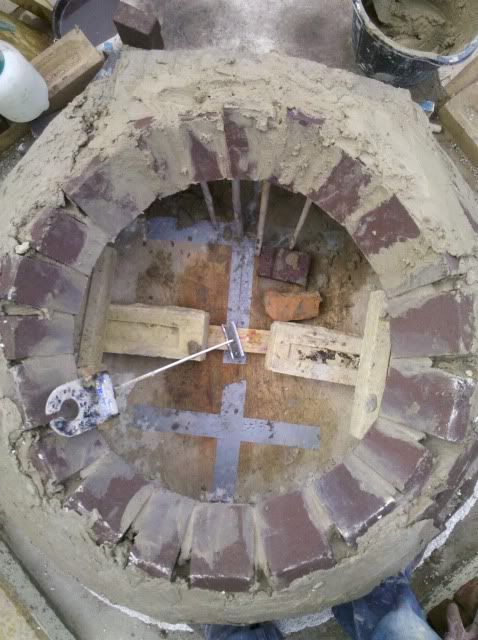
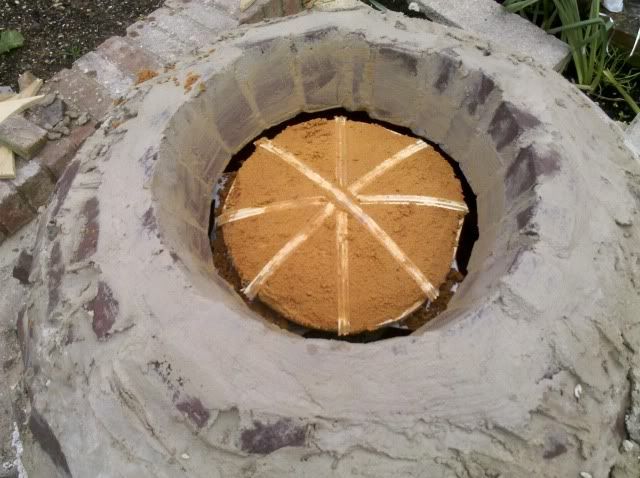
This is my experience, and others will probably chip in. The indispensable tool (ie. the ingenious rotational tool) consists of a hinged bar which is able to rotate, with a piece at the end that allows you to align the brick in an identical fashion all the way round the dome. Mine consisted of a hinge with one screw securing it to the exact centre of the floor (well actually a piece of wood located in the centre). The other side of the screw had a threaded rod bolted on to it, which had an L shaped piece of metal at the other end. The picture below is an overhead view of the tool with the dome half finished.  [edit] it is very very important that the rod used is aligned with the vertical centre of the brick in order to eliminate any steps or overlap between each of the chains. This requires the L shaped end to be half the height of a full brick. [edit] it is very very important that the rod used is aligned with the vertical centre of the brick in order to eliminate any steps or overlap between each of the chains. This requires the L shaped end to be half the height of a full brick.The IT is great for roughly 2/3 to 3/4 of the full height of the dome, as the homebrew mortar quite quickly sticks each brick in place, meaning that the tool does not need to support the brick in position for too long. After that height, either small lengths of bamboo or timber (see also the picture above) can be used to keep the bricks in position, or you can use a former. I used a former for the last few chains on my dome, but found it much more difficult to keep the inside of the brickwork free from excessive mortar, although it is fairly easy to scrape this off with the former removed, even 24 hours later, as it takes a while to fully cure. My former is shown below - very patriotic!  Full sand formers get used for clay ovens but I don't think I have seen one for a brick oven. |
|
|
|
Post by h12rpo on Aug 15, 2012 14:08:04 GMT
Yup did it that way and used small terracota tiles putting the fore edges together and letting the rear fan out. @ Bob, can you elaborate on this? any pics to help me understand what yr saying? @ Faz, are there any posts on how to make indispensable tool I can be pointed to? |
|
|
|
Post by tonyb on Aug 15, 2012 22:09:13 GMT
Like Faz my IT was a bit of a Heath Robinson contraption as well, comprising of hinge, piece of25mm x 25mm dowel and a few couple of right angle brackets. It was really just a case of finding something to use as a pivot (the hinge) something to maintain constant (or nearly constant) radius the dowel and something to align the brick (right angle brackets). It doesn't need to be perfect, just near enough.
The main advantage of using the IT is that you can clean the inside of the dome as you go along.
If you go the blog I did (address below) there are some pictures of my interpretation of the IT tool on the first page of the WFO Construction gallery.
|
|
|
|
Post by Fat Bob on Aug 15, 2012 23:38:28 GMT
I ain't got pics, but you make a circle with square or oblong objects by putting the smaller edges around a circle. The objects fan out at the rear.
I'll draw it for you if you cannot get the idea.
Duh after writing this my poxy conection showed Faz's pic that show the fanned out bricks - tho he isn't doing it around a dome of sand.
These guys are building perfect ovens it isn't necessary to have perfection - see my Fete du Pain pics.
|
|
|
|
Post by turkey on Aug 16, 2012 10:17:31 GMT
just remember the base you attach the tool to is thin enough to be able to come out of the door or it will be a task or cutting / burning it out.
mine was made using part of the concrete former as the base (old wardrobe door) cut to look like a plaster, rounded at the ends but thin so it would slide out the door, rotated 90 degrees in the oven so it was secure and would not move, I used a gate style hinge loosely screwed onto the base so it would twist and the hinge itself does the elevation. The rod was an off cut of decking I had used to prop the underside of my concrete former with a cheap L metal bracket screwed to the end.
I found the main aim for me was to line the brick up manually and then with the angle from the top part of the L I could see how far it needed to lean inwards to continue the correct dome profile, as mentioned the homebrew mortar is sticky so it was fine, for the last few rings I used some celotex insulation I had used as the arch formers, cut to the dome profile and thin like batons, with the curved end it made it easy to get the right support for any of the brick rings near the top. These held the bricks well as I went round and by the time I finished the ring the bricks where self supporting ish and just left a few supports in bridged between two bricks to keep it all secure.
|
|