|
|
Post by lemonsouffle on Nov 18, 2012 22:56:46 GMT
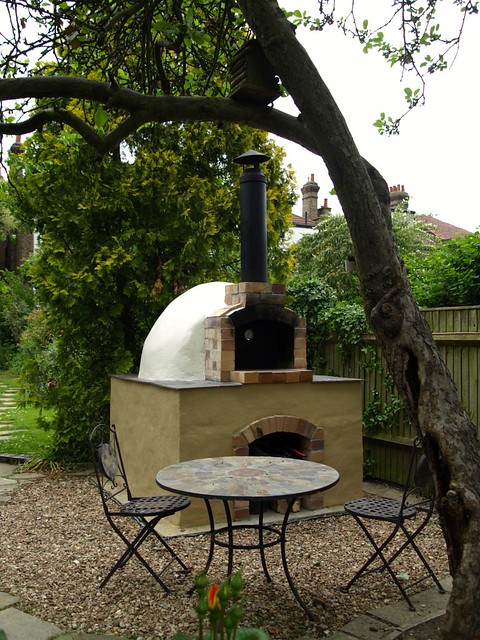
I've decided it's finally time to post about our WFO build. We've been reading the forum for months and after a slow start due to the wet weather in the summer things have progressed at a steady pace this autumn. We are building a 90com pompeii oven based mainly on the Forno Bravo plans also looking at Alan Scotts book for ideas and avidly reading every last post on this forum. The oven is to be used for pizzas and bread baking at least and I am keen to find out more about roasting other cooking in a WFO. We bought most of the basic building materials from Jewsons, using the forum discount. I'm not sure if they were cheapest but after the lovely manager spent about 45 mins walking round the Jewsons yard with me and the Forno Bravo plans I felt he had earned my business. All the firebricks, cement and insulating material are from Kiln Linings and many thanks to Liam for his good sense and general helpfulness on the phone. It has been a real family effort so far with my parents, husband and children all helping. I've posted a load of photos on Flickr which you can see here www.flickr.com/photos/lemonsouffle/sets/72157632041138821/As you can see from the pictures we are getting close to competing the dome (but will I be able to roast in it on Christmas day?). The next decisions will be how to create a thermal break between the dome and the entrance and what sort of chimney. Don't know the answers yet so all advice welcome. Then how to dry out the dome and start the curing fires. Looking forward to sharing more progress soon. |
|
|
|
Post by rivergirl on Nov 19, 2012 11:42:32 GMT
Love the pictures!! Fingers crossed that you will be able to use it for Christmas.....
|
|
|
|
Post by richburrow on Nov 19, 2012 12:11:53 GMT
looks great!!!!!!
|
|
petec
WFO Team Player

Posts: 232
|
Post by petec on Nov 19, 2012 13:02:27 GMT
looking great - good luck with the rest of your build
I'm at a similar stage - just finished the dome and now planning how to do the outer arch and thermal break this weekend before doing the insulation layers. Be interesting to see how yours develops.
Keep the photos coming !
Rgds
Pete
|
|
|
|
Post by cannyfradock on Nov 19, 2012 17:02:47 GMT
Lemonsouffle
That's some really good progress since your initial posts. Love the picture diary.....great work.
This year we've been up against it regarding our dismal climate, but I'm really surprised about so many ongoing builds at this time of year.
There are a few ways to put a thermal break between inner and outer arches. I've used "fibre board" 5 or 10mm will do. I cut the fibre board to the width of the brick and placed it dry up against the inner arch, then dry butted the outer arch up against this. On future builds I will cut the fibre board back enough to put a "fire-proof mastic" joint on the inner surface. Other members have used thin slices of thermolite block and others have used home brew. All we are trying to achieve with this thermal break is to dissapate the heat transferring form inner to outer dome. Apart from losing any thermal value from the dome, any heat which escapes from inner to outer arch may crack the final render coat which often extends to the outer arch. I invite contradiction to my comment and hope you get some other feedback on this point.
I've seen some fancy brick chimneys .....and I've used ceramic clay chimneys, but usually they need an inner sleeve to stop the outside of the chimney from getting too hot.....again this is the cause of cracking around this area. A double sleeved stainless steel chimney is favourite. (I've used this system twice, but both times the chimneys were second hand and I had to butcher the base to suit the dome). New s/s chimneys can be bought on line for £80 upwards. If you go down this route, also buy the base unit which will stop the outer sleeve from getting hot, thus prevent cracking around this area. It's always handy to have the chimney at hand.....or in mind before creating the vent apeture in the outer arch.
As soon as your keystone is in place, start the curing fires. There is so much moisture in the mortar and bricks (especially if you soaked them for cutting) that the sooner the better for drying out the dome. The curing process can continue during and after laying the thermal blanket and vermecrete layers.
I'm old fashioned and use kindling fires to start with and gradually (very gradually) build up the heat. Other members have also had great success with heat lamps etc. I think that with any curing process common sense must prevail as all we are trying to do is augment the natural drying process. Curing with any cement based product will only start after the 7th day (and never stops) so we are just trying to dry the bricks and mortar before we go for the full gotham city fire from hell......I always advise at least 2 weeks of curing fires before trying to fire your dome as hot as the devil's own festering ar*ehole.......which of coarse it will achieve.
As long as the work progresses and you are carefull with your firing I see no reason why you can't use your oven on Christmas day (even if the outer layers are not finished, as long as the dome is dry......you can fire it up. You will need more fuel if the insulation layers are not complete, but it shouldn't stop you from firing it up.
All the best with the rest of your build.
Terry
p.s.....many thanks for sharing your build with us and please feel free to put your photo diary of your build in your signature.
|
|
|
|
Post by tonyb on Nov 20, 2012 17:19:12 GMT
Well done, you are wll on your way and should be able to roast in it on Christmas Day but unless you have flexible and understanding dinner guests I'd be a little cautious at attempting this as a first roasting project. If you do decide to go ahead let us know and I'm sure that between us we can help you make a success.
|
|
|
|
Post by lemonsouffle on Nov 25, 2012 20:06:18 GMT
Hi All thanks for your encouraging comments. Terry thanks for the advice about the chimney and curing fires, I feel much more confident now. We were able to do so more work this weekend and have completed another ring of bricks. Progress is slow because my other half is cutting all the bricks to minimise the amount of mortar used and my are using the pre-mixed mortar from kiln linings which seems to harden quite slowly, so we let one row set before starting on the next. Anyway it looks as if we have 1 more row of bricks and the keystone to do next weekend. Here is the latest pictures of the dome: Attachments:
|
|
|
|
Post by lemonsouffle on Nov 25, 2012 20:07:19 GMT
Can't upload more than 1 picture at a time but here is the view of the top of the dome Attachments:
|
|
|
|
Post by lemonsouffle on Nov 25, 2012 20:11:15 GMT
And finally a carefully cut brick, (with many thanks to bookemdanno for advice on the Screwfix angle grinder blades when we were in despair a few weeks ago)  Attachments:
|
|
|
|
Post by cannyfradock on Dec 1, 2012 13:01:25 GMT
lemonsouffle I admire anybody who takes the time to cut their bricks in a "Trapazoid" fashion. Many of us (including myself) just parge up the upper rings of the dome with more homebrew mix.....without cutting the angled bricks. The difference for you (although debated) will be a more efficient dome, but the outstanding difference will be the appearance of the interior. The best example of a dome interior of a Pompeii oven that I know of is Charley's Pompeii build on the old forum  This man joined the old forum and said....."ah well, I just have to learn as I go along". So many people have joined the forum (s) since Jan 2010 and every single build (must be in 3 figures by now) gives me a great buzz when I see all the hard work come into fruition. Looking forward to your next set of pics. Don't forget...slowly. slowly with the curing fires, but you can start them as soon as the keystone of the dome is laid. Terry |
|
|
|
Post by lemonsouffle on Dec 9, 2012 20:39:56 GMT
Hi All I have been asked to make a correction to the original post, I am not personally building a wood fired oven Mr Lemonsouffle is building it, I am making tea and going shopping for more bits. Now that we are all clear about the division of labour the exciting news is the dome is compete and we have removed the forms. We tried one tiny fire today and the bricks were immediately sweating. Planning to keep curing fires going all week. Still trying to decide on chimney design but a brick or traditional clay/terracotta chimney is the preferred option at the moment. Here are a couple of photos and the rest are in our Flickr album Attachments:
|
|
|
|
Post by lemonsouffle on Dec 9, 2012 20:40:39 GMT
Another photo of the inside of the dome Attachments:
|
|
|
|
Post by lemonsouffle on Dec 9, 2012 20:41:04 GMT
A tiny fire Attachments:
|
|
|
|
Post by umhloti on Dec 10, 2012 8:56:45 GMT
Looking well nearly there
|
|
|
|
Post by lemonsouffle on Dec 10, 2012 17:19:32 GMT
A slightly larger curing fire today. I've bought some ready cut kindling and it is burning very nicely, Looking at the entrance side on you can see the hazy hot air escaping at the top and the clear cold air going in the bottom. Not sure how hot it was inside but the exterior of the dome felt about as warm as a radiator along the top third. Attachments:
|
|