|
|
Post by lemonsouffle on Jan 7, 2013 15:44:35 GMT
Hi All, thanks for your advice and words of encouragement. Things have gone rather slowly over the last 2 weeks with Christmas and the rain getting in the way but we have built the entrance porch and the 2 arches at the front so are ready for the chimney. We also filled in the cracks which appeared on the exterior after the last firing. Today tried another fire with excellent results. After 2 hours the interior of the oven had gone from black soot to white all over and was off the scale of my IR thermometer (which means over 375C and definitely hot enough). The exterior was up to 100C and steam was coming off all the new mortar, there is a network of fine cracks in the exterior of the mortar where the steam was coming out but inside the oven there is no sign of cracking. Since the oven is not yet insulated I didn't expect it to stay hot for long so I made some simple dough for pitta bread to cook quickly. Once we saw the lovely hot dome, a piece of mozzarella leapt out the fridge, the pitta dough made a perfect base and it was pizza for lunch. ;D Took about 5mins to cook and tasted perfect. Pitta bread cooked well, with glowing embers still in the back and then temperature had started to drop so we put some cookies with a makeshift door in place to finish our first bake. The oven temperature was below 200c for the cookies. Here's a picture of the pizza cooking in the oven. There are more pics in my Flickr album. Next comes the chimney. Attachments:
|
|
|
|
Post by umhloti on Jan 7, 2013 20:28:27 GMT
wow thats a perfect looking pizza. And flicker album is looking well
|
|
|
|
Post by lemonsouffle on Jan 12, 2013 17:35:32 GMT
Umhloti - thanks for your comment, it was the best tasting pizza I have ever eaten!! We made progress today on how to fix the flue to the entrance arch. Decided to build a flat platform on top of the entrance arch, place the flue on it and support the flue with 2 courses of bricks cut with a circular hole in the middle of them. In pictures it look like this, nothing has been mortared yet because it is too cold. Laying out and marking the bricks (on the kitchen table because it was cold outside) 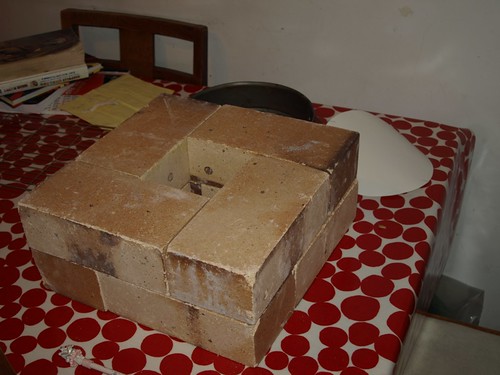 First layer of bricks cut and flue standing up inside them to show off precision angle grinding by Mr LS 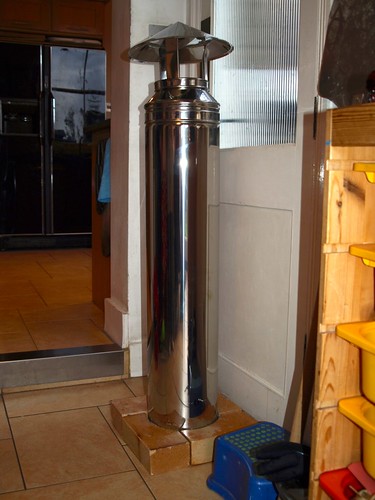 2 layers of bricks cut and looking good  Thin bricks and little wedges closing up the gap between the 2 arches and creating the flat platform and it looks like this: 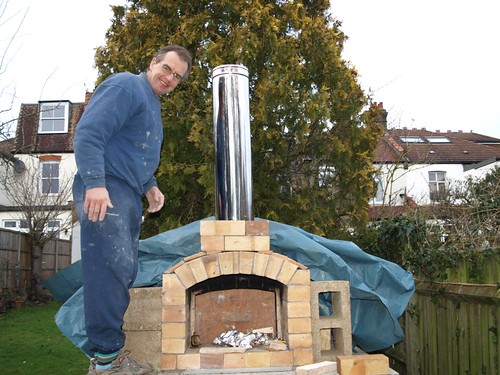 The remaining problem is the exposed insulation at the bottom of the flue this picture was taken looking up the flue from the entrance arch 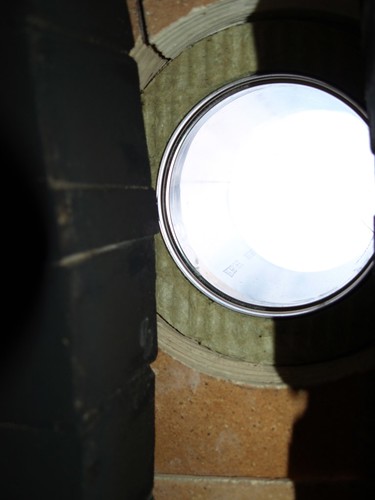 I think we will need to make something like Petec's platform to go under the flue to finish things off. |
|
petec
WFO Team Player

Posts: 232
|
Post by petec on Jan 12, 2013 18:31:13 GMT
Brilliant - love the 2 courses cut to make a 3-d jigsaw.
....and you're already cooking in yours too !
I checked out the flickr pages to see how you'd done it - great work.
Cheers
Pete
|
|
|
|
Post by lemonsouffle on Jan 12, 2013 19:56:36 GMT
Thanks Petec. My photo links didn't work I'll try again tomorrow.
I haven't cooked very much it loses heat quickly because there is no insulation.
Your build is looking pretty good.
|
|
|
|
Post by turkey on Jan 13, 2013 14:20:36 GMT
looks very good  i took the liberty to pop in and fix your links, from flicker on the image you want click the share button then select bb code, and then bb code again, you can then copy the text in, I deleted the additional hyperlink it puts in to tidy the post, but each image is still linked back to flickr and the full res image. |
|
|
|
Post by cannyfradock on Jan 13, 2013 14:59:24 GMT
Thanks Turkey......love those pics
It shows one proud Lemonsouffle.....just itching to fire that beautiful beast up.
Terry
|
|
|
|
Post by lemonsouffle on Jan 13, 2013 15:55:11 GMT
Hi Turkey, thanks for fixing the links.
I'll try to follow those instructions next time I add photos.
Next little problem is that we have continued using the KWASLC ready mixed mortar for the entrance porch bricks (because it was in the tub and easy to use) so now we need to get them hot enough to set the mortar at full strength. I'm thinking of setting a fire in the porch next week to do this can anyone think of a reason why this won't work?
|
|
|
|
Post by turkey on Jan 13, 2013 17:14:36 GMT
its going to be hard to get external bricks really up to temp but a good fire is a good start and I am sure you can get it hot enough you don't want to touch , can always target the mortar joins with a blow torch once the fire is really going to assist if you want. Like any heating make sure you spread it around evenly but should be fine as is a refractory product, the joints all look nice and thin so I don't suspect you will have any issues. |
|
|
|
Post by lemonsouffle on Jan 27, 2013 20:42:23 GMT
Hi All we have now set a deadline for completion of the oven to be ready for a pizza party on 3 Feb to celebrate our daughter's 13th birthday. So great progress has been made here this week in spite of the snowy weather. The first task was a porch fire to heat up the refractory mortar and get it to set. It would have been simpler and quicker to dismantle the porch and rebuild using home brew but with a big fire in the porch and a blowtorch on the outer surface I think the mortar has all set. 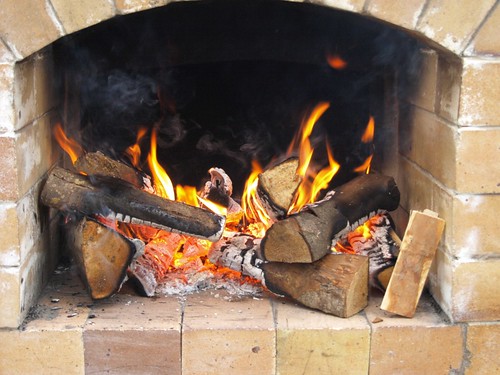 Porch Fire Porch Fire by Londonoven, on Flickr Then last Friday a final massive curing fire to check all was ok before insulating the dome. I burnt a load of kiln dried wood and in spite of the freezing temperatures the interior of the dome reached >375C (max limit of my infra red thermometer) and the exterior of the dome bricks was 140C-150C. When the fire started the interior of the dome was -2.5C The exterior was steaming away and things were so hot I baked a few loaves of bread. I knew that baking would be tricky as the dome would lose heat rapidly once the fire was out so I baked 2 loaves with a small fire and the door open then raked out the ashes and tried to bake another loaf with retained heat. It worked out pretty well and by the evening the dome was still around 100C. 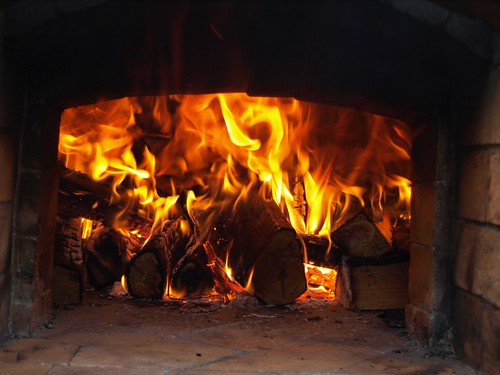 Roaring fire Roaring fire by Londonoven, on Flickr 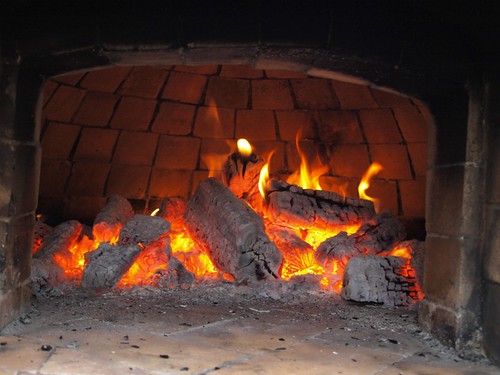 Dome turns white Dome turns white by Londonoven, on Flickr 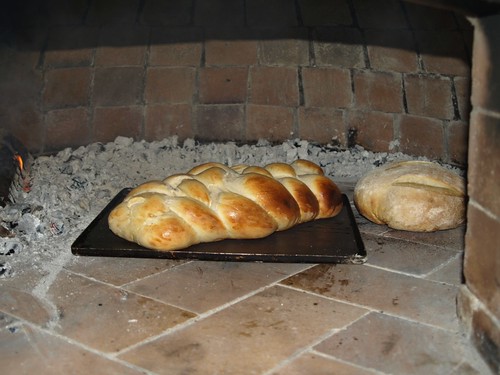 Cooking bread with small fire in oven Cooking bread with small fire in oven by Londonoven, on Flickr 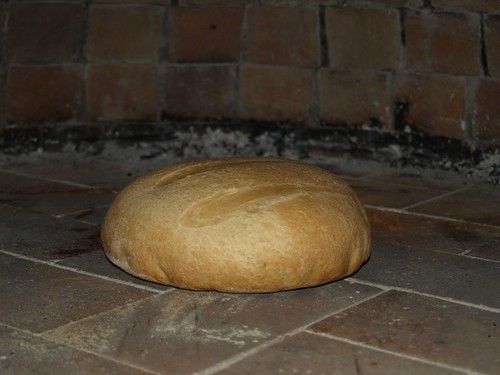 Cooking bread using retained heat Cooking bread using retained heat by Londonoven, on Flickr Yesterday we got serious with insulation and wrapped the whole thing up in 4" of insulating blanket. We have been following the Forno Bravo plans which say either 1" blanket and vernicrete or 2-3" of blanket: so we applied 2*2" layers of insulating blanket. Then 2 layers of render and hopefully the oven is ready for serious cooking next week.  Untitled Untitled by Londonoven, on Flickr 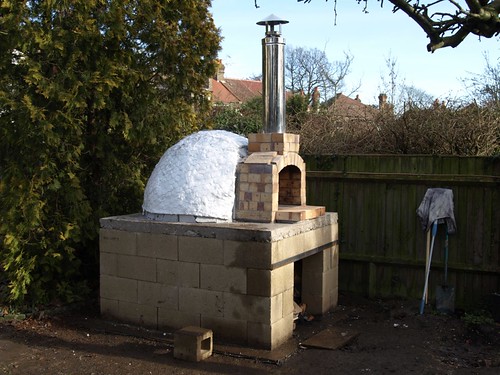 Untitled Untitled by Londonoven, on Flickr 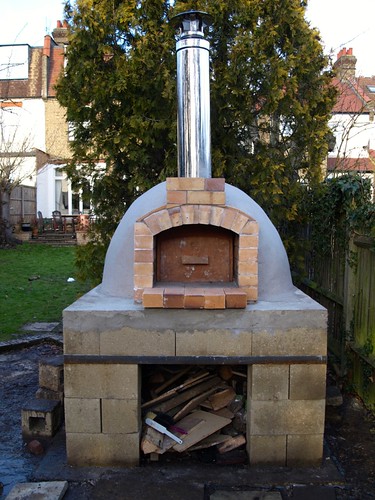 Untitled Untitled by Londonoven, on Flickr 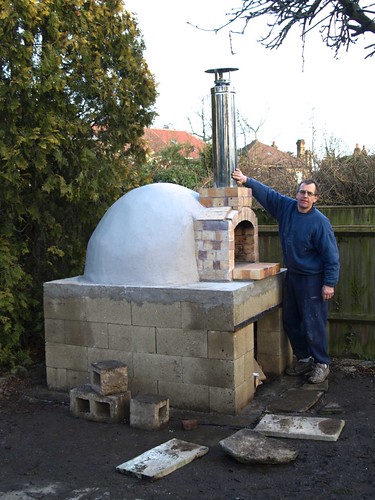 Untitled Untitled by Londonoven, on Flickr For anyone who is interested there you can see more photos in the Flickr album if you follow the link at the bottom of the post. It has been an amazing experience and we are still feeling a bit shocked to realise that we can now move on to the next phase and actually start cooking in the oven. How long should we wait for the render to dry before firing up? I would like to do a big hot fire this week, looking at the weather forecast ideally tomorrow, before the party next sunday. Any more advice? Many many thanks to everyone on this board for their helpful, useful and encouraging comments. The next stage will be to finish off the exterior decoration on the base and around the dome to make it look good and tidy up the garden around the oven which is a muddy swamp at the moment but that will have to wait a few weeks. Bye for now LS  |
|
|
|
Post by cannyfradock on Jan 28, 2013 21:21:16 GMT
LS
Now then.....what a brilliant build!! Really nice Flickr photo diary.
I haven't seen the FB plans but I'm surprised they said it's OK to double up on the thermal blanket and skip the vermecrete layer. The vermecrete layer acts as the heat stop. The properties within the vermiculite will bounce all the heat back into the dome and when the cement and water is added to the vermiculite, this forms a crust for your final render coats. When the vermecrete is minimum 3" thick then the outer crust will not move with expansion or contraction of the dome and will be barely warm to the touch.
With 2x2" layers of thermal blanket I can't see much heat escaping. The render will harden in 2 to 3 days but will only start curing after 7 days. Maybe best to wait the 7 days before putting a full gotham city fire into your beautiful beast.
Please let us know how the render gets on (I hate using vermecrete)...and many thanks for sharing your build with us.
Terry
|
|
|
|
Post by lemonsouffle on Jan 28, 2013 22:41:50 GMT
Hi Terry thanks for your comments. The insulation is interesting, the FB plans state 1" blanket + vermicrete or 2-3" blanket, I checked with Liam at Kiln Linings before we ordered and he confirmed that it should be ok so we ordered 2 boxes of 2" thick blanket. My view was that if we could avoid mixing vermicrete it would be a good thing and using extra blanket didn't seem to be much more expensive. We wrapped the oven up in 1 layer of blanket and covered with chicken wore to hold in place and then a second layer of blanket. 1 box was slightly more than required for the first layer but not quite enough for the second layer so we patched up the gaps with bits of the insulating board left over from the under-hearth insulation, and split the blanket near the base of the oven to make extra layers to cover the top of the dome. Then more chicken wire to hold the blanket in place and a final chicken wire 'form' loosely arranged over the outside. We used the Kiln Linings KL16F castable for the render and it stuck on pretty well. If you were going this route in future it might be easier to buy the 1" thick blanket and apply more layers then with the final layer you could choose to put more at the top where the dome gets hottest. I was really keen to get a fire going today as it was the only day this week that was supposed to be dry. Things went pretty well. I didn't put in too big a fire to start with and the whole dome eventually heated up and burned off the soot and the exterior of the dome remained cold to the touch. I've still got a lot to learn about managing the fire. No signs of cracks in the dome. Then it started to rain! I was undaunted and covered the (cool) dome with a plastic sheet and managed to bake 3 loaves of bread - 2 sourdough and 1 oat and apple loaf. 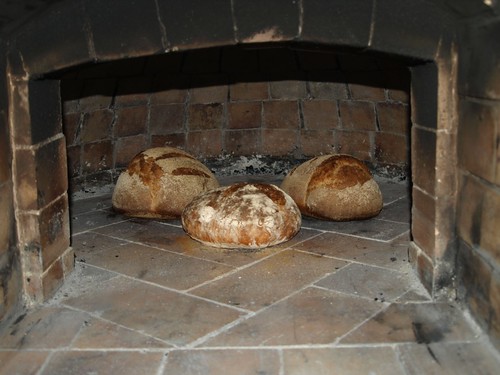 Untitled Untitled by Londonoven, on Flickr And out of the oven 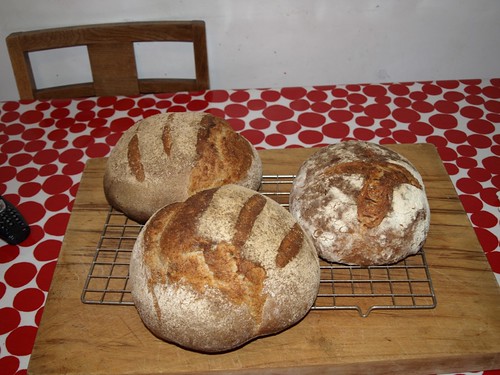 Untitled Untitled by Londonoven, on Flickr Opening the oven door and seeing the steam escape and then those beautiful loaves was a great moment. After the bread was finished I put a casserole dish with a beef bourgignon in for 3 hours. In summary the fire started at 10:45am was allowed to burn slowly and with not much wood to start with, the bread went in to bake at 2pm, casserole in to cook at 3:30pm casserole out at 7:30pm and oven floor and walls reading still 180C I think the insulation is fine and I am ready for pizza party on sunday. I guess I can now start posting in the cooking sections of the website rather than the build threads. ;D LS |
|
|
|
Post by cannyfradock on Jan 28, 2013 22:58:41 GMT
LS Interesting reply. I used Liam's castable over the top of the oven I built for my boss.. ukwoodfiredovenforum.proboards.com/index.cgi?board=pompeiioven&action=display&thread=677 .........it's good stuff but I had a bit of cracking where it touched the double lined s/s chimney.....my fault as I butchered the chimney to fit the oven and I let the outer sleeve of the chimney touch the dome. I love those loaves that you are baking. I'm baking twice a week now, but only in my domestic oven (don't use my backyard WFO as I built it before these forums were created). I didn't know any better and I didn't add any insulation. " I guess I can now start posting in the cooking sections of the website rather than the build threads."......yes please!! Terry |
|
leeb
valid member
Posts: 74
|
Post by leeb on Jan 29, 2013 17:15:35 GMT
Hi LS great job on the build, haven't tried bread in my oven yet. But I am really getting into bread. Those Sourdoughs look amazing, is there any chance of sharing your recipe ? My two attempts have failed as both were a bit too wet and sticky and stuck to the floured basket liner whilst raising  Also not come across a good starter yet. Looking forward to seeing your pizza's best Leeb |
|
|
|
Post by lemonsouffle on Jan 30, 2013 16:03:20 GMT
Hi Leeb,
thanks for your lovely comment about my loaves, they baked so well in the oven I am delighted with them. One thing that was very noticeable was that the loaves increased in height so much in the brick oven, in my domestic oven they tend to spread out more and all that lovely steam in the oven made a great crust.
There are 2 different types of bread in the picture the 2 loaves on the left are The Mill Loaf and on the right is Apple and Oat Bread. Both recipes are from Dan Lepard's book The Handmade Loaf. The Mill Loaf uses a mixture of white, wholemeal and rye flour that has a terrific flavour and the Apple and Oat bread uses some sourdough starter and a little bit of dried yeast. If you want to improve your bread making I really would recommend this book. If you can't get a copy I'll type out the recipe for you.
The sourdough starter I use is 10 years old now and it just sits in tub in the fridge until I need it, I take it out the night before I am going to bake, refresh it with flour and water then leave at room temp overnight for the yeast to wake up before I make the dough. In the method Dan Lepard describes the dough is kneaded on an oiled (not floured) surface then rested for 10mins several times before leaving it for the first rise, as you go through this process the dough becomes more elastic and easier to manage. I'm no expert, just a keen home baker, but I would say if your dough is sticking to the proving baskets then it is too sticky. Making bread is a mix between art and science and if the dough seems too sticky I just add a little flour until it feels right.
Try to make your own starter - it really is a little bit of magic. I used grapes, flour and water for mine following the instructions in the Moro cookbook but there are plenty of other instructions available.
Good luck with your bread making
LS
|
|


 Also not come across a good starter yet.