sean
valid member

Posts: 63
|
Post by sean on Feb 25, 2020 20:07:56 GMT
Good Evening all, Looking for some guidance Currently building milan 750 pizza oven, since I started last year (stopped for winter time) I have decided to put a wooden shelter over the outdoor kitchen area this creates another issue with the flue penetrating the roof. I am thinking a doubled line flue is now required to allow the flue to go through the roof with a suitable flashing to prevent water getting in. I cant find the previous thread but I recall a discussion about the ideal flue width for this pizza oven Do I stick with the current 125mm flue or go up a size to a 150mm flue? How have others sealed & secured the flue into position? Open to other ideas and advise as it comes thanks all Sean  |
|
|
|
Post by truckcab79 on Feb 26, 2020 12:26:39 GMT
Nice looking build you have there.
Not sure if they have changed the design since I did mine but im sure it was meant to be mortared into the brickwork. I actually mortared in a short connecting piece flush with the brickwork and then the chimney just slots in and I remove it for the winter. There was some comment that on mine they should have supplied a 150mm flue but in use mine draws perfectly. Was going to use a taller one to help it further but hasn’t been necessary. That said I’m sure if you are buying a double-walled one anyway then you may as well go for larger diameter and longer length (which you’ll need anyway to get through the roof. Have a look at suppliers for wood burner chimneys etc. Pretty sure they make plates that you bolt down which then in turn take a removable flue (or just a bolt down connector plate if you don’t need to remove the flue. If you look on their sites or on eBay then the available fittings will really answer the question for you.
|
|
sean
valid member
Posts: 63
|
Post by sean on Feb 26, 2020 21:24:19 GMT
Hi Truckcab Thanks, it should hopefully be a nice setup once complete this project has defiantly got away with its self, i have till the 11th July to complete it as a big family bday party planed. So have been looking on various websites and agree with you that it makes more sense to go up to the 6inch flue if buying new and gainingn with the additional flow. I have the newer 4 piece dome so the flue will be starting of at 5inch so have a few options 1.stay with 5 inch flue   2. get a increase adaptor 5 to 6inch  3. some how grind out enough material to allow fitting of a 6inch flue from the start fixing it in place i think some fire proof rope and cement around the joint will be fine, I was planing on bricking up the first part of the flue joined into the stone arch for a better look however this leads me onto my second problem. My other issue is i would like to fit a flue damper, i have the one supplied with the kit that is for a single skin flue but not sure how i will fit this before switching to a twin wall. i have found a twin wall damper but this is costly.  |
|
|
|
Post by truckcab79 on Feb 27, 2020 0:24:33 GMT
The material that the domes are made of is quite easily chipped out to a larger size though personally I’d be nervous about enlarging it by that much in case I knocked out more than intended. The ‘right’ answer is that you’ll only get the full benefit of the 6” glue if you enlarge it as otherwise you’ll still have the restriction of a 5” at the start. Personally however I’d go with the 5” and the enlarger and run 6” for all the rest. My understanding is that you’ll still get a significant gain from the enlarged section and the extended length. To me thats an excellent compromise. Just my opinion of course, but my 5” with 500mm of height already draws well so anything else would be a bonus.
|
|
|
|
Post by truckcab79 on Feb 27, 2020 15:27:46 GMT
With regard to the damper with everything else you’re spending them if you can stretch to it then I think you’d kick yourself not to go with that double wall damper. Looks nice, will cut down the build time and will probably work well. It’s a bit spendy though!
Worth giving Pizza Oven Supplies a call though. I believe they use single wall 6” on their bigger kits and I’m sure they would sell (give?!) you a damper. Obviously it will need to be adapted to the 6” twin-wall. At the very least the handle / bar will be too short. Easy enough to bend up another one though.
|
|
sean
valid member
Posts: 63
|
Post by sean on Feb 29, 2020 17:09:52 GMT
That's a good point about about possible damage to the flue if try to take some material out so probably not worth it.
I am now away with work for a few weeks, so I priced up a flue using rough sizes and it's sitting around £450 not including the fancy damper🙁
I am now thinking stick with the single skin 5" flue coming out of the oven with the damper fitted then fit an extender to 6" twin wall 500mm before going through the roof, as you say it will still.help with draw especially once it got some good heat in there.
I will draw up a few pictures with different flue options with cost then post in here see what you think, I also can't seem to find a twin wall flue damper in Matt black.
How do these single wall dampers fit without leaking smoke out the drill holes?
Maybe I will just stick a brick on top of the flue for a damper haha.
Cheers for the help
|
|
|
|
Post by truckcab79 on Feb 29, 2020 22:48:36 GMT
Here’s one in black. At £300 I’m not sure it helps though. Does look lovely mind. www.fireplaceproducts.co.uk/en/accessories/twinwall-flue/convesa-kc-twinwall-flue-500mm-length-with-damper-1Personally I’d go for the 5”-6” adapter and then run 6” for the whole length. Not sure what you mean by drill holes. Do you mean the holes through the flue that hinge the damper disc? If so I wouldn’t worry about it. Mine is single wall and nothing leaks out. The damper isn’t exactly an air-tight fit at least not in mine so any smoke that wants to get out will escape past the damper rather than out the holes. I’m sure you could wrap fire-proof rope around the hinge if you could find one small enough. Hardly worth the effort though. On the ovens we have the over-riding factor is that the chimney is behind the door. In an ideal world the door would sit behind the flue so you could completely separate it from the oven and prevent any heat loss via it. With that in mind I’d go with what I’ve said above and use an insulated door. For what’s its worth I have the standard 5” single wall flue, a 5mm steel door (not insulated), and I still have decent heat in the oven the following morning just by putting the door on and closing the damper. |
|
sean
valid member
Posts: 63
|
Post by sean on Mar 8, 2020 4:51:31 GMT
Wow that is a very nice damper but not even my man maths will allow that kind of spending. Truckcab - so saying we go with the full 6inch flue from the top of the cast then fit a single wall damper like the 1 below in the twin insulated flue, and just bend a new handle for the extra length required? seems simple enough. 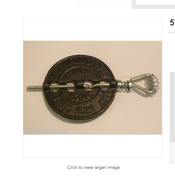 I was reading over your thread about making a door, thats also on the job list this time home. thanks |
|
|
|
Post by dave36 on Mar 8, 2020 8:00:27 GMT
Sean
Funnily enough, I’m doing exactly the same as you. Putting up a covered pergola around the oven & BBQ. If it helps with the chimney glowing embers we’re pretty good on price and avoids me paying multiple P&P charges by sourcing slightly cheaper bits and pieces from multiple suppliers. I’m going 4 inch to 5inch adapter, twin wall all the way up (only need 1-1.3m). Moving the door behind chimney by casting a new inner arch (my old single skin has a damper).
Out of interest, what are using for the roof? I’m veering towards twin wall polycarbonate, but interested in options.
Dave
|
|
|
|
Post by truckcab79 on Mar 8, 2020 17:46:02 GMT
Wow that is a very nice damper but not even my man maths will allow that kind of spending. Truckcab - so saying we go with the full 6inch flue from the top of the cast then fit a single wall damper like the 1 below in the twin insulated flue, and just bend a new handle for the extra length required? seems simple enough. I was reading over your thread about making a door, thats also on the job list this time home. thanks I’ve not used twin wall so worth checking that twin and single will actually fit together. I’d be surprised if they don’t though. Not sure what you mean about bending a new handle? Presumably you have or will buy a six inch single damper so that will come with the damper disc and handle no? But in the likely event that I’ve misunderstood something, then yes just bend up a new one. The angles are quite tight but nothing that you can’t achieve with a bench vice and a bit of slim round bar to hammer it round to keep the bend consistent. Door was a nice easy project. Even at 5mm it was relatively easy to hand cut with a slitting disc on an angle grinder. If you can’t weld then easy enough to buy a suitable handle. Plenty on eBay, including those coiled ones that dissipate heat. Just search for ‘oven handle’. |
|
sean
valid member
Posts: 63
|
Post by sean on Mar 9, 2020 0:33:30 GMT
Sean Funnily enough, I’m doing exactly the same as you. Putting up a covered pergola around the oven & BBQ. If it helps with the chimney glowing embers we’re pretty good on price and avoids me paying multiple P&P charges by sourcing slightly cheaper bits and pieces from multiple suppliers. I’m going 4 inch to 5inch adapter, twin wall all the way up (only need 1-1.3m). Moving the door behind chimney by casting a new inner arch (my old single skin has a damper). Out of interest, what are using for the roof? I’m veering towards twin wall polycarbonate, but interested in options. Dave Hi dave, Will have a look at that site cheers. I am doing the same kind of flue idea as yourself seems like twin wall is the only way to get throught the roof, i am currently working away from home and trying to sort out what i need from pictures is not working so playing it safe and wait till i am home to measure up properly. Roof wise i am putting wooden planks on, 68 in total i think. I did ponder the polycarbonate roof idea however my kitchen area is in a North facing part of the garden and we live in Scotland so just had thoughts of it going green quickly and would be forever jet spraying it clean. Once i had bought all the wood HQ decided to have an imput and she thinks windows in the roof would be a good idea  , so maybe next year i might look at putting some polycarbonate windows in. It should look some thing like this.  Next issue is finding a flashing for the roof. I have been looking at this the red design its rated to 225oC the highest i have found so far and can take a High +260 (intermittent)  Sean |
|
|
|
Post by dave36 on Mar 9, 2020 8:28:40 GMT
Sean Funnily enough, I’m doing exactly the same as you. Putting up a covered pergola around the oven & BBQ. If it helps with the chimney glowing embers we’re pretty good on price and avoids me paying multiple P&P charges by sourcing slightly cheaper bits and pieces from multiple suppliers. I’m going 4 inch to 5inch adapter, twin wall all the way up (only need 1-1.3m). Moving the door behind chimney by casting a new inner arch (my old single skin has a damper). Out of interest, what are using for the roof? I’m veering towards twin wall polycarbonate, but interested in options. Dave Hi dave, Will have a look at that site cheers. I am doing the same kind of flue idea as yourself seems like twin wall is the only way to get throught the roof, i am currently working away from home and trying to sort out what i need from pictures is not working so playing it safe and wait till i am home to measure up properly. Roof wise i am putting wooden planks on, 68 in total i think. I did ponder the polycarbonate roof idea however my kitchen area is in a North facing part of the garden and we live in Scotland so just had thoughts of it going green quickly and would be forever jet spraying it clean. Once i had bought all the wood HQ decided to have an imput and she thinks windows in the roof would be a good idea , so maybe next year i might look at putting some polycarbonate windows in. It should look some thing like this. Next issue is finding a flashing for the roof. I have been looking at this the red design its rated to 225oC the highest i have found so far and can take a High +260 (intermittent) Sean Thanks Wood Roof will look good, I need the light though as mine is in a dark corner of the garden. 200 degrees will absolutely fine (I’m buying the same) my single skin didn’t get to that temperature at the bottom, so a twin at the top will be much lower. |
|
sean
valid member
Posts: 63
|
Post by sean on Mar 9, 2020 20:17:13 GMT
Hi dave, Will have a look at that site cheers. I am doing the same kind of flue idea as yourself seems like twin wall is the only way to get throught the roof, i am currently working away from home and trying to sort out what i need from pictures is not working so playing it safe and wait till i am home to measure up properly. Roof wise i am putting wooden planks on, 68 in total i think. I did ponder the polycarbonate roof idea however my kitchen area is in a North facing part of the garden and we live in Scotland so just had thoughts of it going green quickly and would be forever jet spraying it clean. Once i had bought all the wood HQ decided to have an imput and she thinks windows in the roof would be a good idea , so maybe next year i might look at putting some polycarbonate windows in. It should look some thing like this. Next issue is finding a flashing for the roof. I have been looking at this the red design its rated to 225oC the highest i have found so far and can take a High +260 (intermittent) Sean Thanks Wood Roof will look good, I need the light though as mine is in a dark corner of the garden. 200 degrees will absolutely fine (I’m buying the same) my single skin didn’t get to that temperature at the bottom, so a twin at the top will be much lower. Let me know how you get on with the poly roof it will be interesting to see once its finished. If you on FB i am a member of a page called - DIY outdoor bbq kitchens (or some thing like that, i will check when next on my phone) loads of people putting poly roofs on pangola's Are you using a kit of the shelter? |
|
sean
valid member
Posts: 63
|
Post by sean on Mar 9, 2020 20:34:08 GMT
Wow that is a very nice damper but not even my man maths will allow that kind of spending. Truckcab - so saying we go with the full 6inch flue from the top of the cast then fit a single wall damper like the 1 below in the twin insulated flue, and just bend a new handle for the extra length required? seems simple enough. I was reading over your thread about making a door, thats also on the job list this time home. thanks I’ve not used twin wall so worth checking that twin and single will actually fit together. I’d be surprised if they don’t though. Not sure what you mean about bending a new handle? Presumably you have or will buy a six inch single damper so that will come with the damper disc and handle no? But in the likely event that I’ve misunderstood something, then yes just bend up a new one. The angles are quite tight but nothing that you can’t achieve with a bench vice and a bit of slim round bar to hammer it round to keep the bend consistent. Door was a nice easy project. Even at 5mm it was relatively easy to hand cut with a slitting disc on an angle grinder. If you can’t weld then easy enough to buy a suitable handle. Plenty on eBay, including those coiled ones that dissipate heat. Just search for ‘oven handle’. Hi Truckcab - here is my thinking, Flue cast outlet fit a 5 inch single flue to 6 inch double flue adapter, seal this in place.  6 inch double flue for the rest of the height. Now without spending silly money on the flue damper, Fit an single 6 inch flue damper into a double flue. the internal diameter of the flue is still going to be the same size just the outside is thicker, obviously you would not be doing this to a stove in the house but with it been outside i am sure its fine  and will save me several £100. For this i will need to make an extended rod bent to size and as you say it wont be to hard to bend it to shape with the vice & hammer. Thanks for the help Sean |
|
|
|
Post by truckcab79 on Mar 9, 2020 23:38:10 GMT
Ah understood. Good idea, so yes, just a longer ‘handle’ needed.
|
|


 , so maybe next year i might look at putting some polycarbonate windows in.
 and will save me several £100.