|
|
Post by cannyfradock on Dec 19, 2013 22:13:03 GMT
Mathew There is a formula somewhere on the net for chimney diameter in comparison to cubic metre..age of a dome that I copied and posted....but I can't find that post...whoops. A lot of the questions that are answered on the web regarding vent opening size usually relate to the height of the chimney...or a percentage of the internal arch area (10% of the internal arch = the size of the vent). For your oven hearth size I would say a 5" square would be adequate for venting your dome although the chimney should be at least 60cm high to obtain a good draw. 1 meter would be better. When I build 90cm internal diameter Pompeii oven I try to get close to 5" square, but as I create the vent using 1/4 and 1/2 bricks in the internal arch, I usually only achieve 4 1/2" at the most. When cold the initial firing does have smoke coming out of the front but once there is heat in the oven, the vent does it's job....well. This thread from the FB forum has quite a few comments on the subject... Vent Size Terry |
|
matthewcove
WFO Team Player
 More details about the oven project and maybe side projects on my blog: http://fireandfocaccia.blog
Posts: 100
|
Post by matthewcove on Dec 20, 2013 21:45:25 GMT
Terry,
Thanks, lats will be lots of help. I think I will get it close enough. I should have about 2 meters of chimney.
I have almost fished the hearth bricks now. Will put up some more pictures in a day or two I hope.
Matthew
|
|
matthewcove
WFO Team Player
More details about the oven project and maybe side projects on my blog: http://fireandfocaccia.blog
Posts: 100
|
Post by matthewcove on Dec 28, 2013 18:24:13 GMT
More progress to show. I had to re-post this as I accidentally deleted it. The hearth is complete after a few late nights. 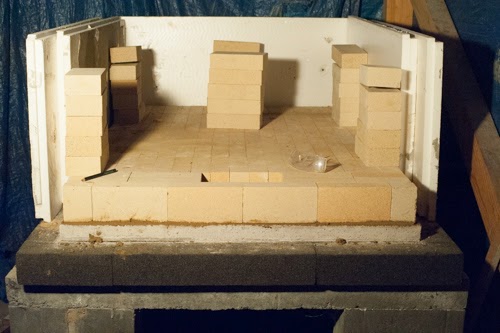 |
|
matthewcove
WFO Team Player
More details about the oven project and maybe side projects on my blog: http://fireandfocaccia.blog
Posts: 100
|
Post by matthewcove on Dec 30, 2013 11:27:21 GMT
The supports for the door lintel are now set and ready to hold the mold where I will cast in place the Lintel. I'm very excited by making progress. Matthew 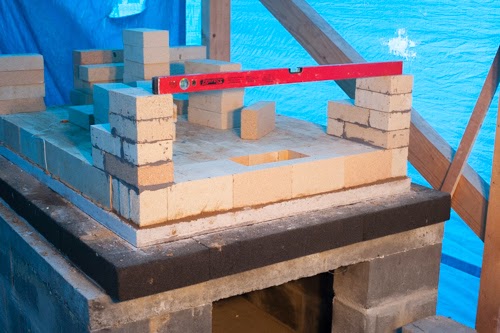 |
|
|
|
Post by cannyfradock on Dec 30, 2013 12:19:20 GMT
Mathew
" I'm very excited by making progress."......and me. Love the images to follow your progress.
I'm looking forward to following the rest of your build.
Terry
|
|
matthewcove
WFO Team Player
More details about the oven project and maybe side projects on my blog: http://fireandfocaccia.blog
Posts: 100
|
Post by matthewcove on Dec 30, 2013 14:34:51 GMT
some more pics of progress 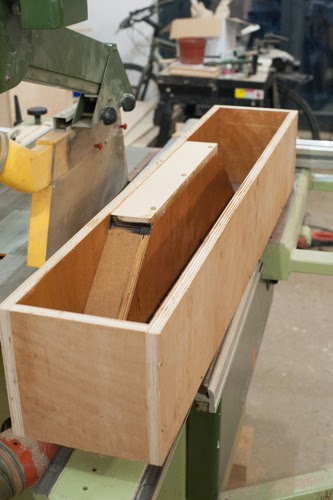 The lintel mold Compacting the stainless steel fiber reinforced refractory in thin layer for maximum strength 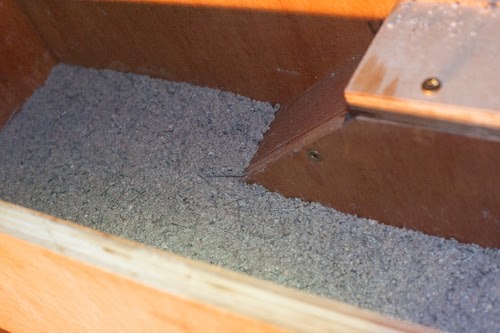 The mold, now full. Can't wait to de-mold tomorrow 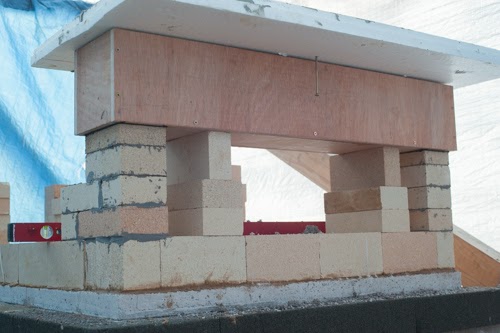 Matthew |
|
|
|
Post by bookemdanno on Dec 31, 2013 13:23:46 GMT
Some nice "Man-toys" in that very tidy looking workshop Matthew!
|
|
matthewcove
WFO Team Player
More details about the oven project and maybe side projects on my blog: http://fireandfocaccia.blog
Posts: 100
|
Post by matthewcove on Dec 31, 2013 14:08:55 GMT
Now I have de-molded the lintel. even after spending hours carefully compressing the layers of refractory into the mold, I am disappointed with the amount of voids, but I do think this this will still be strong enough for the job. I am also a bit concerned that the lintel has very bad abrasion resistance, probably, I did not reach high enough curing temperatures. I have re-covered the lintel now with a heater as I am sure there is still some curing to be done. I will have to find something to treat the surface with to improve the surface durability, probably sodium silicate. any advice on what I can do here? 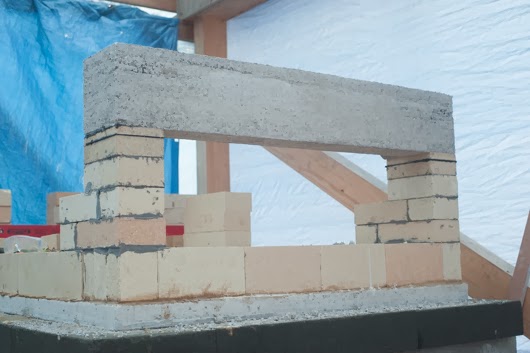  Not sure about how 'tidy'the workshop is, the pictures don't show how you can hardly move in there due to the level of dissarray. Got to spend a day or so organising. Matthew |
|
|
|
Post by cannyfradock on Dec 31, 2013 15:28:42 GMT
Mathew Excuse my ignorance but I had to look up "Sodium Silicate"....found this on Wiki.. ... Concrete and general masonry treatment:- Concrete treated with a sodium silicate solution helps to significantly reduce porosity in most masonry products such as concrete, stucco, plasters. A chemical reaction occurs with the excess Ca(OH)2 (portlandite) present in the concrete that permanently binds the silicates with the surface making them far more durable and water repellent. It is generally advised to apply this treatment only after the initial cure has taken place (7 days or so depending on conditions). These coatings are known as silicate mineral paint. I always advise against using fire-cement in any brick build wood-fired oven unless every joint is no more 2 or 3mm thick. Or it's OK to use fire-cement if your bricks for the dome (Pompeii) or vault (Barrel) are trapazoid cut (angled or wedge shaped bricks). We generally use what is referred to as "homebrew mix" which is Sand, cement, powdered fire-clay and hydrated lime at a ratio of between 4 and 6 parts sand to 1 part of the other three. Going back to your lintel ....this is one instance where I WOULD use the ready made fire-cement. A very thin layer could be trowelled on to fill any of the larger voids in the concrete and a second layer (again..I'm talking 2 to 3mm) could be laid on and trowelled flat once the first layer has set and dried. These are only my thoughts on the subject so please don't accept my suggestion as correct....it probably ain't. It's after the fact (apologies) but by running an electrical sander (without the paper) over the shuttering after the concrete was poured would have brought all the air to the top and the creamy fat of the concrete to each surface. I recommend this method to members when they pour their oven slab. Your best bet for advice would be to contact the company who supplied the fire-bricks to you. Although you cast the lintel yourself they will probably be able to suggest the correct render to remedy the surface. Most of us on the forum use the same refractory supplier...Liam from Kilnlinings ....as his prices are very competitive and he's "phone friendly" with any questions. The trapazoid or tapered bricks which I mentioned previous can be seen here..  Terry |
|
matthewcove
WFO Team Player
More details about the oven project and maybe side projects on my blog: http://fireandfocaccia.blog
Posts: 100
|
Post by matthewcove on Dec 31, 2013 16:45:58 GMT
Hi Terry, I was planning to bond the bricks together with mortar provided by the brick manufacturer. there is no guarantee that it is suitable for the bricks in my dome, which are not tapered so do have larger gaps at the fatter end. I'm planning bricks the minimum distance so they are almost touching without mortar on the inner surface of the dome. The mortar I have comes pre-mixed the datasheet is attached here moratex.pdf (89.14 KB) and for interest the castable refractory they recommended for the lintel is attached here. PCO_Cast.pdf (90.62 KB) In your opinion, should I not use the mortar I have been planning to for the dome? Matthew |
|
|
|
Post by cannyfradock on Dec 31, 2013 20:39:14 GMT
Mathew
We have had many members asking advice on why their ready mixed fire-cement isn't drying. Many say that even after a week you can still poke your finger into the larger areas at the back of the brick.
Again you must ask your supplier if the fire-cement is suitable for large joints in the brickwork. Most of the pots of ready mixed fire-cement will state somewhere on the pot the maximum thickness the fire-cement can be used....normally the maximum is around 5mm......again, ask your supplier and read the instructions.
Worst case scenario is buy in the materials needed to make the homebrew mix. Some members have missed out the powdered fire-clay as it's difficult to get hold of but all have used lime with the sand and cement.
Get back to us if your unsure...
Terry
|
|
matthewcove
WFO Team Player
More details about the oven project and maybe side projects on my blog: http://fireandfocaccia.blog
Posts: 100
|
Post by matthewcove on Jan 1, 2014 10:17:44 GMT
Terry,
I will follow your advice on this. I think I will set the narrow gaps on the arch with the pre-mix and then fill any larger gaps with the home brew mix. Alternatively, if I am feeling ambitious enough and I have enough brick, I may try cutting them all to shape. i think the latter maybe a bit optimistic if I want to finish in 2014.
Happy new year
Matthew
|
|
barney
WFO Team Player
Posts: 119
|
Post by barney on Jan 3, 2014 10:18:01 GMT
Hi Matthew,
Great looking build, really showcasing your skills here. Just thought I would add my tuppence worth as I have covered some of this ground before. I had trouble with premixed mortar setting in thick joints so built it up with thin mortar joints and then back-filled with homebrew as Terry suggests, seems to have worked a treat. I was going to offer the rest of my homebrew materials if you were close (I've got half a bag of fire clay, loads of lime and some vermiculite left over, not to mention the whole tub of pre-mix mortar!), but seems you're in Poland?!
Good luck with the rest of the build.
Barney
|
|
matthewcove
WFO Team Player
More details about the oven project and maybe side projects on my blog: http://fireandfocaccia.blog
Posts: 100
|
Post by matthewcove on Jan 3, 2014 10:49:15 GMT
Hi Barney,
Its great to get help form you all on this forum. Researched a lot, but there is no substitute for hearing from your experiences. Correct, I am in Poland, I moved here from the UK with my wife, I don't know too many people here, so it's really nice to find a community of oven builders here on this forum. I'm also hoping that my oven will bring together the local community here once I start baking.
Matthew
|
|
|
|
Post by bookemdanno on Jan 3, 2014 13:05:02 GMT
Matthew, what's it like in poland?
Not many going in that direction, according to the news!
I ususally find that mixing any concrete type mixes, its better to have them on the wetter side, rather than dry and "tamperable".
This allows them to settle at their own rate, and the particles to flow around each other creating a more solid mass.
The higher water content delays the cure time more, creating a stronger end result too.
However, too much water can weaken things and cause the mix to settle out too. Its a delicate balance, which sort of comes with practice.
Terrys idea of a sander running against the boards is a great method of driving out any air pockets too.
Good luck with the next stages and the battle against the seasons.
Big windy weather over here again, which might mean its going to hit Poland in a day or so!
|
|


