matthewcove
WFO Team Player
 More details about the oven project and maybe side projects on my blog: http://fireandfocaccia.blog
Posts: 100
|
Post by matthewcove on Dec 5, 2013 8:03:08 GMT
After many re-designs and trying to get other projects out of the way, I have finally started to build my oven. The bake area is 0.9m x 1.25m. You can follow all the progress on my blog. fireandfocaccia.blogspot.co.uk/I'll also update this thread with some progress from time to time. Thanks Matthew |
|
|
|
Post by cannyfradock on Dec 5, 2013 22:23:15 GMT
Hello Mathew........welcome to the forum.
Many thanks for including your blog link with your 1st post. Love the design...and Allan Scott was also a big influence on me. As you mention the great man has passed on, but his oven designs are bountiful in all corners of the world. I've been lucky enough to visit a family sourdough bakers using a 5' x 7' Allan Scott Vault oven, who operate out of West Wales. (Mair's Bakehouse)
I'm truly interested in your build and shall keep a keen eye on your blog. Updates on the forum would be a bonus.
Terry
p.s...you can upload your own Avatar(picture) to appear alongside each post you make and you can also put a link to your blog in your signature (the link will appear at the foot of each post you make)....just click on "profile" and follow the instructions.....shout out if you have any probs.
Terry
|
|
matthewcove
WFO Team Player
More details about the oven project and maybe side projects on my blog: http://fireandfocaccia.blog
Posts: 100
|
Post by matthewcove on Dec 6, 2013 20:35:23 GMT
Hi Terry, Thanks for the posting tips, I am very new to forums. I will post any major progress steps with the oven to the forum, I'm hoping to make some progress in the next few days, but the weather is getting really bad.
Matthew
|
|
|
|
Post by cannyfradock on Dec 6, 2013 20:42:54 GMT
Hi Terry, Thanks for the posting tips, I am very new to forums. I will post any major progress steps with the oven to the forum, I'm hoping to make some progress in the next few days, but the weather is getting really bad. Matthew Hi Mathew Just saw your post as I come on-line. There's quite a few photo diaries of oven builds on the forum which may be of interest to you. If you want to ask anything please shout out. We maybe haven't got all the answers (or maybe we have) but there's usually a member who can help out with those awkward bits. Please feel free to post any pics. Terry |
|
matthewcove
WFO Team Player
More details about the oven project and maybe side projects on my blog: http://fireandfocaccia.blog
Posts: 100
|
Post by matthewcove on Dec 11, 2013 18:24:34 GMT
Today we finally got round to pouring the slab of refractory that the hearth bricks will sit on. Well not really poured, more like spread, as the mixture used was quite dry. I have put a quite detailed description of how we did this and why on my blog along with lots of pictures. Here is a quick picture of the finished slab 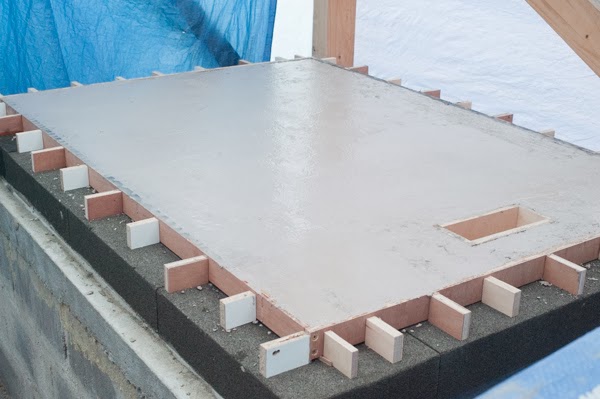 Looking forward to hearing you feedback and suggestions soon. Matthew blog.fireandfocaccia.com/ |
|
|
|
Post by firebeard on Dec 12, 2013 18:30:15 GMT
Hi Mathew,
Your work looks very smart. I have never used the Foamglass insulation what is the highest temperature it is ok to use it at?
Joe
|
|
matthewcove
WFO Team Player
More details about the oven project and maybe side projects on my blog: http://fireandfocaccia.blog
Posts: 100
|
Post by matthewcove on Dec 13, 2013 11:12:36 GMT
Hi Joe,
The Foamglas insulation is rated up to 430, but this is with maintaining its full comprehensive strength which is >600KPa. As the loading on the foamglas in this design is low, due to the cast refractory slab, the point at which the glass will start to soften is considerably higher than this, 800+. I was considering using a layer of ceramic based insulation in-between the refractory slab and the Foamglas, but decided this would be un-necesary after doing some research into the temperatures reached during firing at the hearth insulation boundary.
|
|
matthewcove
WFO Team Player
More details about the oven project and maybe side projects on my blog: http://fireandfocaccia.blog
Posts: 100
|
Post by matthewcove on Dec 13, 2013 16:30:08 GMT
Hearth slab uncovered Today the cover and the shuttering came off the hearth slab. The slab has been kept wet by sealing it in plastic sheet for about 48 hours and then kept warm (maybe only 10°C ) under a small tent using a fan assisted electric heater. Without this, the refractory would not have cured properly in the -6 C that we have been getting during the night. 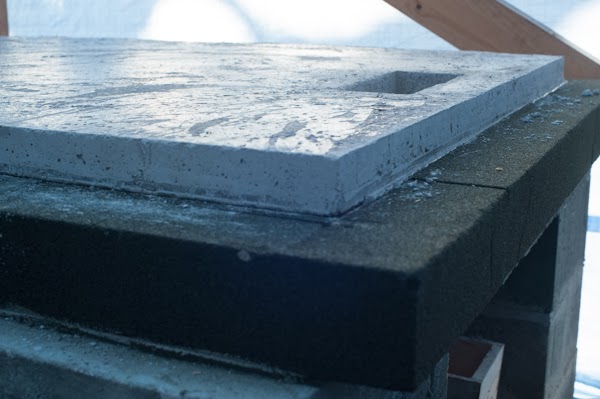 There are more details and pictures on my blog |
|
|
|
Post by firebeard on Dec 14, 2013 10:23:00 GMT
Thank you for the information about Foamglas it sounds like a very useful product. I built an oven loosely based on the Alan Scot Bread Builders design in the summer of 2010. I built it on the back of a trailer as I did not have a permanent location available. I ran out of time on the project and insulated it with fiberglass as a temporary measure so I could fire it up for an event. I have not found time to finish the project, it still needs to be insulated properly and made weather tight. There are a few photos of my oven on flickr www.flickr.com/photos/49880045@N04/with/4768782545/Joe |
|
matthewcove
WFO Team Player
More details about the oven project and maybe side projects on my blog: http://fireandfocaccia.blog
Posts: 100
|
Post by matthewcove on Dec 15, 2013 20:56:07 GMT
Hi Joe,
Nice looking oven, I would like to make one of those maybe one day. Looks like you have a load of thermal mass, it must way quite a bit. Some great photos, one of the reasons for building this oven is to try and bring some community to our village and make some friend. Do you keep pigs too. We don't have any at he moment but are looking to get back into pig keeping next year.
The foamglas is very expencive, so I would only use it where is needs to support the weight of the oven. I think I am going to go for a loose fill and make my oven exterior cladding from mild steel sheet. I've only got the design in my head so far, but I'm sure I will put it in sketchup soon.
Matthew
|
|
|
|
Post by cannyfradock on Dec 16, 2013 10:48:22 GMT
We also have another member from Cardiff who is using foamglass in his Barrel/Vault oven build. He only lives 30 minutes away so I popped down a couple of months ago when he was just laying his fire-brick hearth. I'm not sure if he's finished his oven yet as we haven't heard from him in a while. Here's his thread.... link Terry |
|
matthewcove
WFO Team Player
More details about the oven project and maybe side projects on my blog: http://fireandfocaccia.blog
Posts: 100
|
Post by matthewcove on Dec 16, 2013 22:26:27 GMT
laying the hearth bricks After a hard days work, it was time to unwind by laying a few of the hearth bricks for my wood fired oven. It's not exactly the best time of year to be doing this, it is definitely winter here in Poland, dark by 4 PM and about -5 °C by then. 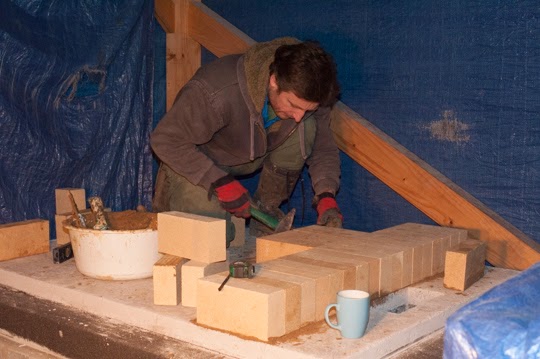 I have written a full step by step record of what I have done on my blog. I think things are going ok but suggestions would be very welcome. Matthew |
|
matthewcove
WFO Team Player
More details about the oven project and maybe side projects on my blog: http://fireandfocaccia.blog
Posts: 100
|
Post by matthewcove on Dec 17, 2013 7:57:06 GMT
Hi Terry,
Just has a quick read of the post from the build in Cardiff that is using Foamglas. It is a shame there are no details of the build, but it did remind me that I need to put my thermocouple on the hearth, I had almost forgotten.
Matthew
|
|
|
|
Post by cannyfradock on Dec 17, 2013 8:49:21 GMT
Mathew
Your hearth bricks are looking fine. I only ever lay them flat but as I build mostly Pompeii or Clay ovens this serves my purpose well. I see many members laying their fire-bricks on edge ...as you have, on a Vault/Barrel oven build. You can't see it from the picture on the forum, but looking at your blog (brilliant btw) I see you use the same system as I do....a tilers notched trowel. I find a rubber (white) mallet is good for gently tapping the bricks down. note:...even though the fire-bricks look exactly uniform...they're not and have slight imperfections. Some people try re-laying fire-bricks that don't go down perfectly flat but sometimes this isn't possible. I try to get my fire-brick hearth as near as possible flat, then if there ARE any add edges that will catch the peel, I simply "touch" them off with a 4" angle grinder using a grinding disc.
Love the butchering skills on your lamb.
Terry
|
|
matthewcove
WFO Team Player
More details about the oven project and maybe side projects on my blog: http://fireandfocaccia.blog
Posts: 100
|
Post by matthewcove on Dec 19, 2013 13:28:54 GMT
Hi Terry, I'm just working on an updated design drawing to account for the slight difference between what I was intending to build and how big the slab actually is. I saw somewhere you mentioned the recomended cross sectional area of the chimney in proportion to the hearth size, but I cant find where the comment was? Can you give me any sizing advise for a 90cm x 125cm hearth. below is a picture of the cast lintel that includes the chimney transition. Matthew  |
|


