matthewcove
WFO Team Player
 More details about the oven project and maybe side projects on my blog: http://fireandfocaccia.blog
Posts: 100
|
Post by matthewcove on Jan 22, 2014 10:46:48 GMT
Hi Terry, Have been seeing some traffic to my blog from twitter this morning. That must be due to your followers I am guessing  Thanks Matthew |
|
matthewcove
WFO Team Player
More details about the oven project and maybe side projects on my blog: http://fireandfocaccia.blog
Posts: 100
|
Post by matthewcove on Jan 22, 2014 12:03:24 GMT
Hi Kipper,
The frame is just an alternative support structure for the arch to enable a low roof with only moderately thick walls. An Alan Scott oven uses a pored reinforced concrete jacket, older oven just have very thick brickwork. The steel will add some thermal mass / heat storage, but quite small compared to the brickwork. This oven was designed to have a moderate level of heat storage to make it more versatile. If this was going to be used for bread every day then I would have built an oven with twice the thermal mass of this one. As this oven will be insulated with loose fill perlite, we may add more thermal mass later to tweek the thermal characteristics.
Thanks
Matthew
|
|
kipper
WFO Team Player
Posts: 125
|
Post by kipper on Jan 22, 2014 15:44:22 GMT
thanks for the explanation Matthew.I can now see the need for that iron work.
looking forward to seeing the next stage. fingers crossed the weather won't get too severe fire you.
|
|
matthewcove
WFO Team Player
More details about the oven project and maybe side projects on my blog: http://fireandfocaccia.blog
Posts: 100
|
Post by matthewcove on Jan 22, 2014 20:10:53 GMT
Few bits more were completed yesterday after I poster the update. I have now finished the rear wall of the oven and the reducer arch. The oven is well wrapped up and being heated from inside by a 1KW electric heater. The bricks even feel warm on the outside. the thick mortar joints are drying out ok, I think that the thickest ones will take 3-4 days before they are completely dry. next step is to cast some refractory on the top of the reducer arch to bring it up to the same height as the top of the door lintel. 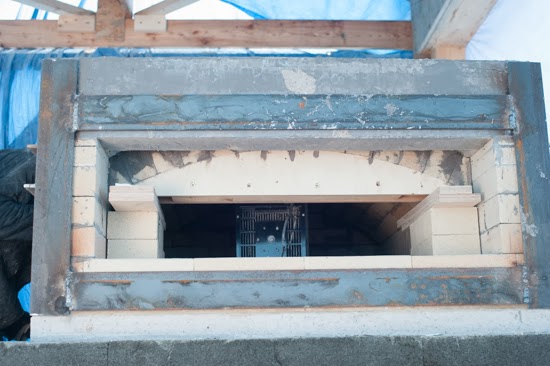 matthew |
|
matthewcove
WFO Team Player
More details about the oven project and maybe side projects on my blog: http://fireandfocaccia.blog
Posts: 100
|
Post by matthewcove on Jan 24, 2014 20:17:11 GMT
Just finished the first curing fire in my oven. Have been heating the brickwork with an electric heater all week above 30 C so it was time to start increasing the fire. I'm staying below the protocol provided by the refractory manufacturer so I'm hoping for not too much movement or cracking. None spotted so far, but much higher temperatures to come. This just got very exciting. Here is the traditional 'stuck in the oven' picture 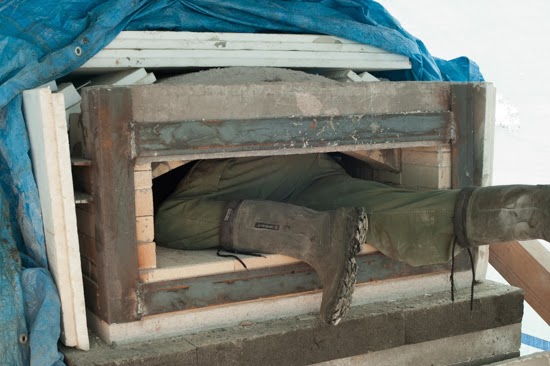 Lots of detail and some really cool pictures of this evenings firing on my blog here.Matthew |
|
|
|
Post by firebeard on Jan 24, 2014 21:32:13 GMT
Hi Matthew,
That's a great photo, I have been following your posts your oven is looking very good. When I built my oven I tried to get my mates kid to pose for a photo with just her head stuck out of the mouth but she didn't like the idea.
Joe
|
|
matthewcove
WFO Team Player
More details about the oven project and maybe side projects on my blog: http://fireandfocaccia.blog
Posts: 100
|
Post by matthewcove on Jan 24, 2014 21:40:31 GMT
thanks Joe. I can understand not wanting to go in there. I did'nt want to myself
Matthew
|
|
|
|
Post by firebeard on Jan 24, 2014 22:09:28 GMT
My oven is roughly the same width as yours but 25cm longer. When I built the arch I put some temporary steel ties across the inside to stop the roof pushing out until I had the reinforced concrete jacket round it. Working inside the oven with an angle grinder to remove the ties was the worst part of the build.
Joe
|
|
matthewcove
WFO Team Player
More details about the oven project and maybe side projects on my blog: http://fireandfocaccia.blog
Posts: 100
|
Post by matthewcove on Jan 24, 2014 22:19:31 GMT
Joe,
I looked at your last thread, I live in Poland now with my wife, but I am originally from Wootton in Befordshire. My folks still live there. I have also got my dad into baking bread, but not yet managed to convince him that he should build a WFO.
Matthew
|
|
|
|
Post by cannyfradock on Jan 25, 2014 13:31:39 GMT
Mathew
Knew that sooner or later you'd have to do the dangling legs bit. Even the guys who use a central pivitol jig on a Pompeii build have to do the same on the last few rings and capstone.
Looking forward to seeing a picture of the inside.
Terry
|
|
matthewcove
WFO Team Player
More details about the oven project and maybe side projects on my blog: http://fireandfocaccia.blog
Posts: 100
|
Post by matthewcove on Jan 28, 2014 13:06:05 GMT
Ooops! Last few days have mainly been concerned with making the chimney transition, this part will act to smoothly transfer the exhaust gasses to the round chimney pipe and will also contain a flap that can be moved to adjust the flow rate. Fully closed the chimney damper will enable to oven to be sealed during baking of bread. The transition section has been made from 2mm sheet steel, cut using an angle grinder and then welded using a cheap stick welder. The shapes were worked out by first drawing it in Sketchup and then transferring the measurements to the sheet steel. 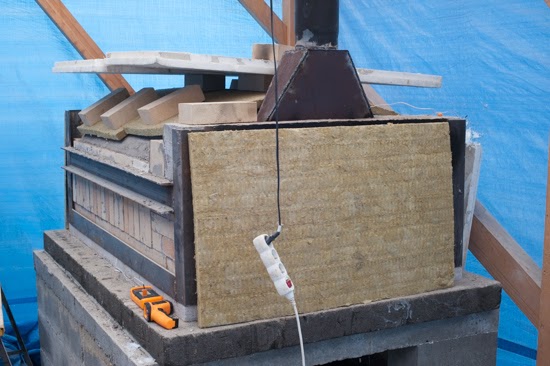 Chimney transition in place With the chimney transition in place, the curing fires are a lot easier to light, keep it burning and a cleaner burn with less smoke. The oven dome has also been covered with some temporary insulation, the insulation is a foil faced mineral wool that is rated to 530°C. I have covered the dome in this as it enables a more even heating of the dome during the curing process. The curing fires have gradually been increased in temperature, the oven has now been fired for a total of about 24 hours. Unintentionally, the curing has now been completed, after (I thought anyway!) fire had gone out last night, I completely filled the oven with alder logs. I had planned to leave the logs in the oven as they had been in the rain, leaving them not dry enough to fire the oven. Unfortunately there must have been some embers left in the oven and once the logs had dried out they ignited. When I woke up this morning there was a large hole in the roof of the bakery (fortunately, it did not set fir to the structure) and there was a very small amount of ash where the logs had been. The fire must have been seriously hot, all the black soot that had collected inside the oven was burned off, even on the reducer dome and chimney transition. Several hours later the temperature of the brickwork is still over 300°C and the temperature of the hearth insulation transition is at 230°C. I had intended to spend a few more days gradually increasing the temperature, but I guess the curing process was expedited. There has been some cracking near the centre of the oven, but nothing more than I had expected even with a proper curing process, some in the brick dome and one crack in the refractory slab that the hearth sits on. Matthew |
|
|
|
Post by cannyfradock on Jan 28, 2014 14:46:06 GMT
Mathew
I think you were very lucky as the small cracks sound like superficial cracks so you should be OK. Still don't take for granted that your oven is fully cured after that blast of heat....even when fully cured people usually find that the oven will get better in performance the more they use it...until about the 4th or 5th full firing at which stage every drop of moisture should have left the oven.
Your not on your own with the drying logs catching fire overnight......some have even said that the whole pile of drying wood have caught alight at the same time giving one almighty initial whoosh!!.....this may have caused your superficial cracks?
Terry
|
|
matthewcove
WFO Team Player
More details about the oven project and maybe side projects on my blog: http://fireandfocaccia.blog
Posts: 100
|
Post by matthewcove on Jan 30, 2014 21:59:45 GMT
Loads of work completed over the last couple of days. Finally got to cook some pizza tonight, practice for the party at the weekend. feels really good to have made it this far. Load of pictures and story on my blog here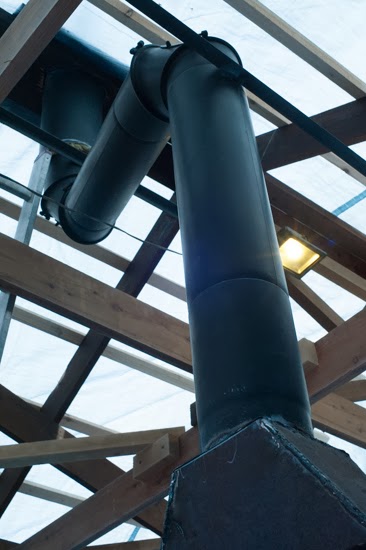 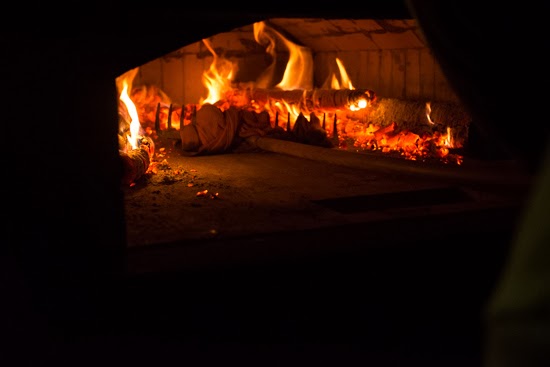 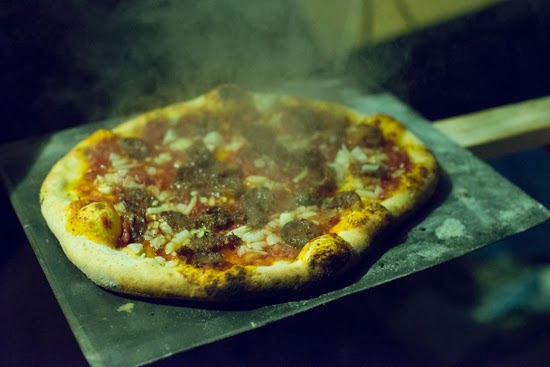 Thanks Matthew |
|
|
|
Post by cannyfradock on Jan 31, 2014 11:07:47 GMT
Mathew
Love the picture of your oven in use.....and lovely looking pizza...spot on!!
I like your thinking/design in including a damper system in your vent. The vent opening and chimney diameter are a good size so you will have no problem in getting heat into your oven.
Don't forget that your oven will increase in performance each time you use it until about the 5th full firing....or have I already mentioned that?
Terry
|
|
matthewcove
WFO Team Player
More details about the oven project and maybe side projects on my blog: http://fireandfocaccia.blog
Posts: 100
|
Post by matthewcove on Jan 31, 2014 12:35:15 GMT
Hi Terry,
The oven is working good for pizzas with the fire still burning, but I am hopeing to cook come sourdough tomorrow, not sure how I am going to do with the little temporary insulation. What changes do people observe after a few big fires, staying hot for longer, taking less time to get hot?
12 hours after finishing firing the thermocouple in the hearth is reading 150 C, it only got to about the same last night, so the foam glas is working well.
thanks
Matthew
|
|


