|
|
Post by docfester on May 4, 2014 6:00:11 GMT
So the build progresses and a bonus with nice weather this bank holiday weekend allowing a good attempt at topping the inner dome out. The last 2 days have seen the first few brick layers on;- 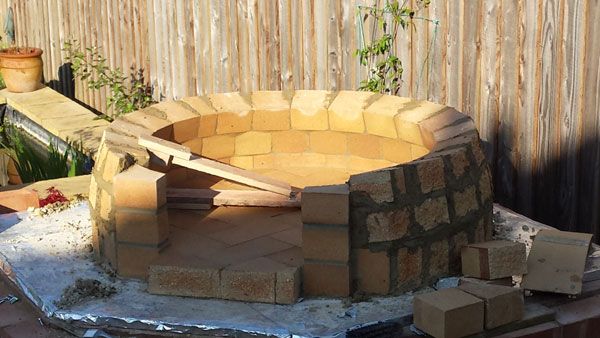 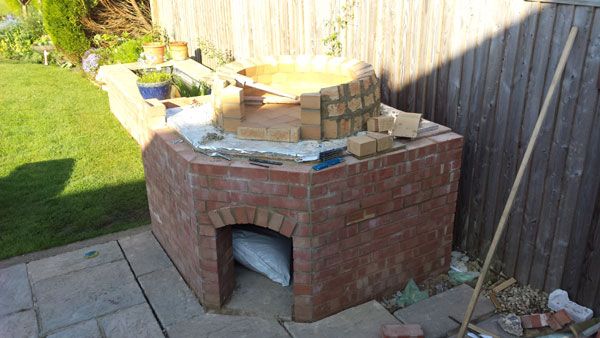 I actually had a few of the hearth firebricks 'sink' and not sure why. I manage to dig my way to them carefully lifting the bricks squarely out to avoid chipping corners. Still have one at the back that I will have to live with. So the end of yesterday has seen the entrance arch added with the dreaded dome/arch transition still to go. 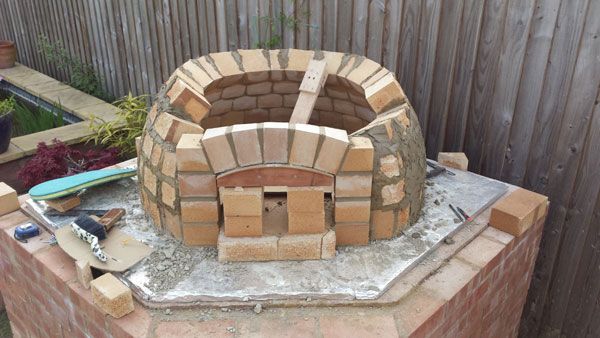 I did cut the back of the arch bricks to aid with the transition. 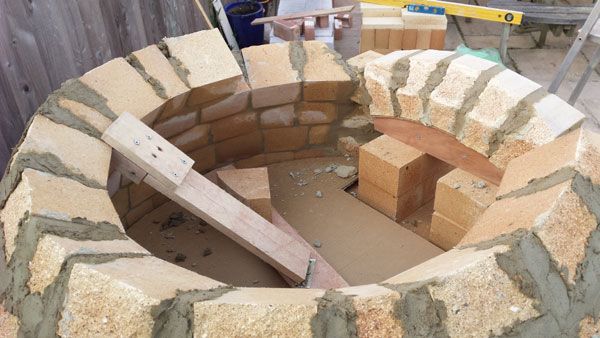 Should get some more progress shots taken later today. Pete |
|
rokdok
WFO Team Player

Posts: 130
|
Post by rokdok on May 4, 2014 8:14:02 GMT
Wow Pete you are really rocketing ahead. I'll be interested to see how you get on with the transition. -I think I'm going to build the arch bit by bit as I build the rings up. Cheers Paul
|
|
Bo
valid member
Posts: 75
|
Post by Bo on May 4, 2014 18:55:33 GMT
I wouldn't worry about the transition, I also cut the bricks in the arch after marking them using the IT tool and used thin cuts to help maintain the circular shape of the dome, it all worked out better than expected an wasn't as scary as I thought it would be !!
|
|
|
|
Post by docfester on May 5, 2014 20:30:01 GMT
Thanks Paul & bo. Well the build progressed quite well over this weekend and did make good use of the bank holiday. As I have moved the entrance arch back into the dome to give me a greater landing area the dome has taken on a distinct 'blunt' front side. I am having to shorten the brick width over the arch but no great problems;- 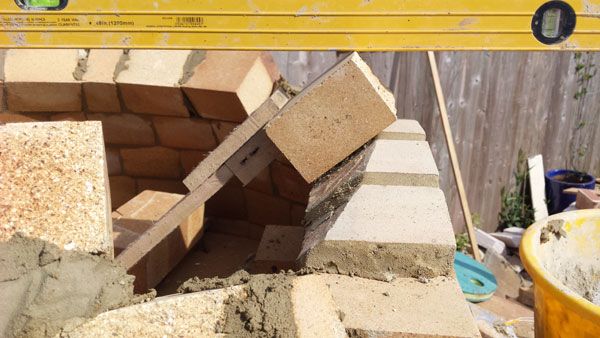 So with this I progressed the rings up and above the arch 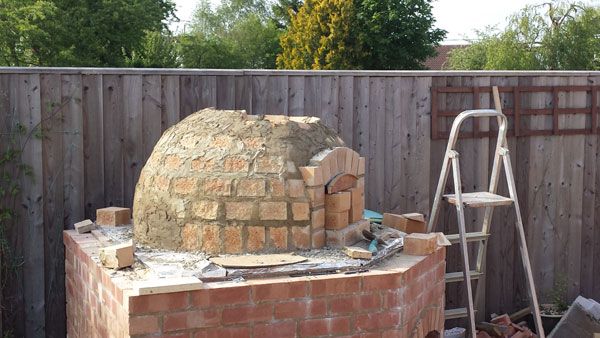 Using the IT became more and more unusable the higher I went as the dome varied from the perfect sphere and I ended up eyeing it. 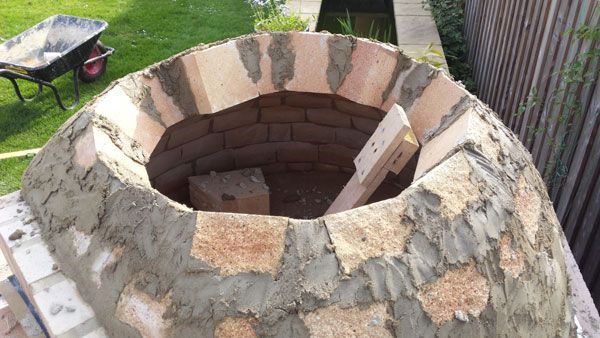 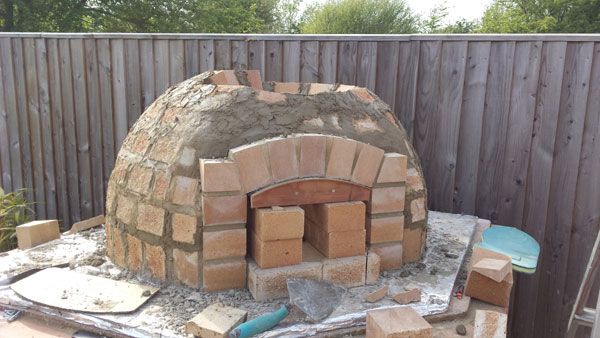 More to follow Pete |
|
|
|
Post by docfester on May 5, 2014 20:43:25 GMT
I had a minor collapse on the highest ring, having too much faith in the HB and even after leaving the brick a while to stick it eventually gave way. So a former was quickly knocked up which consisted of a plywood base propped up with bricks on the inside, the top was then covered with sand and I have plenty in the bulk bag at the end of my drive. Sorry no pics of this as I was in a hurry to complete before the forecast rain, did buy a gazebo which lasted a day before turning inside out a week ago!! 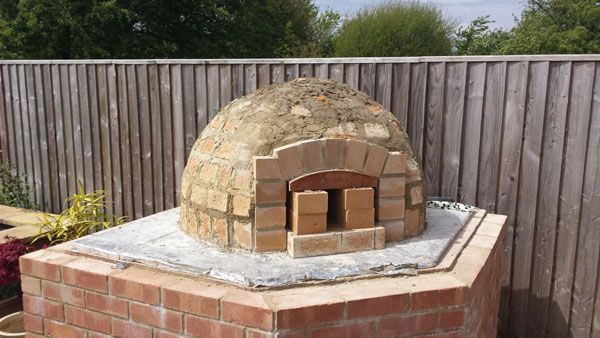 So the outside is not pretty but that will be covered anyhow. 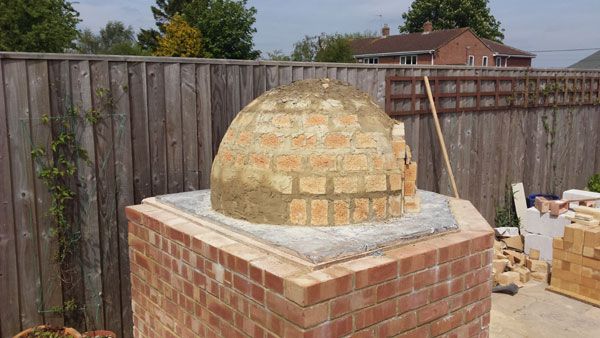 So after a few hours I removed the arch former and all the debris from the inside. I had used the original cardboard template as a cack-catcher on the floor of the oven so that saved on the cleanup. 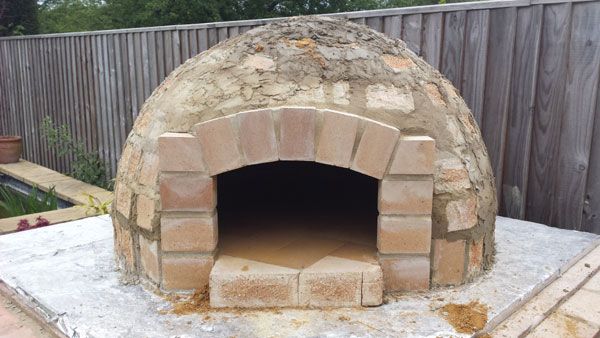 So I then pointed the inside joints of the upper rings now the former had been removed, I will class the upper joints as functional not prize winning!  . The ones on view from the entrance I'm pleased with, hmm... smells of the sea in there. 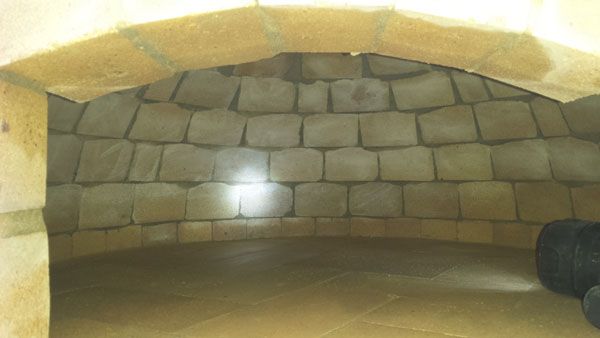 So thats where I am now, a plastic sheet covering the dome as the heavens opened about 5 mins after I completed the dome. Next to attack the entrance arch but maybe not for a week or so, back is giving me hell with all the awkward positions I have found myself in on this build. Cheers Pete |
|
rokdok
WFO Team Player
Posts: 130
|
Post by rokdok on May 7, 2014 6:49:27 GMT
Work of Art Pete. Very neat. Did you just use the sand former for the last brick ? Cheers Paul
|
|
|
|
Post by docfester on May 7, 2014 19:10:45 GMT
Thx paul,
Gravity was winning when i was 2 rings from the top, so sand former was in place from this point on. Strongly advise a former of some sort in place as it made the job so much easier.
Cheers
Pete
|
|
Bo
valid member
Posts: 75
|
Post by Bo on May 12, 2014 6:13:26 GMT
Looking good mate...
|
|
|
|
Post by cannyfradock on May 15, 2014 15:38:56 GMT
Hi Pete
I've been watching your progress and "learning" a great deal....I need to use the central pivotal jig I.T....on my next/current build. I thought that I'd already commented on your build but I think I'm getting confused with your build....and RokDoc's build......both fine builds and similar in quality craftmanship. I think though that you are a few stages ahead of RokDok....(it's the "Dok" bit that confused me).
It's always very useful on your first build to have someone else share a similar build at the same time.
I truly appreciate all the stage comments and pics......and what good pics they are!!.....interior looks a work of art (in all honest...it IS..a work of art) ...and love the transition pic. ....I've always used dome formers on my builds (not the I.T) so I generally have to do a bit of jiggerypokery to get the first full ring over the arch transition to work smoothly. On a 90cm diameter oven I set my internal arch back into the dome at a 45cm opening. My internal arch is a half brick, but I still have to go slightly out of a perfect circle to make this work......I've often wondered how this would work when using the indispensable tool......"I'm still learning"
Great build Pete....and....try to be patient with those curing fires.....it'll pay great dividends later.
Terry
|
|
|
|
Post by docfester on May 19, 2014 19:07:10 GMT
Thx Terry & Bo, Well a little more progress so thought I better update this build log. Next to attack was the entrance arch which required a new deeper former to be produced as the entrance is a brick and a half deep.  I added a 10mm insulation break in the hearth using a slice of thermolite block and topped with HB motar, I had the good intention of using the same method between the inner arch firebricks but this got forgotten! 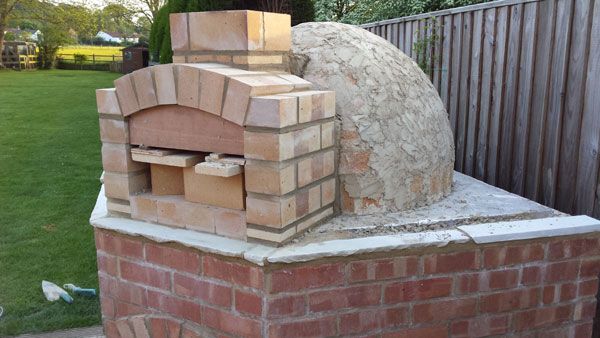 The hole for the flue allowed a brick and a half around the opening so thought I would use up some of these firebricks and have a brick chimney. A day later and the former was removed allowing the joints to be pointed inside. 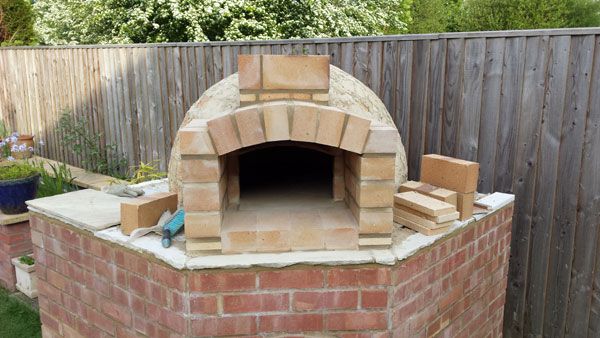 Would have loved to space the outer arch to use a keystone but I'm happy enough with the result. I used the same radius for the former as I have for all of the arches and increased the height of the the outer arch by using a 1" brick at the base and thus raising the brickwork enough to expose the inner brickwork for the door to be added later. So today on went the insulation blanket which I thought would be a battle in the wind but seemed to stick nicely to the dome. 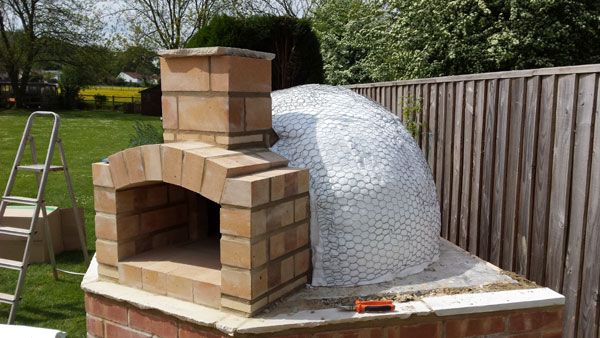 Biggest headache was the chicken wire, not sure if the blanket actually needed it to stay in place but I'm sure this acts as a key for the vermicrete to follow. This 'devil's porridge' deserves its name and really strange to mix and apply. The only mix I could find was 5:1 vermiculite/cement so that's what I went with and applied roughly 1-2" over the dome. 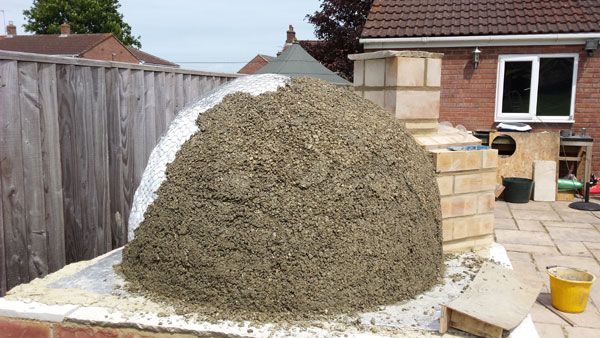
I did make a shaped trowel for applying but found it easier with a builder trowel and my grubby hands!
More to follow
Pete
|
|
|
|
Post by docfester on May 19, 2014 19:15:35 GMT
So after the vermicrete had gone off I thought it was about time for another curing fire and stand back to admire the oven. 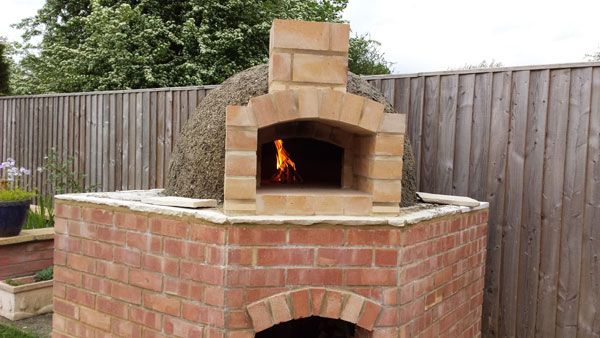 Had to check if the chimney worked but these small fires soon become large fires and I have to resist the temptation of adding more wood. 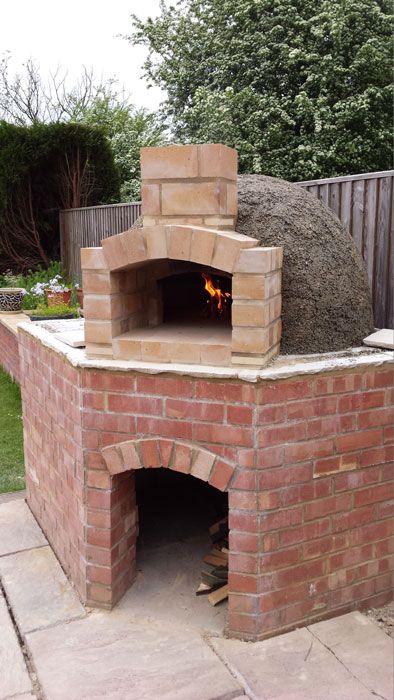 I intend to finish the chimney with a capping stone but for now that can wait. Right now I have a decision for the finish, either render or my preferred option of cladding in brick to match the base. How long would you wait before the final finish layer if I have small curing fires daily? Cheers Pete |
|
|
|
Post by cannyfradock on May 19, 2014 21:02:54 GMT
Hi Pete
I touch my forelocks to you Sir....what a fine build. Love those last pics of a bit of pyroclastic flow within the oven.
The hard work and the important bits are now done. The outer layer is purely to waterproof the dome and have it's individual cosmetic touch. To do your preferred option will take a lot of cutting of bricks to make the bricks look aesthetically pleasing to the eye. It does however look real good if you can get it right. It'll need a fair bit of time and patience to get it right. I'm lazy so the K-rend bags of waterproof mortar sound like a good option to me. ....I have to put a finish on a Pompeii dome in 2 weeks. (my thoughts)....I'm thinking of using K-rend (comes in 6 different colours) ...putting a thin base coat on, then adding small pieces of hay to the final coat. I'll try to get k-rend with a teracotta colour so it resembles a Cob oven finish......hope I haven't complicated the issue.
If you have the time try to get 3 kindling fires a day in your oven for at least a week before putting on the final coat. There is no "set time" for curing an oven but I always recommend 3 weeks of augmented curing fires before fully firing. Even when fully fired it may take up to 3,4,5 full firings to see the true potential of your oven.
Terry
|
|
|
|
Post by docfester on May 20, 2014 6:11:31 GMT
.....hope I haven't complicated the issue. Certainly not Terry it makes perfect sense. I am tempted with the K-Rend even if this is to waterproof the dome and I could add the brick cladding in the future. Any ideas how much it is or how much I would need? Thanks for info on the firing and I will keep the oven ticking over daily...... Cheers Pete |
|
rokdok
WFO Team Player
Posts: 130
|
Post by rokdok on May 20, 2014 10:23:47 GMT
Pete that looks fantastic. You seem to work at an incredible rate. Do you get a good draw on the chimney? It must be about 10 inches high. I've seen recommendations for chimney height of up to a metre, so it'll be interesting to see if it sucks all the smoke up on a full fire. I expect I will. Cutting bricks is really really dusty work even if you give them a good soak, as you say you could always add them after. All the best Paul
|
|
|
|
Post by cannyfradock on May 20, 2014 13:15:14 GMT
Pete
I haven't yet used K-rend (K-rend is the make but there are many other makes of the same stuff and more and more builders merchant seem to be stocking it.) I got a quote a while back from "Sheffield Insulation" (if you google their name you can find your local branch)...it was about £8 a bag......and I think it will take 3 bags.
Terry
|
|


 . The ones on view from the entrance I'm pleased with, hmm... smells of the sea in there.
