|
|
Post by docfester on Apr 15, 2014 20:05:34 GMT
After many months of looking at the superb builds on this forum I have eventually taken the plunge and actually lifted a spade in anger. Like so many people I have lurked in the background trying to absorb as much information about constructing a WFO and finally taking my first tentative steps. So to begin with I'm a bit of a rookie when it comes to bricklaying so no sniggering at the back..... Thought it only right to share my build as so many helpful builds on the forum have inspired me. The proposed location being the corner of the patio and I'm thinking of a pompeii clad in brick with the inner dome and floor constructed with fire brick. 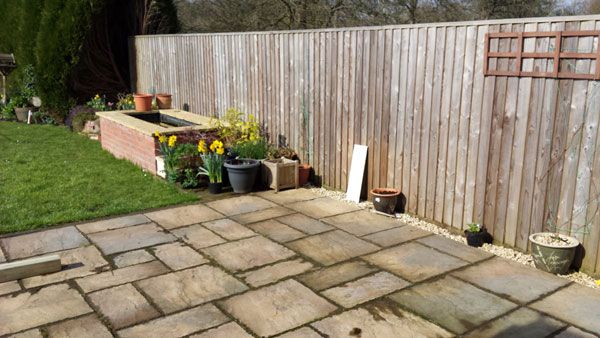 After the first day I had the slab down 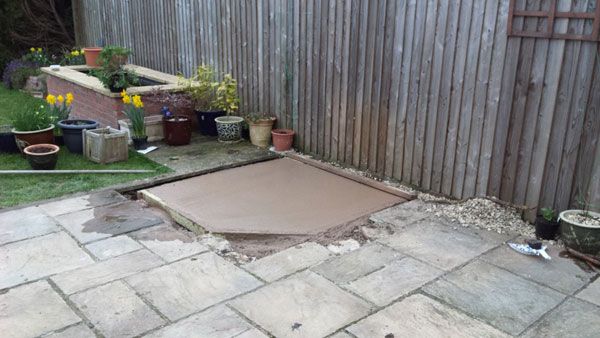 Sorry no progress shots as it was getting pretty late when this was finished. The base had hardcore then a layer of sand, closely followed by a DPC, plenty of rebar and then the muck. The slab is around 1600mm square and although I have no game plan to the size of the oven I hope this will be large enough. Last week I made a start with block work and thought I would also clad this in brick at the same time. Maybe the wrong way to construct as most builders seem to leave this until the oven is finished, but thought I would get less ear ache if the build looks semi-finished as I go....  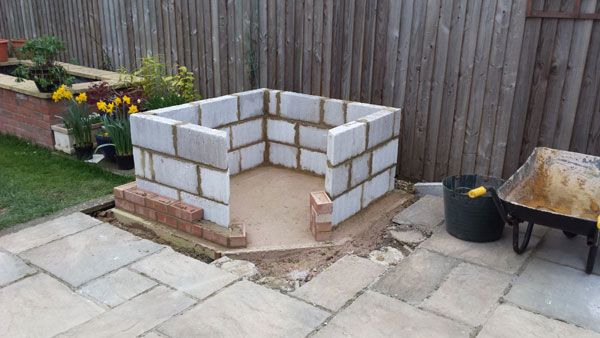 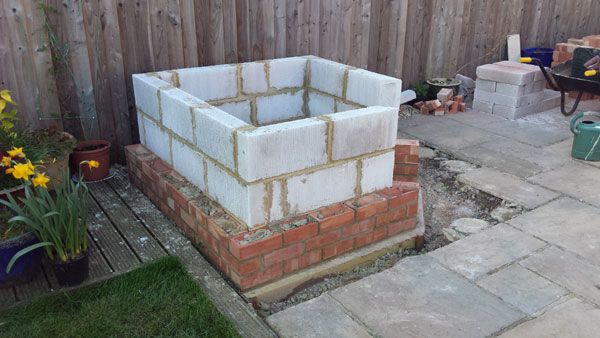 Both the blocks and brick have a DPC and the intention is to re-lay the patio slabs up to the brick. 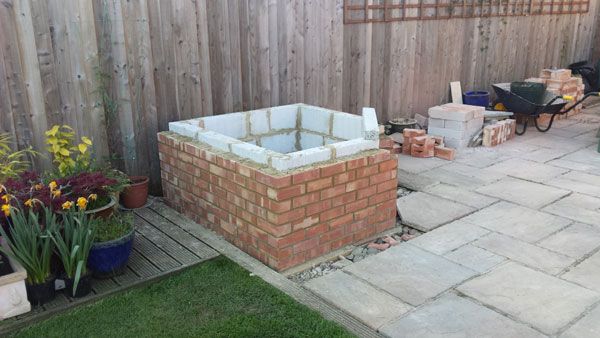 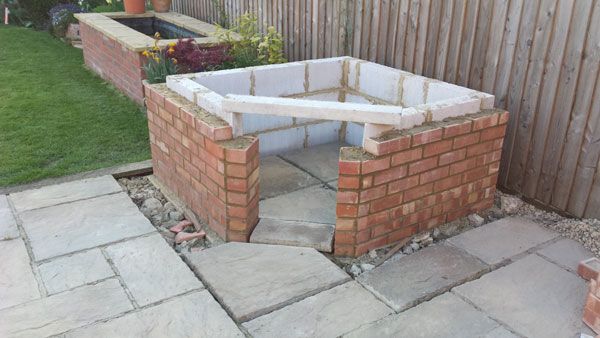 So this is the progress so far after some dodgy bricklaying and pointing (the fish pond in the background is not my handywork and just there mocking me!). Next up will be the front arch and then deciding just how high I should make the wall before the slab goes on top? I know the final hearth needs to be elbow height so thinking the lintel and possibly another 2 layers of brick should bring it up to around the right height? The intention is concrete slab, insulation blocks on the flat and fire bricks. Cheers Pete |
|
Bo
valid member

Posts: 75
|
Post by Bo on Apr 17, 2014 3:29:38 GMT
Looking good.
|
|
|
|
Post by docfester on Apr 23, 2014 12:59:12 GMT
Thanks bo, its a steep learning curve but I'm going at my own pace which helps. The build has progressed in the last week as I've stolen a few days off work and dodged the showers. I did increase the height by another block as I had under estimated by quite a way. Next up the shuttering and rebar went in in readiness for the concrete slab. 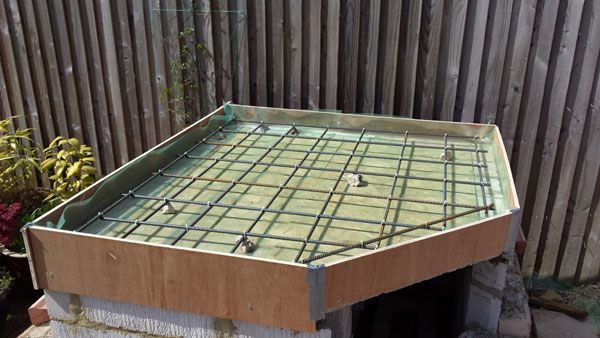 Then the concrete.. 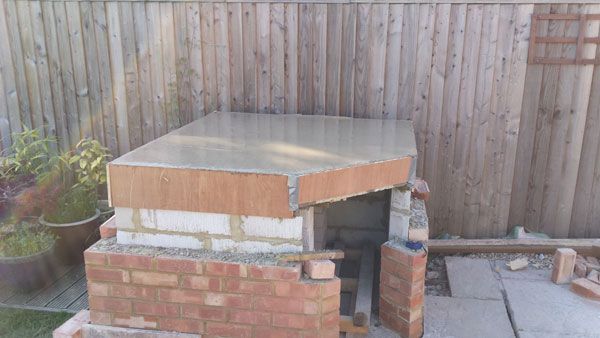 A good few days to harden off allowed me build up the wall a little. I made use of a few pallets to support the slab whilst it set and eventually had the misfortune of having to cut them up to get them out again!! So the build to date looks like this; 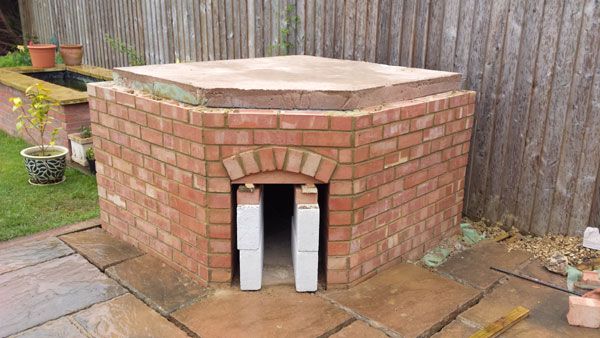 Giving it a few days before the arch former is removed and 2 more brick layers should see this part finished. Spoke with Liam at Kilnlinings today and ordered the firebricks, fireclay and other bits and pieces which I hope will be with me by the weekend. I had intended using Thermo blocks under the hearth but Liam advised using the CalSil board so will give that a try. Finally a thank you to the forum and Liam @ kilnlinings for the discount voucher as this is the most expensive part of the whole build. More soon Pete |
|
|
|
Post by bookemdanno on Apr 24, 2014 12:15:44 GMT
Nice start Pete!
Glad you went the route of setting everything out from a course below finished floor height to hide the foundation.
It always looks better!
good luck!
|
|
|
|
Post by cannyfradock on Apr 25, 2014 6:28:35 GMT
Pete
Great work!!.....your brickwork (and blockwork) look fine to me. Nice bit of corbelling out of your arch....I like that special touch.
I wish I could spend more time on the forum.....I could've then suggested that you build your outer brickwork wall up higher than the slab. You could've then used it as a shuttering for your support slab (that's the method I use)....as it is your picture of the shuttering and the re-bar is just about spot-on and very useful to show other members how to create this stage.
I've only used the Calcil board from Liam once. The product works extreemly well and gives brilliant heat insulation/retention to the fire brick hearth, but, he recommends wrapping the board in tin foil....this proved difficult to spread the homebrew mix on it to lay the fire-bricks. Next time I go down this route I'll probably lay a thin slurry of cement and lime over the foil and let it dry to ease the laying of the fire-bricks with refractory mortar.
Love the build so far. Looking forward to following the rest.
Terry
|
|
|
|
Post by docfester on Apr 26, 2014 6:33:28 GMT
Thanks Danno & Terry for your words of encouragement, will try and keep the build photos updated on a regular basis. Terry I have to admit it is was your build that gave me the inspiration to have a crack myself. Yes I did intend to use the outer brick as shuttering but this all got forgotten as the build progressed. So at present the build looks like this; 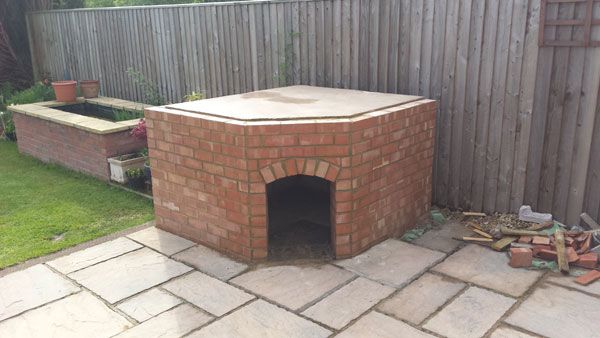 Got the bricks to a level I'm happy with for now, not sure about the underhearth insulation height until I dry run everything so still a final coarse of bricks to finish things off. I carefully removed the arch former after a few days and relieved that the arch didn't collapse on me. Dogs already checked out the inside and eyeing up as a personal residence. True to his word Liam from Kilnlinings got the bricks and extras to me yesterday, which gives me the weekend to start laying out the plan for the oven itself. 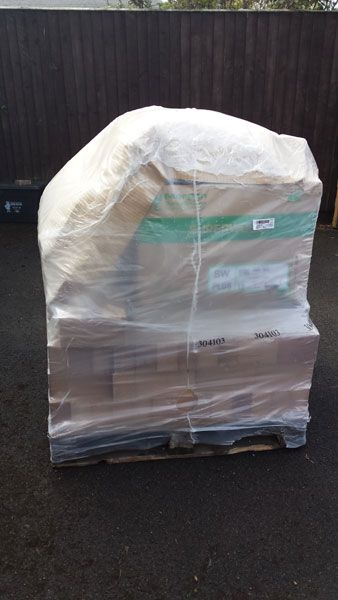 Feels good to get the actual oven building after all that brickwork and looking forward to the next stage. Stay tooned Pete |
|
Bo
valid member
Posts: 75
|
Post by Bo on Apr 26, 2014 7:45:20 GMT
A lot neater than mine but then I went for a rustic look!! I look forward to seeing the weekends work, have fun!!
|
|
|
|
Post by cannyfradock on Apr 26, 2014 19:53:11 GMT
|
|
|
|
Post by docfester on Apr 27, 2014 6:37:49 GMT
A lot neater than mine but then I went for a rustic look!! I look forward to seeing the weekends work, have fun!! Rustic is good Bo.... believe me with a close inspection mine can easily be in the same category! So not the best weather yesterday but in between showers I managed to cut the herringbone hearth firebricks. 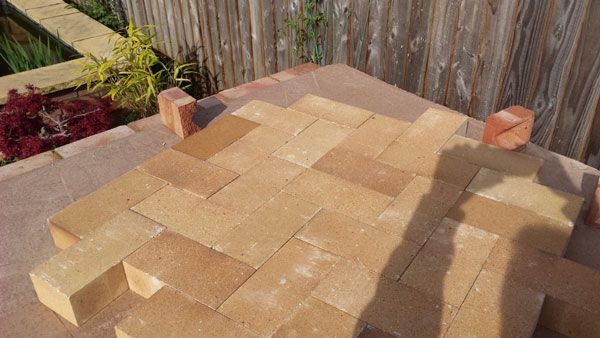 Laid them onto the slab and made the template from cardboard to the correct size and traced onto the firebricks for the cuts required. 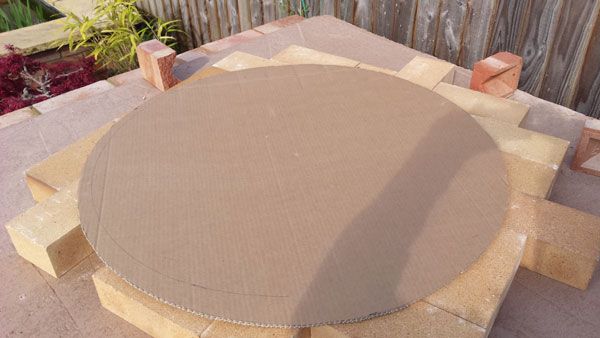 Then cut the firebricks numbering each as I went in case of confusion! 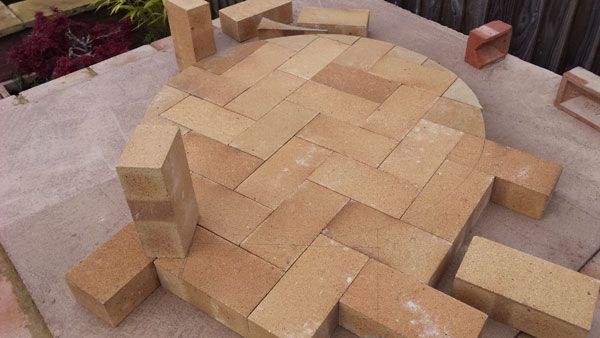 After cutting the first 2 bricks the blade in the angle grinder (4.5") called time and I rushed out to get a couple of replacements. Same happened with the next one so I was worried the bricks are too tough and thinking of solutions but then noticed the blades were blue and I had obviously overheated them. So it was my fault as I was trying to force the blade through instead of just letting the blade cut at its own pace. Not had a problem since and cooled with water as I go just to be safe and put that one down to experience! Next up I removed the firebrick jigsaw puzzle from the slab and added the insulation board 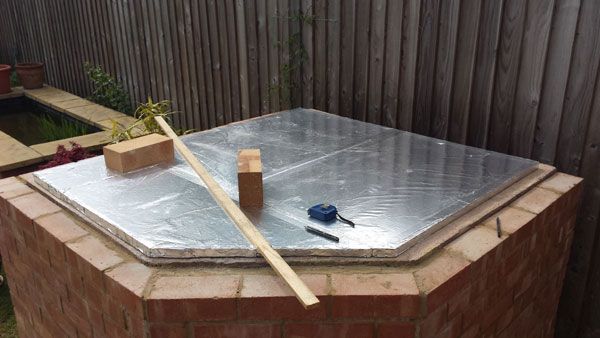 Battling the wind everything had to be weighted down, even the board! 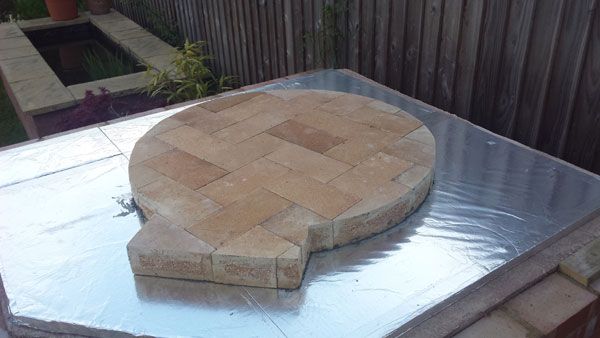 So managed to get the hearth bricks cemented down with a 50:50 fireclay/cement mix before the heavens opened again. Never used the fireclay mix before and damn that stuff is sticky. Hope to be adding the first ring of soldier bricks today. Cheers Pete |
|
|
|
Post by docfester on Apr 27, 2014 6:45:14 GMT
Terry yes the first link is the one that got me hooked, will take another look at the 1" pavers on that build. Also thanks for the link for the Abersychan build which looked to use Calcil board considerably thicker than I have been supplied, I think mine was 1" so hope that will give enough insulation. Thinking about it I could have doubled up the board to sit just under the oven itself but not sure I quite had enough for that anyway. Cheers Pete |
|
|
|
Post by cannyfradock on Apr 27, 2014 10:32:20 GMT
Nice neat workmanship Pete. It's always impressive when you see that characteristic keyhole shape of the hearth bricks. Tip top work on the herringbone pattern.....and laid diagonally also....perfect.
I don't know a lot about the calcil board...mine was 50mm thick (I think). That stuff is remarkably good as an under hearth insulation, but not sure on the recommended thickness.
Terry
|
|
Bo
valid member
Posts: 75
|
Post by Bo on Apr 27, 2014 16:45:21 GMT
I got my son to run the hose over the bricks as I cut them and it seemed to work quite well and it kept the dust down as well. There certainly doesn't appear to be much "rustic" to be seen so far in your build!!!Looking good.
|
|
alun
valid member
Posts: 55
|
Post by alun on Apr 29, 2014 23:55:43 GMT
Looks amazingly neat. Puts a lot of other builds to shame. Great to see the outer bricks in place at the same time as the main build. As you say, it looks a lot less like a work in progress (coming from someone with exposed breeze blocks still in the garden a year later...)
|
|
|
|
Post by docfester on Apr 30, 2014 20:43:58 GMT
Thanks for your kind comments and I did manage to get the soldier course up last weekend just not got around to posting the pics 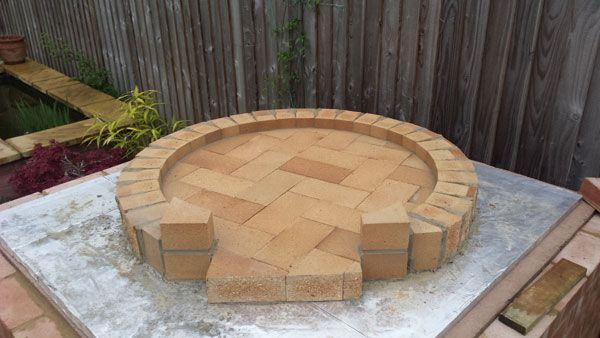 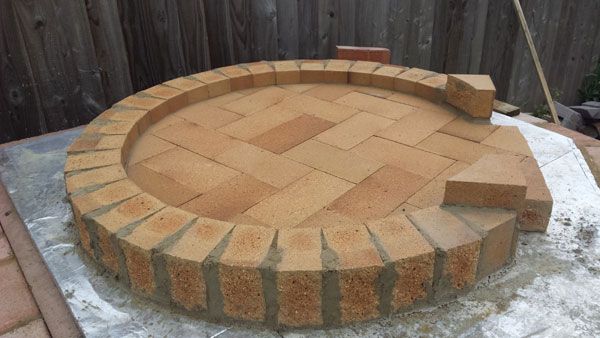 Getting to the satisfying part of the build now as the actual oven shape is created. Got some high points on the hearth to still take out with the angle grinder but next on the list is creating one of these magic IT's. The homebrew is much more workable with the 5:1:1:1 mix than the underhearth 50:50 fireclay/cement and easily sponged away to give a nice smooth finish. Having annoyed the neighbours last weekend cutting the firebricks I hope the trusty bolster will do most of the work for the oven walls until I get near the top. Cheers Pete |
|
rokdok
WFO Team Player
Posts: 130
|
Post by rokdok on Apr 30, 2014 21:05:51 GMT
Hi Pete neat work, I'm about a day behind you. Amazing how different all these ovens are, Cheers Paul
|
|


