|
|
Post by markmckenzie on Oct 16, 2019 8:13:41 GMT
|
|
|
|
Post by truckcab79 on Oct 17, 2019 7:05:15 GMT
Lovely work. Glad you’re doing a brick clad outer. They do look fantastic and you don’t see many finished that way.
|
|
|
|
Post by markmckenzie on Oct 17, 2019 12:01:12 GMT
I hope you'll like it!
28 half-bricks per layer of the outer dome - all will need cutting down. Glad I bought the Stihl saw now.
I'm thinking of adding fibreglass strands to the vermicrete layer as it will be semi-structural.
Mark
|
|
|
|
Post by downunderdave on Oct 17, 2019 20:43:03 GMT
Hi Mark, Not 100% sure of your intentions here, but if you are planning to use vermicrete instead of ceramic fibre blanket, then if so be aware that to achieve adequate insulation value the vermiculite should have as little cement added to it as possible. 10:1 is about as lean as is workable and results in a very weak material, but firm enough to render onto. The addition of glass fibres to a very lean vermicrete is unlikely to strengthen the mix to a significant degree. Also the fibres used must be the zirconium coated alkaline resistant ones (look for AR glass fibres) as non coated fibres will react and degrade from the cement content. In your case you’ll be just filling the space between the two brick shells so a dry blanket is a far better performing solution. Alternatively, and not quite as good a performer, would be a loose fill of either vermiculite or perlite. Loose perlite being a better performer than loose vermiculite.The addition of water (around a third of the volume of vermiculite) to a vermicrete mix is problematic because removal is difficult and too much heat will make it swell and crack. Remember that 1 litre of water will expand to around 1600 litres of steam. The escape in your case would be greatly reduced because it will be held in by the outer brick layer.  |
|
|
|
Post by markmckenzie on Oct 18, 2019 8:34:02 GMT
Hi Dave,
I will be using 50mm of ceramic blanket and then vermicrete over that.
The aim is to use the vermicrete as the former for the outer brick skin (if I can place it accurately enough). Water removal will be facilitated by the use of air brick vents in appropriate places. I am hoping that the vermicrete is porous enough to facilitate this.
It will also be the former for the front exterior brick arches and, in the hope that I could strengthen the vermicrete without resorting to a higher cement ratio (and more water), I decided to add the glass fibres. I take onboard your recommendation for the AR coating and will look for this.
Time to get outside and work on the outer firebrick arch and flue gallery.
Regards,
Mark
|
|
|
|
Post by oblertone on Oct 18, 2019 9:54:12 GMT
FWIW I'd be very tempted to go down the loose fill route using either perlite or vermiculite. You appear to have approximately 4" gap between domes, and without consulting any tables I'd say this would be perfectly adequate insulation using dry vermiculite.
A long time ago I worked in a factory producing wire and wire rope, our galvanising baths contained molten zinc at about 450c, these were covered in a 4" layer of loose vermiculite and this was sufficient to lay your bare hand upon the surface. The advantages of a dry fill being the absence of any water that needs removing. I appreciate your need for a former for the outer dome but would use small blocks of board insulation to keep the separation, these could be reused as the layers progressed.
Nothing in the above is meant as criticism as I stand in awe at what you have completed to date.
|
|
|
|
Post by markmckenzie on Oct 18, 2019 14:04:16 GMT
Please do not worry about criticism - I have a thick skin and have not made a pizza oven before!
I think that the only way I can get a good accurate finish on the dome is to lay the bricks onto something firm - that's why I'm going for the vermicrete. I appreciate the water issues and allowing for that is in the plan. I don't think I'm good enough to build a brick dome without decent support.
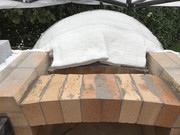
Today I cemented in the outer firebrick arch and wrapped the dome in 75mm (not 50mm as I'd planned earlier) of insulating blanket. This way I'll need less vermicrete = less water to allow to escape.
I've ordered the AR fibres too - thanks for that tip Dave. I wouldn't want to have a failure just for the sake of £25 of fibres.
Fixing arches is a total art - I had to slowly allow the arch to settle as the cement dried so the arch started about 5mm higher than it's final position. Thought I'd leave it alone to dry before tackling the flue gallery - I'll have a go tomorrow if I have any free time.
|
|
|
|
Post by markmckenzie on Oct 18, 2019 15:17:41 GMT
|
|
|
|
Post by markmckenzie on Oct 18, 2019 15:18:38 GMT
Few more...   |
|
|
|
Post by downunderdave on Oct 18, 2019 19:38:06 GMT
Hi Mark,
From your photos I thought you were planning to build the outer brick shell, as you already have a couple of courses done, then fill the space with wet vermicrete, no blanket. That’s why I could see problems. Now I see that you are using blanket and then restoring the the form with a vermicrete layer. This is the normal procedure.It is best once the vermicrete appears dry (a couple of weeks) to eliminate the water from the whole structure before applying the outer brick shell. In fact you could use the oven for months in this state provided you keep it dry. The outer shell is only decorative and protection from weather, bumps and abrasion. Very nice build by the way. My apologies for misinterpretation of your planned approach.
|
|
|
|
Post by markmckenzie on Oct 19, 2019 15:01:21 GMT
|
|
|
|
Post by truckcab79 on Oct 20, 2019 13:11:59 GMT
Fantastic build. I wouldn’t worry too much about needing a former for your outer brickwork, though the additional insulation will do no harm of course. I had similar concerns about doing mine. Whilst mine has a cast inner dome, it is then wrapped in insulating blanket and clad in brick like yours. I was concerned that as the blanket was uneven my brickwork would be all over the place. However I laid directly onto the insulation (well, onto the chickewire that went over it). Decent thick bed of mortar to give you some adjustment and it went together well. You could make a former to follow and I did initially but very quickly gave up with it and trusted my eyes. If it looks right then it is generally.
|
|
|
|
Post by markmckenzie on Oct 20, 2019 16:36:03 GMT
|
|
|
|
Post by downunderdave on Oct 21, 2019 7:22:59 GMT
The vermicrete gets easier and easier to apply the higher you go because it’s leaning in more. Just keep making a flat ledge on the top to take the next row. Just tap the outer surface of the vermicrete with the flat of your trowel and eyeball the profile. You can get a remarkably accurate hemisphere that way.
|
|
|
|
Post by markmckenzie on Oct 23, 2019 8:06:32 GMT
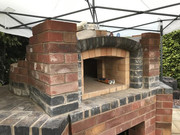
Quick update - well, I thought laying bricks couldn't get any harder. Wrong. The front arch in blue bullnose bricks was really difficult. It's not perfect now but is close enough! Sometimes it's better to trust your own eyes than a former - when I took the former out(all accurately measured) the arch just didn't look right and so I adjusted it with the help of wedges. These will be trimmed off and won't be seen. Also laid 2 courses around the dome. Hoping to get the infill brickwork done above the front arch and the whole dome covered in vermicrete this week - then I'm going to leave it a few days (off to Venice with the family). On my return I will start the curing fires and work on the outer brickwork.       |
|