|
|
Post by lemonsouffle on Jan 7, 2013 18:56:21 GMT
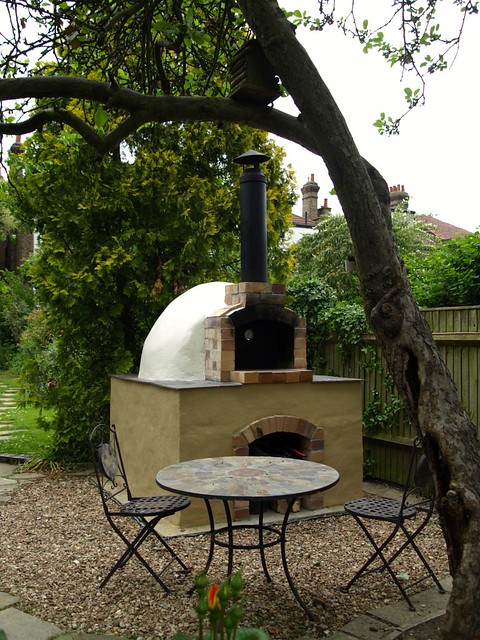
Hi All I need some common sense advice about how to fix a twin wall flue in place. We decided to splash out and buy a 1m 6" twin wall flue for our oven chimney so I looked at some website to check out prices and then phoned one of them. The man I spoke to explained that at each end of the flue pipe the insulation is exposed and assured me that I will also need to buy an adapter (which would cost another £40) to go on the bottom of the flue where it is connected to the oven otherwise the insulation will be exposed to heat etc. Since this business normally deals with wood burning stoves installed in buildings he probably didn't have much of an idea of the sort of structure I was talking about and was advising absolute best practice but it did make me wonder are we doing the right thing? He also pointed out that we will need a rain cap for the top which is pretty obvious and I do intend to get. How have other people dealt with fixing a twin wall flue? Do you need to worry about the insulation being exposed? We haven't got very clear plan of exactly how to fix the flue in place but I assume it will involve lots of bricks and mortar and that the base of the flue will be resting on bricks. These things always seem to become clearer when we are actually doing them. Here is a picture of our entry arch with the gap ready for whatever holds the flue in place  and from the side,  Thanks for reading and for all your help |
|
|
|
Post by Happy Baker on Jan 9, 2013 8:33:06 GMT
Insulation being exposed? The twin wall I have is completely sealed. Like this:  And the need for a hat on your chimney is debatable (I got this from a chimney engineer) because rain very rarely comes straight down, you can get away with a sleeve that sits outside the chimney leaving a gap that the water can drip off. Bit difficult to explain, sorry. Most people go for a 'chinese hat' type, because they haven't got the fire going all the time, and it's easier! (Guilty!  ) And as for fixing it, I would get a local fabricator to make up a plate with a collar that fits up inside the chimney to keep it in place, although because ours is an afterthought it just sits inside the pot, over the chimney aperture. HTH |
|
petec
WFO Team Player

Posts: 232
|
Post by petec on Jan 9, 2013 20:26:59 GMT
Hi there Ms Souffle !! you're at a similar stage to me... I have just received my 1m SS twin wall flue - which is 6" internal diameter. I have been looking at flue plates but most I have seen appear to be for fitting to an indoor fire and are large rectangular plates. I'm trying to find a square one. My plan is to use a sq one which will sit on a level plinth of brick built up around the vent space. I will then lay a couple of courses of brick around this flue plate and the twin wall flue will simply sit on the the flue plate. The plates have a circular collar which locates the bottom of the flue and keeps it in place. Vertically its supported by the couple of courses of brick , then I will probably vermic/render around the base on top of the brick courses. see post number 161 onwards on my build thread, where I asked similar question and got plenty of advice. ukwoodfiredovenforum.proboards.com/index.cgi?board=pompeiiovens&action=display&thread=618&page=11Good luck on the rest of your build. Cheers Pete |
|
petec
WFO Team Player
Posts: 232
|
Post by petec on Jan 9, 2013 20:52:13 GMT
|
|
|
|
Post by Happy Baker on Jan 9, 2013 21:33:41 GMT
That's the sort of thing I was thinking of. His prices don't seem too bad either.
|
|
|
|
Post by tonyb on Jan 10, 2013 11:54:03 GMT
This is the stuff I used which has been problem free for me. www.stovesonline.co.uk/selkirk-flue-components.htmlI have a square anchor plate (I haven't got round to screwing it down yet  ) then a length of about 1 m of flue pipe. As stated by HB, the insulation is fully enclosed, the Selkirk design, and possibly others have a quarter turn screw lock in place to secure the pipe to the anchor plate, and presumably another length of flue if required. I actually remove the flue after firing and just cover the plate with some wood. On the odd occasion I've left the flue in place due to a little too much wine, I've found that there is some staining of the firebricks underneath either from rain entering the flue and washing material off the inside of the flue or from flue gas condensate. I do think a flue raincap is a good idea and if the staining is something that bothers, I suggest a piece of wood under the flue would help keep the hearth clean. |
|
jemb
valid member
Posts: 63
|
Post by jemb on Jan 10, 2013 14:26:53 GMT
ive got the same thing but was thinking more simply. The flue is double lined so stops you burning yourself if you touch it?!, but you only need the inner tube to act as the chimney so my idea was to cut the outer tube about 3 inches around the base & bend back to create flanges which can then be mortared in
|
|
|
|
Post by cannyfradock on Jan 10, 2013 17:54:38 GMT
Lemonsouffle
Nice to see lots of suggestions coming in on this topic. As Pete says, he is also on the same stage as you. As your supplier has said you can buy a flange for the base which either sits in its own round apeture or is bedded on to a flat platform which you have to create on top of your arch. I have only used reclaimed double lined s/s flues and have butchered the outer sleeve exactly as "Jemb" has suggested. (the flues that I bought were sealed at both ends.) Only when I cut the base was the insulation exposed. (I made lots of vertical cuts about 3" high then bent the outer sleeve outwards. I used refractory mortar to bed the s/s flue on the vent, avoiding the outer sleeve actually touching the bricks)
It's always going to be tricky, trying to place a flat end pipe on a curve and Tony B's anchor plate and the chap Pete was talking to sound like a good option.
There is nothing wrong with simply building a flat platform on your arch with a few shims or split bricks then cementing in place with refractory mortar or the product Tony has mentioned. The chimney isn't heavy so it should stay firmly in place......especially if the vermecrete encases the chimney.
As you have created a full void between 2 arches, you may have to fill the void either side of the chimney.
Hope you get a lot more feedback on this.....
Terry
p.s.....good idea to also get idea's from Pete c's build.
|
|
|
|
Post by turkey on Jan 10, 2013 20:37:53 GMT
I think the double lined flue has two uses, one stops you burning yourself and also makes for a hotter flue internally which will create a better draw. with regards to fixing the flue, you can check my build diary for my budget approach which was to not use a base plate and just cement it in. ukwoodfiredovenforum.proboards.com/index.cgi?board=pompeiiovens&action=display&thread=301&page=4I made a flat section over the arch which you will probably need even with the register plate, and then I made some brick teeth to sit the flue on, filled the internal ring with cement and placed it down so, then i made a large ring of cement round the outside that went up and covered an indent on the flue to give it a really good grip. I then build up round the base of the flue with bricks to make a good back fill to hold it all in. I only have a single flue cowl and i used cement to seal the insulation as my flue was not metal sealed, this has cracked due to steam from the base of the flue rising up so need to get a new cowl |
|
|
|
Post by lemonsouffle on Jan 11, 2013 18:42:55 GMT
Hi All thanks for all the replies, so many ideas. The flue arrived yesterday and at both ends the insulation is completely exposed. I bought it from Direct Flues see: www.directflues.co.uk/index.php?page=shop.browse&category_id=32&option=com_virtuemart&Itemid=7 the only connecting plates they sell are for connecting to another pipe coming out of a wood burning stove or similar. I also bought the rain cap for the double wall flue to protect the top insulation and stop rain coming in. we want a black flue (stainless steel is just too shiny) so i also bought a can of high heat spray paint. Tonyb I looked at Stoves online and dismissed them as being too expensive although that anchor plate does look good and was the sort of thing I was imagining might exist. Petec - I have seen your build thread and realised that we were at the same stage, I thought it would be best to post my own question separately. It will be interesting to see what solution you choose in the end. Thank you for the ebay link that could be useful. Turkey - I love the brick teeth what a great solution. I had looked through your thread before but had missed that bit somehow. Cutting the outer sleeve and bending it makes sense so we will bear that in mind as an option as well. Currently we are thinking build up on the sides of the arch to create a flat platform to fix the flue on to. We have some Cal Sil board left over from the under hearth insulation so could put that between the bricks and the flue. It is quite easy to cut and shape so we were thinking that a groove could be cut into it for the edge of the flue to sit in. (inspired by Turkey's brick teeth). On the outside 2 or 3 courses of bricks to support the base of the flue. We have quite a lot of firebricks left over so were going to use them for this work on the outside - is there any reason why you shouldn't use them? Are they ok exposed to wind and rain? When we can go outside in daylight tomorrow and play around with bricks it may start to become clearer. In terms of sequence of build at this point is it necessary to have the chimney in place before insulating and rendering the dome? or could we insulate and do first layer of render then finish off the render later. I am asking because it feels as if there is still a bit of work to do to get the chimney right and I am desperately keen to insulate the dome and cook properly even if snow is forecast for next week. Thanks for all your comments and support. |
|
jemb
valid member
Posts: 63
|
Post by jemb on Jan 11, 2013 19:44:03 GMT
next week? i think you may find a flurry over the weekend.
The reason im a little bit peeved is down to the fact its not meant to get over 3 degrees this weekend which is TOO cold for lay mortar
|
|
petec
WFO Team Player
Posts: 232
|
Post by petec on Jan 12, 2013 14:54:10 GMT
Hi all, small update on vent / chimney transition. Here's what I came up with today as a solution for the vent. Transition from rectangular vent between the 2 arches to a circular vent and plinth for the chimney flue ( or for the flue plate to be mounted on. ) Bricks are just loose, so you can see the idea. Not going to homebrew them in place until the risk of the freeze abates. For the circular vent I just cut one firebrick in half to get a shallow 1 1/2" deep brick , then scribed a rough semi-circle in each half brick, and used the small angle grinder to gnaw away until I got a rough semi circle in them. The additional bricks were grooved all round to a suitable shape/angle for my arch profile using the angle grinder, and then bolster chiseled to remove most of the waste. I then just used the small angle grinder freehand to shape the bricks to the right sort of shape. There will be a few filler bricks at the back where these "plinth" bricks meet the dome to get everything level and solid. i55.photobucket.com/albums/g159/pedrocortez/Pompeii%20WFO%202012/file-24.jpgwill post additional pics in my build thread. Rgds Pete |
|


 )
)

 ) then a length of about 1 m of flue pipe. As stated by HB, the insulation is fully enclosed, the Selkirk design, and possibly others have a quarter turn screw lock in place to secure the pipe to the anchor plate, and presumably another length of flue if required.
