|
|
Post by webbm00 on Jan 7, 2019 14:44:43 GMT
Finally getting close enough to finishing the painting that I can start to think about the oven.  The builders have done a fantastic job with the level and flatness of the slabs so I can put the calcium silicate boards directly on them. I've cut the calcium silicate board so it is 90mm wider than the base of the oven so I can insulate the oven with 100mm of vermicrete and cover it. Just need to cover the calcium silicate with foil first to reduce the moisture absorption. 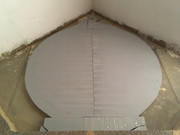 My plan for the base thermocouples is three under the firebricks (one at the back under the fire, one either side under cooking surface), two under the base of the oven (one either side to see how much heat gets through the base) and one under the calcium silicate to see if it stops the heat leaking into the base slab.  Any comments as usual gratefully received |
|
|
|
Post by downunderdave on Jan 11, 2019 23:04:20 GMT
Most WFO operators prefer to maintain the fire on the side rather than at the back. This has three advantages. Firstly it is closer to the oven mouth, so adding and moving wood is easier and secondly, as the oven is always hotter at the rear anyway, the side fire will even the oven temperature difference out more. Lastly the side fire enables you to switch sides should the floor temp drop off too much.
|
|
|
|
Post by oblertone on Jan 12, 2019 8:15:05 GMT
In my experience it takes about 5-6mins to 'prep' a pizza base for cooking and about 2mins to actually cook it, therefore I see two pizza cooking as aspirational but not practical. I do however let my guests prepare their own pizza and it can get a little chaotic at times. I keep the fire in a horseshoe shape which allows for all-round cooking but it still needs turning to avoid burning.
|
|
|
|
Post by devontiger on Jan 12, 2019 11:27:10 GMT
I tend to cook with fire at the rear, although I take on board the comments by d-u-d. I have a metal bar that I put in front of the fire. This stops the fire burning the pizza edges. I also push the fire back with this bar for cooking, & bring it forward with the fire scraper to reheat the floor. webbmOO, you will find whats best for you, as & when you start your cooking. Its all a bit of trial & error. But thats what makes it fun. Last pizza's I cooked in just 90 seconds. If you turn your back on it, it will burn the edge. So keep your eyes on it. Best of cooking to you when you get to it.  |
|
|
|
Post by webbm00 on Jan 12, 2019 15:42:44 GMT
Thanks. I'll move the thermocouples a bit so they cover both side and rear fires a bit better although I don't think the base ones need to move from where they are now to cover this
|
|
|
|
Post by webbm00 on Jan 14, 2019 11:17:57 GMT
|
|
|
|
Post by truckcab79 on Jan 14, 2019 11:49:50 GMT
Coming on nice and quick. Nice to be able to work under cover too. Keep it up.
|
|
|
|
Post by webbm00 on Jan 14, 2019 22:15:50 GMT
I thought it was going too well. Put together the two halves of the base for the first time today as I though I would be able to build it on the calcium silicate boards directly and although the base is level left to right:   and the rear half is level front to back:  the front half isn't level front to back:  and there is a ridge across the join:  I know truckcab79 had worse issues with his kit but they have now got steel moulds for the oven so I thought there wouldn't be any issues. On further investigation the top surface of the front half is flat both front to back and left to right. The issue is the bottom surface which isn't as thick at the back as it is at the front. Not the easiest thing to describe in words but it makes the base trapezoid. Not to difficult to fix with a bit of muck under the front half and to be fair to pizza oven supplies it does say to lay the base on a mortar bed |
|
|
|
Post by webbm00 on Jan 16, 2019 22:53:13 GMT
|
|
|
|
Post by truckcab79 on Jan 17, 2019 7:39:50 GMT
Looking good.
Mine was also built in their steel moulds apparently so I was surprised it wasn’t straighter. As you say though you’re meant to build it on mortar and then mortar the refractory bricks down, so plenty of scope to level off the minor imperfections. Same with the alignment of the dome pieces. I was disappointed with mine initially as I kind of expected to plonk it together and get perfect lines. However if you spend enough time fiddling it back and forward it will eventually get to a point that is prettty much spot-on, or at least I did with mine.
|
|
|
|
Post by truckcab79 on Jan 17, 2019 13:04:55 GMT
Also, if you wanted to fill and smooth the minor imperfection and gaps (not that you'd see them without putting your head in the oven), then I used cheap as chips screwfix fire cement just in the centre where I had a small lump knocked out. You can just squash it in then smooth off with a wet sponge. I figured it may well just drop out, so nothing lost. As it happens, thus far it's stayed solid.
|
|
|
|
Post by webbm00 on Jan 17, 2019 21:36:17 GMT
I saw the fire cement you used on your build and will do the same. I think it's just going to take a lot of trial and error to get the gaps as small as possible with the inside as smooth as possible and then a bit of fire cement to cover the joins. I also notice you used slate to lift bits of the dome which is a great idea as I was using plastic shims and then thought I can't leave them in
I think I have the same issue as you had with the rear dome. I can't bring it forward enough without it hitting the raised section on the base. I may grind a bit of the raised part down before I reassemble it just so I have a bit more freedom to move it forward if I need to.
Did you cover the joints with chicken wire and mortar them in place? The instructions ask for it to "help with thermal movement". I guess it helps even out the thermal expansion rather than it moving one side of the joins?
|
|
|
|
Post by truckcab79 on Jan 18, 2019 9:40:48 GMT
Didn’t cover the joints with chicken wire and don’t think that was in the instructions. Mine came supplied with a tube of sealer / mastic that is used to join the three sections. Don’t recall any requirement to do anything else. The outside gaps I just smoothed over with fire cement for the hell of it and in case there were any small gaps in the sealant due to the casting not meeting perfectly. Didn’t think it would do any harm and just looked more ‘finished’. No reason you couldn’t use chicken wire and mortar I suppose. Probably no gain either though as it’s not going to go anywhere once you’ve covered it all over.
|
|
|
|
Post by downunderdave on Jan 18, 2019 19:35:41 GMT
When filling the seams on the inside I always recommend leaving any in the top half of the chamber in case any bits fall out onto your food. Go at them all from the outside though.
|
|
|
|
Post by truckcab79 on Jan 18, 2019 19:49:02 GMT
I saw the fire cement you used on your build and will do the same. I think it's just going to take a lot of trial and error to get the gaps as small as possible with the inside as smooth as possible and then a bit of fire cement to cover the joins. I also notice you used slate to lift bits of the dome which is a great idea as I was using plastic shims and then thought I can't leave them in I think I have the same issue as you had with the rear dome. I can't bring it forward enough without it hitting the raised section on the base. I may grind a bit of the raised part down before I reassemble it just so I have a bit more freedom to move it forward if I need to. Did you cover the joints with chicken wire and mortar them in place? The instructions ask for it to "help with thermal movement". I guess it helps even out the thermal expansion rather than it moving one side of the joins? Oh, and at the risk of teaching you to sick eggs, once you've spent hours fiddling around to get the perfect position, don't forget to put plenty of witness marks on each piece of casting. Makes it a doddle to then recreate the precise same position when you disassemble to put the mastic in place to finally join them. |
|


