|
|
Post by webbm00 on Dec 20, 2018 19:45:06 GMT
After many years in the planning stage and four weeks in the doing the builders have finished knocking down the garage at the end of our garden and have built the BBQ and pizza oven shelter. So I thought I'd better start a thread before asking loads of questions so I can keep track of them all. Firstly thanks to james9 for his corner build oven base and truckcab79 and his Milano 750 build diary as this was very useful once I'd ordered the oven and then needed to work out dimensions for the builders and other aspects before it arrived. First some pictures of the BBQ and pizza oven shelter  The outdoor kitchen (BBQ, sink and pizza oven)  Pizza oven base  Air bricks under the base for the wood store. Not sure why the builders had put them so high but by the time I'd noticed it they couldn't be moved 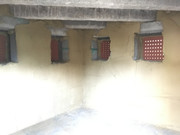 Concrete lintels across the block work to support the oven and give me the biggest wood storage volume  50mm slabs on the lintels for the base. Much easier than casting a slab in place  Now it's over to me to put the oven in. My basic plan is 25mm Calcium Silicate board on the slabs then the 95mm oven base on top of that with the 50mm firebricks inside. That should be 170mm between the cooking surface and the base slab Over the 95mm dome I'll add the insulation blanket and chicken wire and then 100mm of vermicrete (10-1-3.5 vermiculite, cement, water). I may leave it at that or render it the same as the walls. Hole is already cut in the roof and high temp roof flashing in place for the twin wall flue that will be converted to single wall just before entering the oven. Need to work out how to stop the render cracking around the flue but have bought a load of fire rope and high temp silicon to see if that helps I have some hard old hand made red bricks that will do the job for the front arch but need to work out how to insulate it from the rest of the oven and support the arch. Being an electronic engineer I've got thermocouples for under the oven, under the firebricks, in the top of the dome, outside the top of the dome, in the flue and outside the oven and a raspberry pi to record them all. This means I can see how it heats up and holds it's heat as we want to do some post pizza slow cooking. Any issues with the plan so far? |
|
|
|
Post by oblertone on Dec 21, 2018 15:56:44 GMT
Sounds like a plan ! My only comment would be about the twinwall to single joint; most twinwall systems have a register plate to lock the twinwall to an oven/fire etc. employing this would eliminate the need to anchor the structurally weaker single-wall.
|
|
|
|
Post by downunderdave on Dec 21, 2018 19:33:57 GMT
If it were mine i’d Be placing the drier and higher quality insulating cal sil board between the underfloor vermicrete and the floor bricks. Also do your numbers for the outside diameter really well as building into a corner is a real pain, being close to two walls. Finishing at the base is really difficult if you haven’t left enough room. An alternative is to integrate the vermicrete into the walls and fill the useless space in the corner as well. Here is an example of what i mean.  |
|
|
|
Post by webbm00 on Dec 22, 2018 20:31:59 GMT
Sounds like a plan ! My only comment would be about the twinwall to single joint; most twinwall systems have a register plate to lock the twinwall to an oven/fire etc. employing this would eliminate the need to anchor the structurally weaker single-wall. I've got 500mm of single wall coming out of the oven with a single to twin converter that locks into both the single wall and the 1000mm of twin wall. According to the wood burning stove shop it should be self supporting but I have bought a roof support to secure the twin wall just before it goes through the roof. If it doesn't feel secure I'll put a flue support attaching it to both walls |
|
|
|
Post by webbm00 on Dec 22, 2018 20:40:38 GMT
If it were mine i’d Be placing the drier and higher quality insulating cal sil board between the underfloor vermicrete and the floor bricks. Also do your numbers for the outside diameter really well as building into a corner is a real pain, being close to two walls. Finishing at the base is really difficult if you haven’t left enough room. An alternative is to integrate the vermicrete into the walls and fill the useless space in the corner as well. Here is an example of what i mean. If by "floor bricks" you mean the firebricks for the cooking surface I can't easily put it between them and the base of the oven as it is precast and it would reduce the opening height. It may be a benefit having the oven base heat up a bit below the fire bricks as long as it doesn't loose that heat through the calcium silicate board and into the slab below? |
|
|
|
Post by downunderdave on Dec 22, 2018 21:00:04 GMT
If it were mine i’d Be placing the drier and higher quality insulating cal sil board between the underfloor vermicrete and the floor bricks. Also do your numbers for the outside diameter really well as building into a corner is a real pain, being close to two walls. Finishing at the base is really difficult if you haven’t left enough room. An alternative is to integrate the vermicrete into the walls and fill the useless space in the corner as well. Here is an example of what i mean. If by "floor bricks" you mean the firebricks for the cooking surface I can't easily put it between them and the base of the oven as it is precast and it would reduce the opening height. It may be a benefit having the oven base heat up a bit below the fire bricks as long as it doesn't loose that heat through the calcium silicate board and into the slab below? i’m not Sure what is provided in the Milano kit, but it is normal to have at least 3” of insulative material (vermicrete, mill board or cal sil) between the cooking floor bricks or tiles and the supporting slab. So as long as it satisfies this recommendation, you should follow the manufacturers plans and instructions. |
|
|
|
Post by webbm00 on Dec 22, 2018 21:48:24 GMT
If by "floor bricks" you mean the firebricks for the cooking surface I can't easily put it between them and the base of the oven as it is precast and it would reduce the opening height. It may be a benefit having the oven base heat up a bit below the fire bricks as long as it doesn't loose that heat through the calcium silicate board and into the slab below? i’m not Sure what is provided in the Milano kit, but it is normal to have at least 3” of insulative material (vermicrete, mill board or cal sil) between the cooking floor bricks or tiles and the supporting slab. So as long as it satisfies this recommendation, you should follow the manufacturers plans and instructions. The kit is provided by Pizza Oven Supplies and the base of the oven under the cooking floor bricks is 95mm. I'm adding 25mm calcium silicate as a belt and braces as they don't suggest it in their plans |
|
|
|
Post by downunderdave on Dec 23, 2018 1:45:36 GMT
i’m not Sure what is provided in the Milano kit, but it is normal to have at least 3” of insulative material (vermicrete, mill board or cal sil) between the cooking floor bricks or tiles and the supporting slab. So as long as it satisfies this recommendation, you should follow the manufacturers plans and instructions. The kit is provided by Pizza Oven Supplies and the base of the oven under the cooking floor bricks is 95mm. I'm adding 25mm calcium silicate as a belt and braces as they don't suggest it in their plans The two 95 mm floor slabs are presumably insulating slabs (probably vermicrete) that should be adequate under floor insulation. Generally for a 750 mm (30”) diam oven a 150 mm (6”) diam flue is recommended. The Milano 750 kit supplies a 5” enamelled flue. You may have smoke issues, particularly at start up with lack of draw and no funneling in the flue gallery. Also a stainless flue rather than an enamelled one is a better, although more expensive solution. The design also lacks a rebate in the entry to fit a door for retained heat cooking(no flame). If you only plan to cook pizzas then this is not an issue. You might like to raise these points with your supplier. |
|
|
|
Post by webbm00 on Dec 23, 2018 11:48:16 GMT
The kit is provided by Pizza Oven Supplies and the base of the oven under the cooking floor bricks is 95mm. I'm adding 25mm calcium silicate as a belt and braces as they don't suggest it in their plans The two 95 mm floor slabs are presumably insulating slabs (probably vermicrete) that should be adequate under floor insulation. Generally for a 750 mm (30”) diam oven a 150 mm (6”) diam flue is recommended. The Milano 750 kit supplies a 5” enamelled flue. You may have smoke issues, particularly at start up with lack of draw and no funneling in the flue gallery. Also a stainless flue rather than an enamelled one is a better, although more expensive solution. The design also lacks a rebate in the entry to fit a door for retained heat cooking(no flame). If you only plan to cook pizzas then this is not an issue. You might like to raise these points with your supplier. The floor slab and dome are made of a mixture of recycled fire and kiln bricks mixed with ceramic pins and a vermicrete type mix. As for the flue I'll experiment with the 5" and if it is a bit smokey will change it for a 6". There is a bit of funnelling of the flue but no where near as good as if it was fully in the oven opening but that's the price of having a precast oven that you can lift and install yourself. I don't have the time to build one from scratch. I've got a damper to install in the flue and if that doesn't work I'll see if I can convert it to move the flue further into the oven opening. That's the beauty of putting this together, a lifetime of messing about and seeing what happens |
|
|
|
Post by downunderdave on Dec 23, 2018 20:08:23 GMT
The two 95 mm floor slabs are presumably insulating slabs (probably vermicrete) that should be adequate under floor insulation. Generally for a 750 mm (30”) diam oven a 150 mm (6”) diam flue is recommended. The Milano 750 kit supplies a 5” enamelled flue. You may have smoke issues, particularly at start up with lack of draw and no funneling in the flue gallery. Also a stainless flue rather than an enamelled one is a better, although more expensive solution. The design also lacks a rebate in the entry to fit a door for retained heat cooking(no flame). If you only plan to cook pizzas then this is not an issue. You might like to raise these points with your supplier. The floor slab and dome are made of a mixture of recycled fire and kiln bricks mixed with ceramic pins and a vermicrete type mix. As for the flue I'll experiment with the 5" and if it is a bit smokey will change it for a 6". There is a bit of funnelling of the flue but no where near as good as if it was fully in the oven opening but that's the price of having a precast oven that you can lift and install yourself. I don't have the time to build one from scratch. I've got a damper to install in the flue and if that doesn't work I'll see if I can convert it to move the flue further into the oven opening. That's the beauty of putting this together, a lifetime of messing about and seeing what happens The dome and cooking surface are normally made from a dense material for strength and thermal mass The addition of vermiculite to the mix reduces strength and density making the mix more insulative. If those under floor slabs are light weight they are insulators if heavy they are conductors. Do not move the position of the base of the flue towards the centre of the dome. This will change the oven to an updraft system and alter the circulation. It will draw better but you will lose more heat out the flue. The best system is to have the flue independent of the oven proper, at the front. The door then fits past the flue entryand no damper is required. To explain this better and what I meant about funneling, here’s a link to another post showing a cut away pic. community.fornobravo.com/forum/pizza-oven-design-and-installation/other-oven-types/398266-mobile-deconstruction?p=398422#post398422 |
|
|
|
Post by truckcab79 on Dec 27, 2018 17:10:03 GMT
Hi there
Haven’t checked in for a while. Glad you enjoyed my build.
Good to see another Milano 750 being built. Will follow with interest. Couldn’t be happier with mine.
You’re not a million miles from me either. I spent many weekends as a kid fishing the river and canal at Croxley Green.
|
|
|
|
Post by webbm00 on Dec 29, 2018 22:11:05 GMT
Hi there Haven’t checked in for a while. Glad you enjoyed my build. Good to see another Milano 750 being built. Will follow with interest. Couldn’t be happier with mine. You’re not a million miles from me either. I spent many weekends as a kid fishing the river and canal at Croxley Green.
truckcab79 you didn't insulate under the base of the oven in your build and I notice you fitted the flue damper. How well does it hold heat with the damper shut and the door closed? Love the door BTW. We back onto the canal near the station if you remember where that is |
|
|
|
Post by truckcab79 on Dec 29, 2018 22:20:53 GMT
Have only used it as a pizza oven so far and the oven door was built late in the season so I haven’t used it fitted with the door, as an oven as such yet. I would say that even without a door, and with the flue open there was still some heat in the oven the next day. Whatever you add in insulation will only help but I have to say I’m really pleased with the performance of mine as it is. Sure you will be too.
My recollection of fishing at Croxley Green was that we used to exit the station, then walk down a lane opposite, cross over a lock on the canal, then fish the river, mostly under or around the bridge. Never did catch anything on the canal but had loads of big tench out of the river. Happy Days.
Glad you like the door. Really pleased with it and made for the cost of the 5mm steel plate. (Helps that I have welding gear obviously!). Fortunately as I made an error in the base height, I didn’t buy the one from Pizza Oven Supplies as it wouldn’t have fitted!
Looking forward to seeing more of your build.
|
|
|
|
Post by webbm00 on Dec 30, 2018 15:13:21 GMT
You'd have walked past our house to get down the lane to the canal and river. My kids used to go there to play in the river and catch little fish with their nets. We put our cray fish net in further down the river and I can't wait to cook a few of those in the oven.
I'm busy painting the shelter white at the moment. It's like painting the 4th road bridge as when you've been round all the walls the first one is dry and you can start again. Hope to get started on the oven base in a few days
|
|
|
|
Post by truckcab79 on Dec 31, 2018 15:40:07 GMT
Small world!
Look forward to following your build.
I found Nick at Pizza Oven Supplies really helpful incidentally. Don't hesitate to call him if you have any questions that the forum can't answer, or even just to talk through the next step before you build.
|
|


