|
|
Post by marudge on May 6, 2013 20:03:30 GMT
 Not had a great time with the oven floor today. Could do with some advice. I thought laying the oven floor after I had cut and dry laid all the blocks would be easy - it wasn't! In fact there is so little in the forums I thought it would be ' a walk in the park!' This is what I did: - First time I mixed one part clay to one part fine sand, added water until it was 'sludgey' and then trowelled it onto the (calcium silicate) insulating board. I took a notched trowel, that I use for floor tile grout and evened out the bed. It dried so fast (literally seconds) that by the time I had put the bricks on it, it was well and truly dry and I could not make any adjustments to height. Not happy, I scrapped it all off again.
- Second time I thought I would try and lay the bricks on a dry levelling mix. I used the same ingredients, levelled it all out put the blocks on and..... it simply did not hold the bricks in place.
- Finally I decided to scrap all that off and make another mix again 'sludgey' but a bit more sludgey! I only trowelled on enough for a single row, ran the notched trowel over it and then ran for the oven floor bricks and put them in place as fast as I could.
It sort of worked but my oven floor is certainly not dead flat. It is level but some bricks are slightly proud. Is this normal? How flat is your oven floor? I guess the cooking floor is a really important part of the oven so I am keen to get it right. Sorry to share my frustrations! Appreciate any advice on this one. Thanks Mark
|
|
|
|
Post by bookemdanno on May 7, 2013 12:41:28 GMT
Hi Mark, you'll need to damp everything off before laying the bricks. You'll get the same problems with Thermolites, reclaimed brick, firebrick and most things in this warm dry weather. The thirsty materials pull the water from the mix, drying it prematurely and weakening the mortar.
If your past doing it for the third time, damping everything off, nice "sludgey" mix, notched trowel and re-laying Tiling style, you can get dressing wheels that you fit to an angle grinder which could level out your floor. However, a picture may help in giving a better opinion, from others who may have a similar problem.
|
|
|
|
Post by cannyfradock on May 7, 2013 18:29:47 GMT
Mark..
"Sorry to share my frustrations!".....we share your frustrations especially after the work you have done in the precise cutting of your fire-brick hearth.
I agree with Bookemdanno's comment 100%. I have also used a "grinding" disc on a 4" angle grinder to take off some uneven edges as although the fire-bricks seem to be perfect, there are minute flaws in them. Here's some other thoughts....
If I build a Pompeii oven I would have already ordered powdered fire-clay when I ordered the bricks. I use the tried and tested FB mortar (homebrew ) of sand, powdered fire-clay, hydrated lime and cement at a ratio of 4:1:1:1 when laying the hearth bricks AND the dome bricks.....if the sand is fine, I go to 5 or 6:1:1:1.
You used a 1:1 ratio of sand and clay. This to me sounds like the mix is to "neat"...or pure. Even if I have no powdered fire clay I would use hydrated lime with cement....again with sand to about 5:1:1.
If you have got your mortar mix from somewhere where it states 1:1 clay and sand.....OK, but check your bricks have taken to this mix. If you tap the bricks with a panel pin hammer...or something like that, they should not sound hollow.
I don't want to confuse the issue ...and Danno's post was spot on. I'm just concerned about the mortar mix you used.
Terry
|
|
|
|
Post by marudge on May 7, 2013 19:13:26 GMT
I have tried to take a picture but it is pretty difficult. As you can see the variation isn't huge...but they are annoying.  I got the 1:1 mix from the FB instructions - I think the idea is that you can remove oven floor bricks if they get damaged. The addition of cement would stop that. I guess most of the bricks are more-or-less level and therefore I may be better trying to extract the ones that sit low or high and just resetting those - but then I guess it is a nightmare task to extract individual bricks and then to re-insert them. What are your feelings then - should I try again with wet bricks and a more dilute mix? Quite handy having a clay and sand mix because you can just start again! :-) Thanks again for your posts - really helping me think through this. Mark |
|
|
|
Post by cannyfradock on May 7, 2013 20:13:48 GMT
"should I try again with wet bricks and a more dilute mix?"
...Mmmm ....been pondering over this for quite a while now.
Damp bricks would help, but that was not your problem. Your problem was the mix was drying too quick before you had a chance to level the bricks. Your hearth.....from the picture looks pretty good. You may have to "touch up" a few corners with a grinding disc (although you can't see this from the picture).
The main concern for me is that your fire-bricks have "taken" to the mix proposed by FB. To re-lay them will be a pain in the arse, but going back to Danno's comments....a dampened board may have given you a bit more play in being able to tap the bricks into place.
Check the bricks the next day ...and if they have "taken".....I'm sure you can tell, then it doesn't look such a bad result.....not from the picture.
Have you bounced this off the FB forum guys? Many of our members post on both forums. In your case it may be a real good idea. Sometimes people from the UK only get a limited response there, but after following a FB recipe for mortar...it's worth a punt.
Terry
|
|
|
|
Post by bookemdanno on May 7, 2013 20:27:54 GMT
Mark, even at this early stage of our relationship, i already think that you're the sort of chap who'd prefer to take them all up and do it again!  If time is on your side, then do it, as it'll play on your mind. It'll probably only take as long as finding a dressing wheel, driving to the shop, getting back and actually dressing the bricks! I've not used fireclay but even on its own with sand i reckon it'd grab the bricks almost as well as OPC, but over a longer time period or after heat exposure, so it wouldn't be to hard to clean everything up at this moment in time with everything still "green". As for extracting individual bricks...it'd take more effort as they'd probably need to be broken up, or drilled to get them out. I'm only going by my experience of mending walls and brick patios. |
|
|
|
Post by h12rpo on May 16, 2013 11:11:57 GMT
I considered long and hard about dry versus wet lay.......All this 'lay them dry cos then you'll be able to replace one if it cracks' is frankly I think a load of old blx. If you fit the bricks without any gaps between them ie without any mortar between them, I cant see any way of one breaking......even if one did, I reckon getting one out and a new one in would be nigh on impossible. Also, I've never heard of a floor brick cracking - but if one did, so what? Theyre in so tight and level all you would see was a fine line. Even when layed wet, because of the uneven dimensions of my firebricks, there were small fine gaps, but by the time I brushed some of the powder from cutting across the floor it was as flat as Norway.  If you choose dry with your floor inside the first ring, then the brushing of fine powder firebrick in the gaps and a bit of vibration from a hand sander with no abrasive will ensure the bricks are gripped tightly ( like they do when they lay pavers). |
|
|
|
Post by bookemdanno on May 16, 2013 11:53:27 GMT
Exactly R2D2!!
There's lots of ifs and buts on FB.
If a brick cracked, it's bound by all the others, and ash would soon cover things up.
The only "problem" i'd think was if a brick completely spalled, and lost its face or blew apart. Then its done most of the work for you, as you'd need to smash/break it out. That's if you really even noticed it!
Its easier to lay them wet!
|
|
|
|
Post by marudge on May 19, 2013 20:24:17 GMT
Been making slow progress over the last few weeks - all taking abit longer than I planned! Usual over-optimistic self. :-) Here's a few pics on the soldier course and inner arch, all now mortared into place. 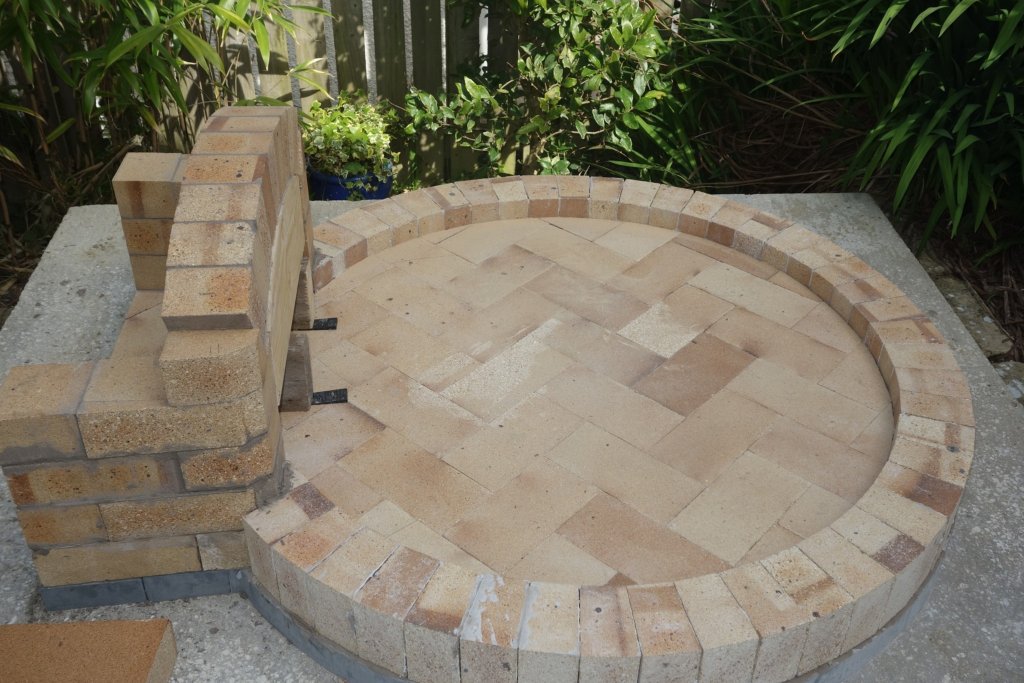   I did re-do the floor...yes for a 4th time and it came out better but still not quite as good as I would have liked. I am surprised how much variation there actually is in the blocks although they look perfect when first delivered. You may be able to see on the first shot I have had a go with a finishing disc which has now all but ironed out any rising edges. First chain next. |
|
|
|
Post by h12rpo on May 19, 2013 22:56:43 GMT
To be fair, that is one sweeeeeeeeet arch !
|
|
|
|
Post by cannyfradock on May 20, 2013 13:07:02 GMT
Mark
I think you are a perfectionist at heart.....love the neat cutting of your bricks.
terry
|
|
|
|
Post by johnaero on May 21, 2013 11:12:46 GMT
tht is some nice bit of artwork
|
|
|
|
Post by h12rpo on May 21, 2013 21:04:49 GMT
You havent cut the backs of the arch bricks though so I'm interested in how youre going to manage the transition
|
|
|
|
Post by marudge on May 22, 2013 7:35:24 GMT
h12rpo - yes I'm interested too in how that will work! :-) My plan was to cut the back of the arch bricks once I have gone up the right number of chains and I can measure where to cut them. Not sure how that will go and of course you have to live with any mistakes made at that stage.
|
|
|
|
Post by bookemdanno on May 25, 2013 6:40:06 GMT
Very nice start Mark!
If there is one area you can afford a little imperfection, that section above the arch is the place! Unless you climb into your finished oven, you won't see it!
Good luck!
|
|

 Not had a great time with the oven floor today. Could do with some advice.


