|
|
Post by jsmythk on Jul 30, 2013 17:39:02 GMT
I am seriously impressed with your workmanship, i am about to get started on my build and have a simple question.....
How did you "stick" the Calc Sil board to the concrete slab?
Best of luck with the build, its going to be amazing
|
|
|
|
Post by marudge on Aug 2, 2013 18:46:23 GMT
Hi
Sorry for delay - only just seen this post! No, I didn't stick it down. There really is no need with the weight you are placing on top of it, it really isn't going to move!
You will also see posts where people have protected it from damp with silver foil. Again I didn't. It is supposed to reduce the thermal insulation properties if it get's damp but there are a few posts around saying that's a myth.
I have yet to test that! :-)
Regards
Mark
|
|
|
|
Post by marudge on Aug 2, 2013 19:02:21 GMT
Just noticed I hadn't posted any of the finished dome - so here they are! Quite pleased really, I just love the dome shape. At the end it got a little frustrating and I learnt to throw out the rule book and go by eye - the calculations and angles just didn't seem to work! On the chimney now...and silly me has decided to build a round chimney - well a 15 sided one anyway. Nobody else seems to have done that...and I am discovering why! :-) Will post more pics once it is in place. 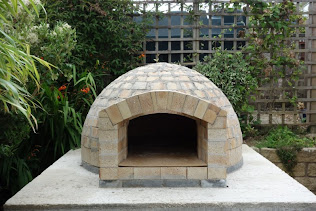 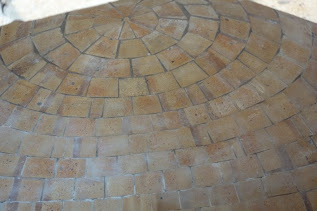   I love the dome shape so much I am thinking of not going for an enclosure but to render it. I have no experience of rendering so yet again it will be a learning experience for me! |
|
|
|
Post by bookemdanno on Aug 2, 2013 19:46:24 GMT
Once again i find myself saying "wow"!!!
Great work Mark!
Funny you say about a "round" chimney...it been one of the ideas floating around my head for my rebuild. You'll probably beat me to it. It seems a great way to further the old brick laying skills doesn't it!
I have no doubts that you'll achieve grand results in rendering your dome.
I found creating a spinning "form" or guide around a top dead centre pivot point really helpful for the vermicrete layer, which then made the render very easy to apply as i maintained the full curves. I also made some curved trowels for the vermicrete and final render layers too. Base the curve upon the estimated radius of the layer you are going to apply.
|
|
|
|
Post by jsmythk on Aug 8, 2013 15:02:21 GMT
Hi Sorry for delay - only just seen this post! No, I didn't stick it down. There really is no need with the weight you are placing on top of it, it really isn't going to move! You will also see posts where people have protected it from damp with silver foil. Again I didn't. It is supposed to reduce the thermal insulation properties if it get's damp but there are a few posts around saying that's a myth. I have yet to test that! :-) Regards Mark Thanks for the reply Mark, I have been getting the groundworks and first layer of walls built up ready for the slab to go on!, I have to say your oven looks amazing. Great work. I will start a new post with some pics once I am a bit further down the line. Cheers |
|
|
|
Post by rivergirl on Aug 10, 2013 18:10:00 GMT
I have said it before but I will say it again!! What a shame that you have to cover up that amazing brickwork!!
|
|
|
|
Post by marudge on Aug 12, 2013 20:22:53 GMT
Managed to get time to put the chimney together yesterday. I did manage to 'go round'! I think it works. I did pop a stainless steel length on top with a cap and it looks much better. I found visualising the transition from an oblong into a circle really difficult so I built the first 2 rings separately and then when they were dry transferred them onto the arches. I had to do a bit of grinding and shaping but as you'll see from the last photo I think it came out alright. Real test is if smoke gets drawn up I guess. :-) Rendering next - everyone wants to start cooking.  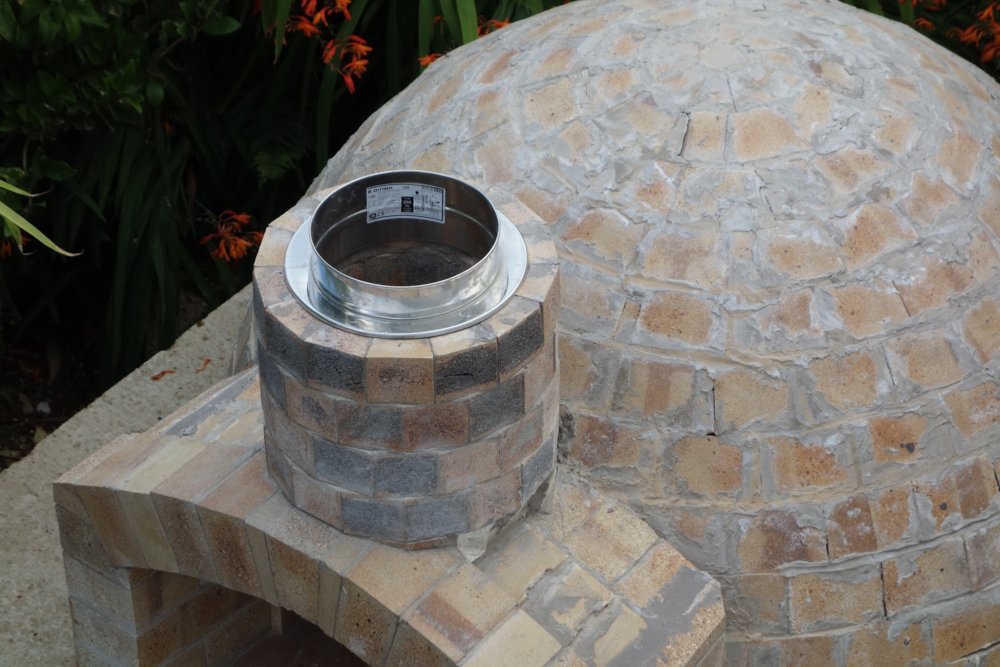 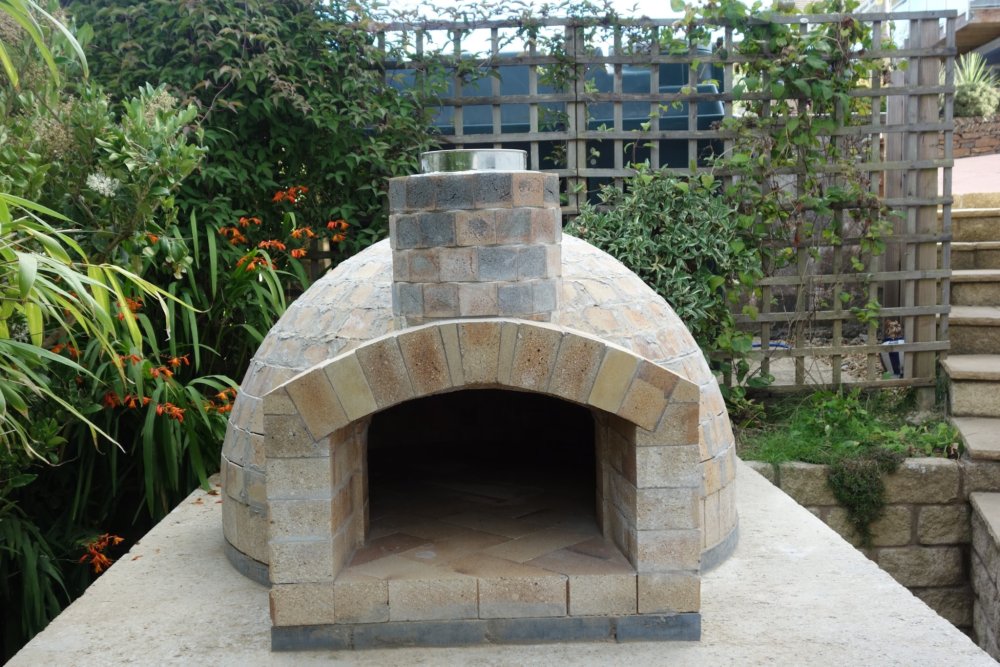 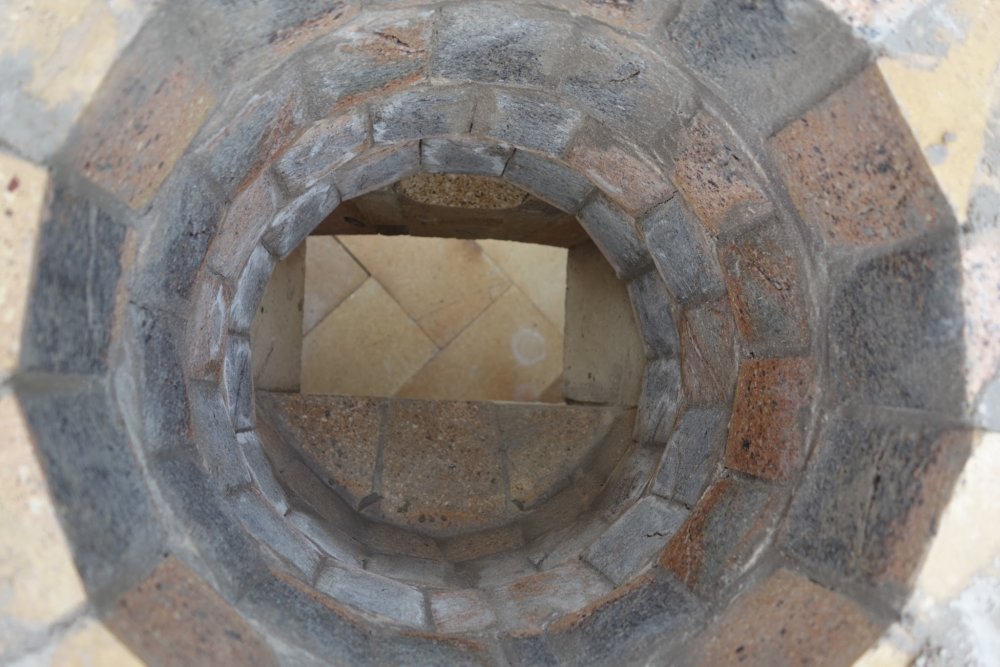 My plan is to do a light render of homebrew - half inch. Then put on my thermal blanket, then chicken wire - at this stage I think I supposed to fire it. I'd then like to do a 2 inch vermiculite layer and then a final coat of concrete render. Trying to make sure I hold all that heat in! :-) |
|
|
|
Post by rivergirl on Aug 12, 2013 20:30:23 GMT
Stunning, simply stunning
|
|
|
|
Post by bookemdanno on Aug 12, 2013 21:21:10 GMT
Lovely! Just as i had envisaged it! Great work Mark!
|
|
|
|
Post by suitord on Aug 13, 2013 12:49:12 GMT
Very Impressive! How are you attaching the collar for the flue? (going to be doing a less pretty version soon)
|
|
|
|
Post by eddiej on Aug 13, 2013 17:00:42 GMT
You don't fancy picking it up and delivering it to my house do you?  Another WOW added to the thread. |
|
|
|
Post by rockrocky on Aug 13, 2013 17:27:25 GMT
Fantastic build and i love the chimney.
|
|
|
|
Post by marudge on Aug 13, 2013 22:04:56 GMT
Very Impressive! How are you attaching the collar for the flue? (going to be doing a less pretty version soon) Hi Suitord The collar (which is actually a boiler adapter) is quite a tight fit into the chimney however I intend to seal it with Flueseal fortafix ceramic adhesive sealant. The stainless flue then fits onto the adapter with a locking band which should hold it all firmly in place. Hope that helps Regards Mark |
|
|
|
Post by marudge on Aug 13, 2013 22:08:10 GMT
Thanks for your kind comments - its really encouraging.
Just heading for the final challenge of render now. I shall start making curved trowels this week I expect. :-)
|
|
|
|
Post by suitord on Aug 15, 2013 13:44:06 GMT
Thanks - all info greatly received!
Again - amazing workmanship.
David
|
|


